Loading...
Loading...
Loading...
Loading...
Loading...
Loading...
Loading...
Loading...
Loading...
Loading...
Loading...
Loading...
Loading...
Loading...
Loading...
Loading...
Loading...
Loading...
Loading...
Loading...
Loading...
Loading...
Loading...
Loading...
Loading...
Loading...
Convinced by Onyxia? Let's see how you can get your own instance today!
onyxia:
-  serviceAccount:
-    create: true
-    clusterAdmin: true
   api:
+    serviceAccount:
+      create: true
+      clusterAdmin: true
   web:
+    serviceAccount:
+ create: true Let's use hashicorp Vault for storing the user secrets.
helm repo add hashicorp https://helm.releases.hashicorp.com

DOMAIN=my-domain.net

cat << EOF > ./vault-values.yaml
server:
  dev:
    enabled: true
    # Set VAULT_DEV_ROOT_TOKEN_ID value
    devRootToken: "root"
  ingress:
    enabled: true
    annotations:
      kubernetes.io/ingress.class: nginx
    hosts:
      - host: "vault.lab.$DOMAIN"
    tls:
      - hosts:
          - vault.lab.$DOMAIN
EOF

helm install vault hashicorp/vault -f vault-values.yaml ...
api:
...
regions:
[
{
...
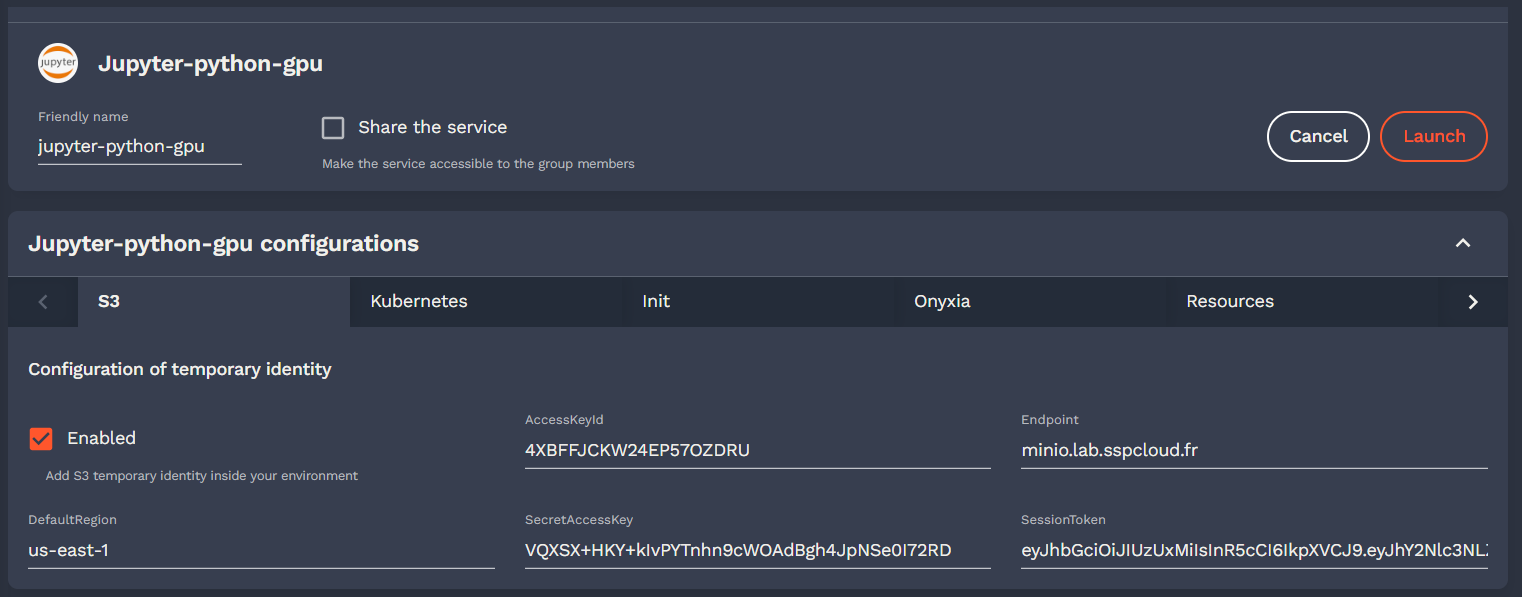
"data": {
"S3": {
- "type": "minio",
"URL": "https://minio.lab.my-domain.net",
"region": "us-east-1",
- "bucketClaim": "preferred_username",
- "defaultDurationSeconds": 86400,
- "oidcConfiguration": {
- "clientID": "onyxia-minio"
- },
+ "sts": {
+ "durationSeconds": 86400,
+ "oidcConfiguration": {
+ "clientID": "onyxia-minio"
+ }
+ },
- "bucketPrefix": "user-",
- "groupBucketPrefix": "projet-",
+ "workingDirectory": {
+ "bucketMode": "multi",
+ "bucketNamePrefix": "user-",
+ "bucketNamePrefixGroup": "projet-"
+ }
},
...
Onyxia Project Core Team Future Developments Roadmap
The TypeScript App that runs in the browser.
helm upgrade onyxia inseefrlab/onyxia -f onyxia-values.yamlonyxia:
web:
env:
- KEYCLOAK_URL: https://auth.lab.sspcloud.fr/auth
- KEYCLOAK_REALM: sspcloud
api:
env:
- keycloak.resource: onyxia
- keycloak.realm: sspcloud
- keycloak.auth-server-url: https://auth.lab.sspcloud.fr/auth
- keycloak.ssl-required: external
- keycloak.public-client: "true"
- keycloak.enable-basic-auth: "true"
- keycloak.bearer-only: "true"
+ oidc.issuer-uri: "https://auth.lab.sspcloud.fr/auth/realms/sspcloud"
+ oidc.clientID: "onyxia"
+ oidc.audience: "onyxia"
authentication.mode: "openidconnect"
regions:
[
{
"id": "paris",
"services": {
- "authenticationMode": "admin",
+ "authenticationMode": "serviceAccount",
"k8sPublicEndpoint": {
"URL": "https://apiserver.kub.sspcloud.fr",
- "keycloakParams": {
- "URL": "https://auth.lab.sspcloud.fr/auth",
- "realm": "sspcloud",
- "clientId": "onyxia"
- },
+ "oidcConfiguration": {
+ "issuerURI": "https://auth.lab.sspcloud.fr/auth/realms/sspcloud",
+ "clientID": "onyxia-k8s-apiserver",
+ }
}
},
"data": {
"S3": {
- "keycloakParams": {
- "URL": "https://auth.lab.sspcloud.fr/auth",
- "realm": "sspcloud",
- "clientId": "onyxia-minio",
- }
+ "oidcConfiguration": {
+ "issuerURI": "https://auth.lab.sspcloud.fr/auth/realms/sspcloud",
+ "clientID": "onyxia-minio",
+ }
}
},
"vault": {
"URL": "https://vault.lab.sspcloud.fr",
- "keycloakParams": {
- "URL": "https://auth.lab.sspcloud.fr/auth",
- "realm": "sspcloud",
- "clientId": "onyxia-vault",
- }
+ "oidcConfiguration": {
+ "issuerURI": "https://auth.lab.sspcloud.fr/auth/realms/sspcloud",
+ "clientID": "onyxia-vault"
+ }
}
}
]git clone https://github.com/InseeFrLab/onyxia
cd onyxia/web
yarn install
# To start the app locally
yarn dev
# If you want to test against your own Onyxia instance edit the .env.local.yaml
# file (created automatically the first time you run `yarn dev`)The backend REST API in Java
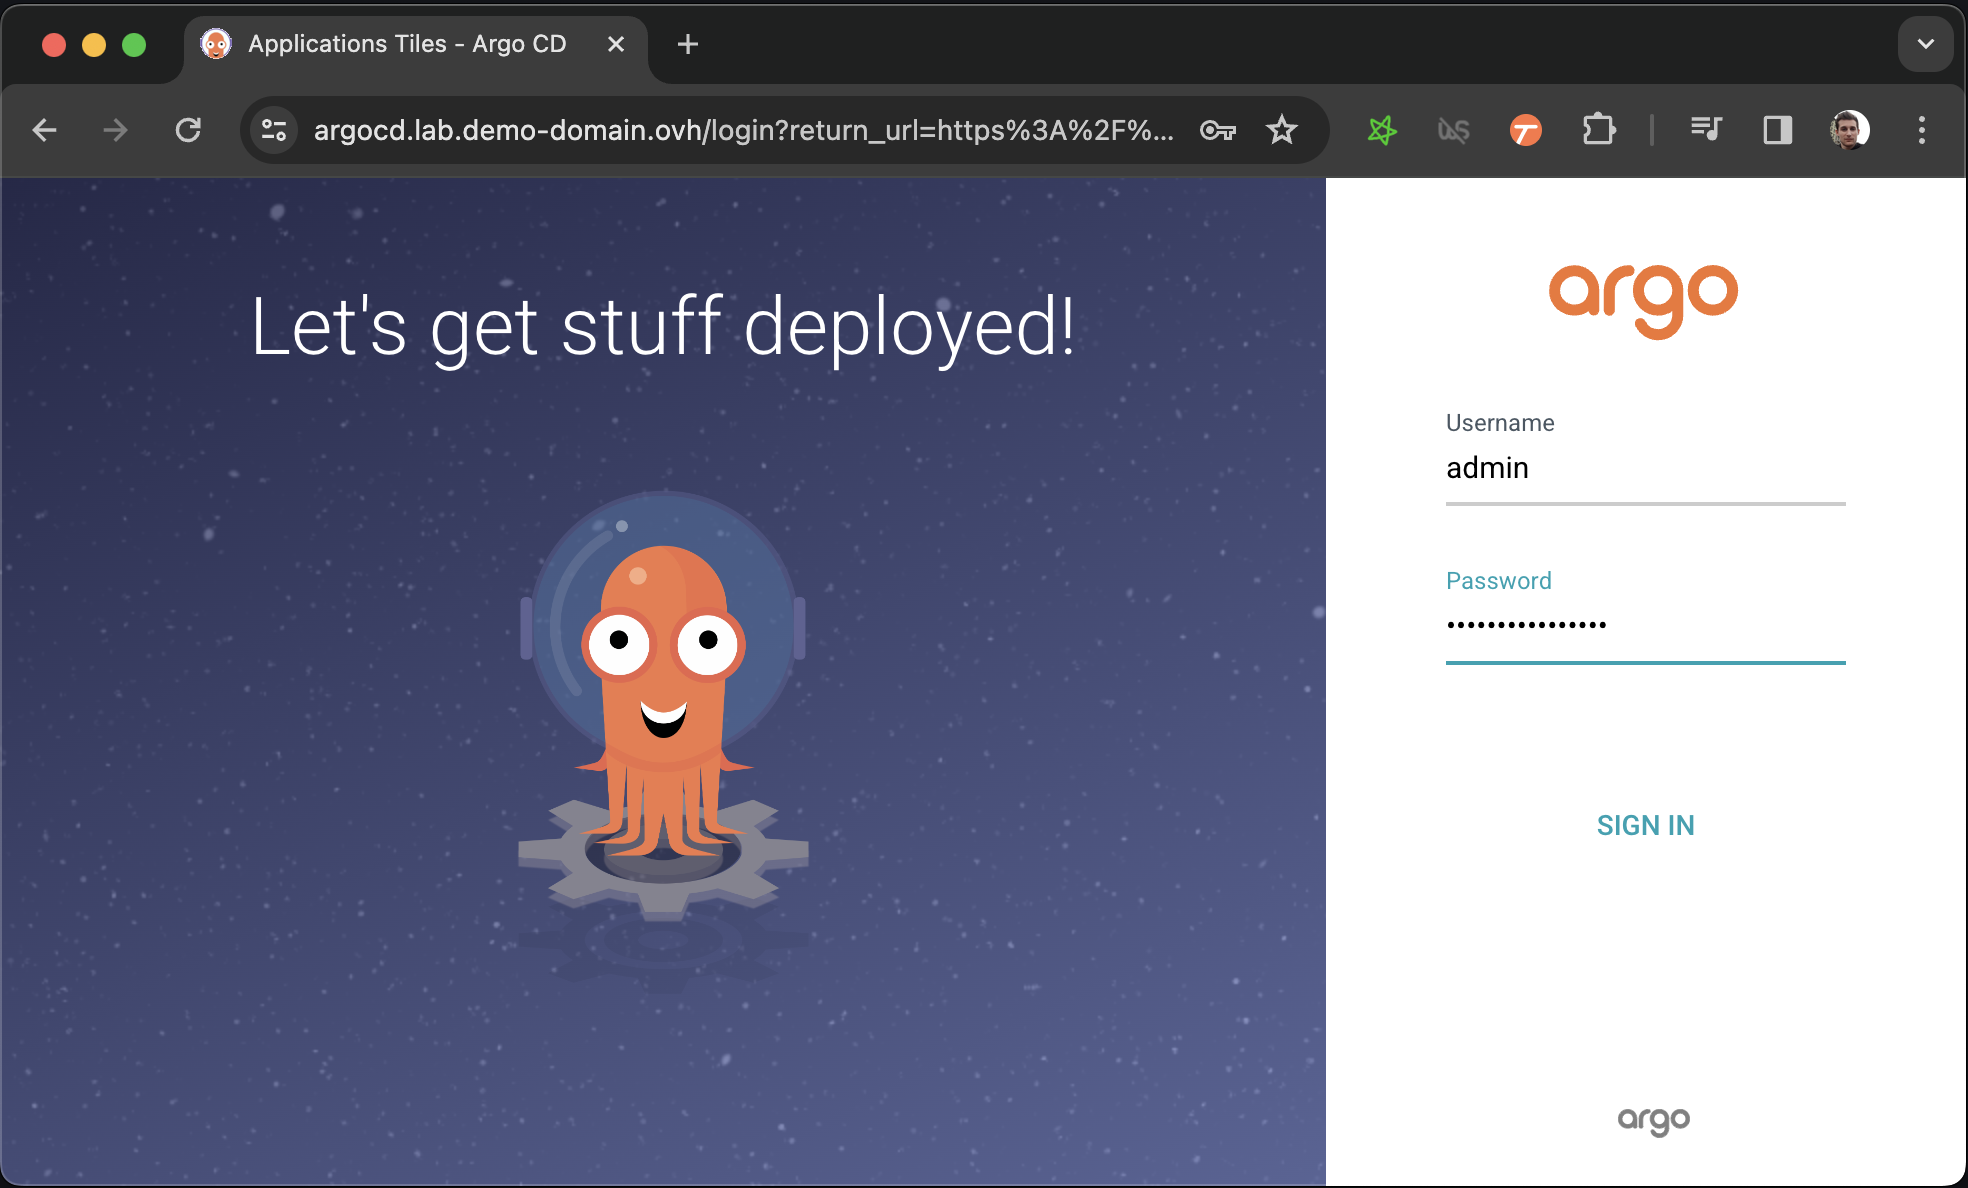
Let's install ArgoCD to manage and monitor our Onyxia Datalab deployment!
git clone https://github.com/<your-github-org>/onyxia-ops
cd onyxia-ops
cd apps/minio
# In the values.yaml file replace `$KEYCLOAK_MINIO_CLIENT_SECRET` by the value
# you have copied in the previous step.
git commit -am "Set minio OIDC client secret"
git pushgit clone https://github.com/<your-github-org>/onyxia-ops
cd onyxia-ops
cd apps/onyxia
mv values-minio-enabled.yaml.yaml values.yaml
git commit -am "Enable MinIO"
git push"nodeSelector": {
"type": "object",
"description": "NodeSelector",
"default": {},
"x-onyxia": {
"hidden": false,
"overwriteDefaultWith": "region.nodeSelector",
"overwriteSchemaWith": "nodeSelector.json"
}
}
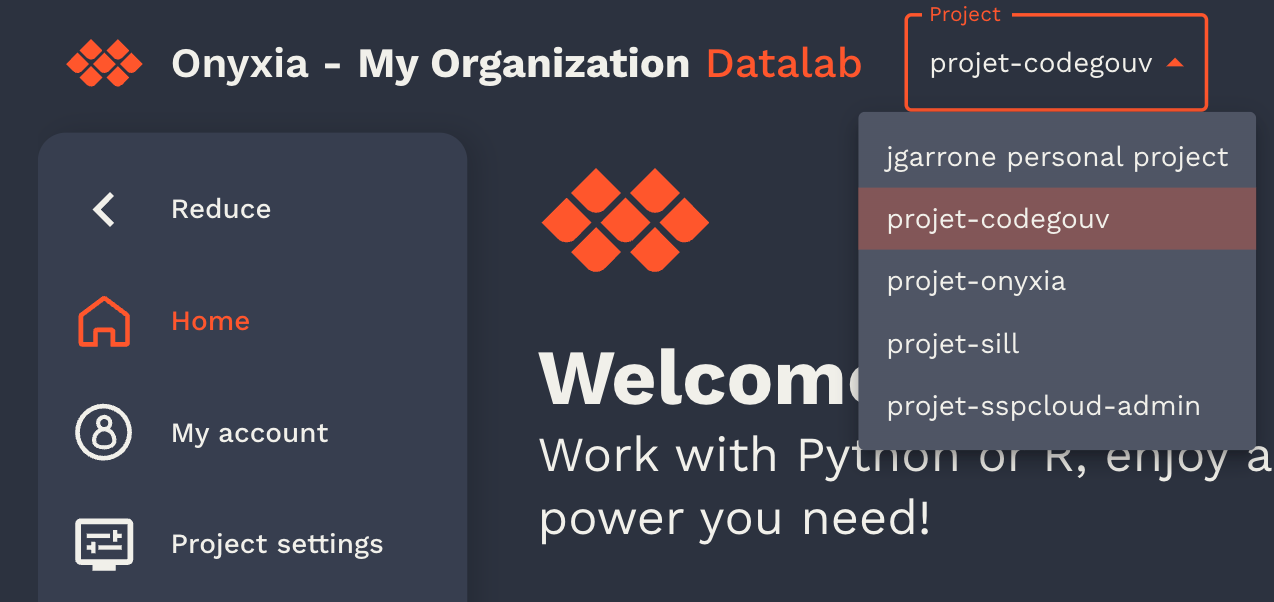
Enabling a group of users to share the same Kubernetes namespace to work on something together.
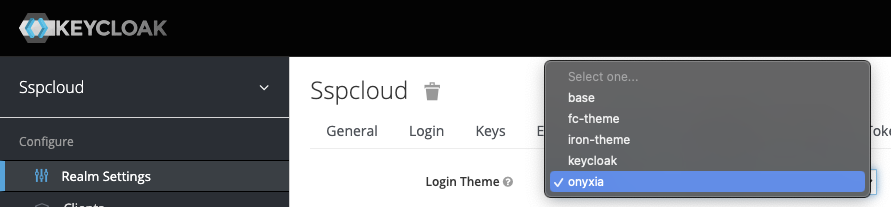
Customize your Onyxia instance with your assets and your colors, make it your own!
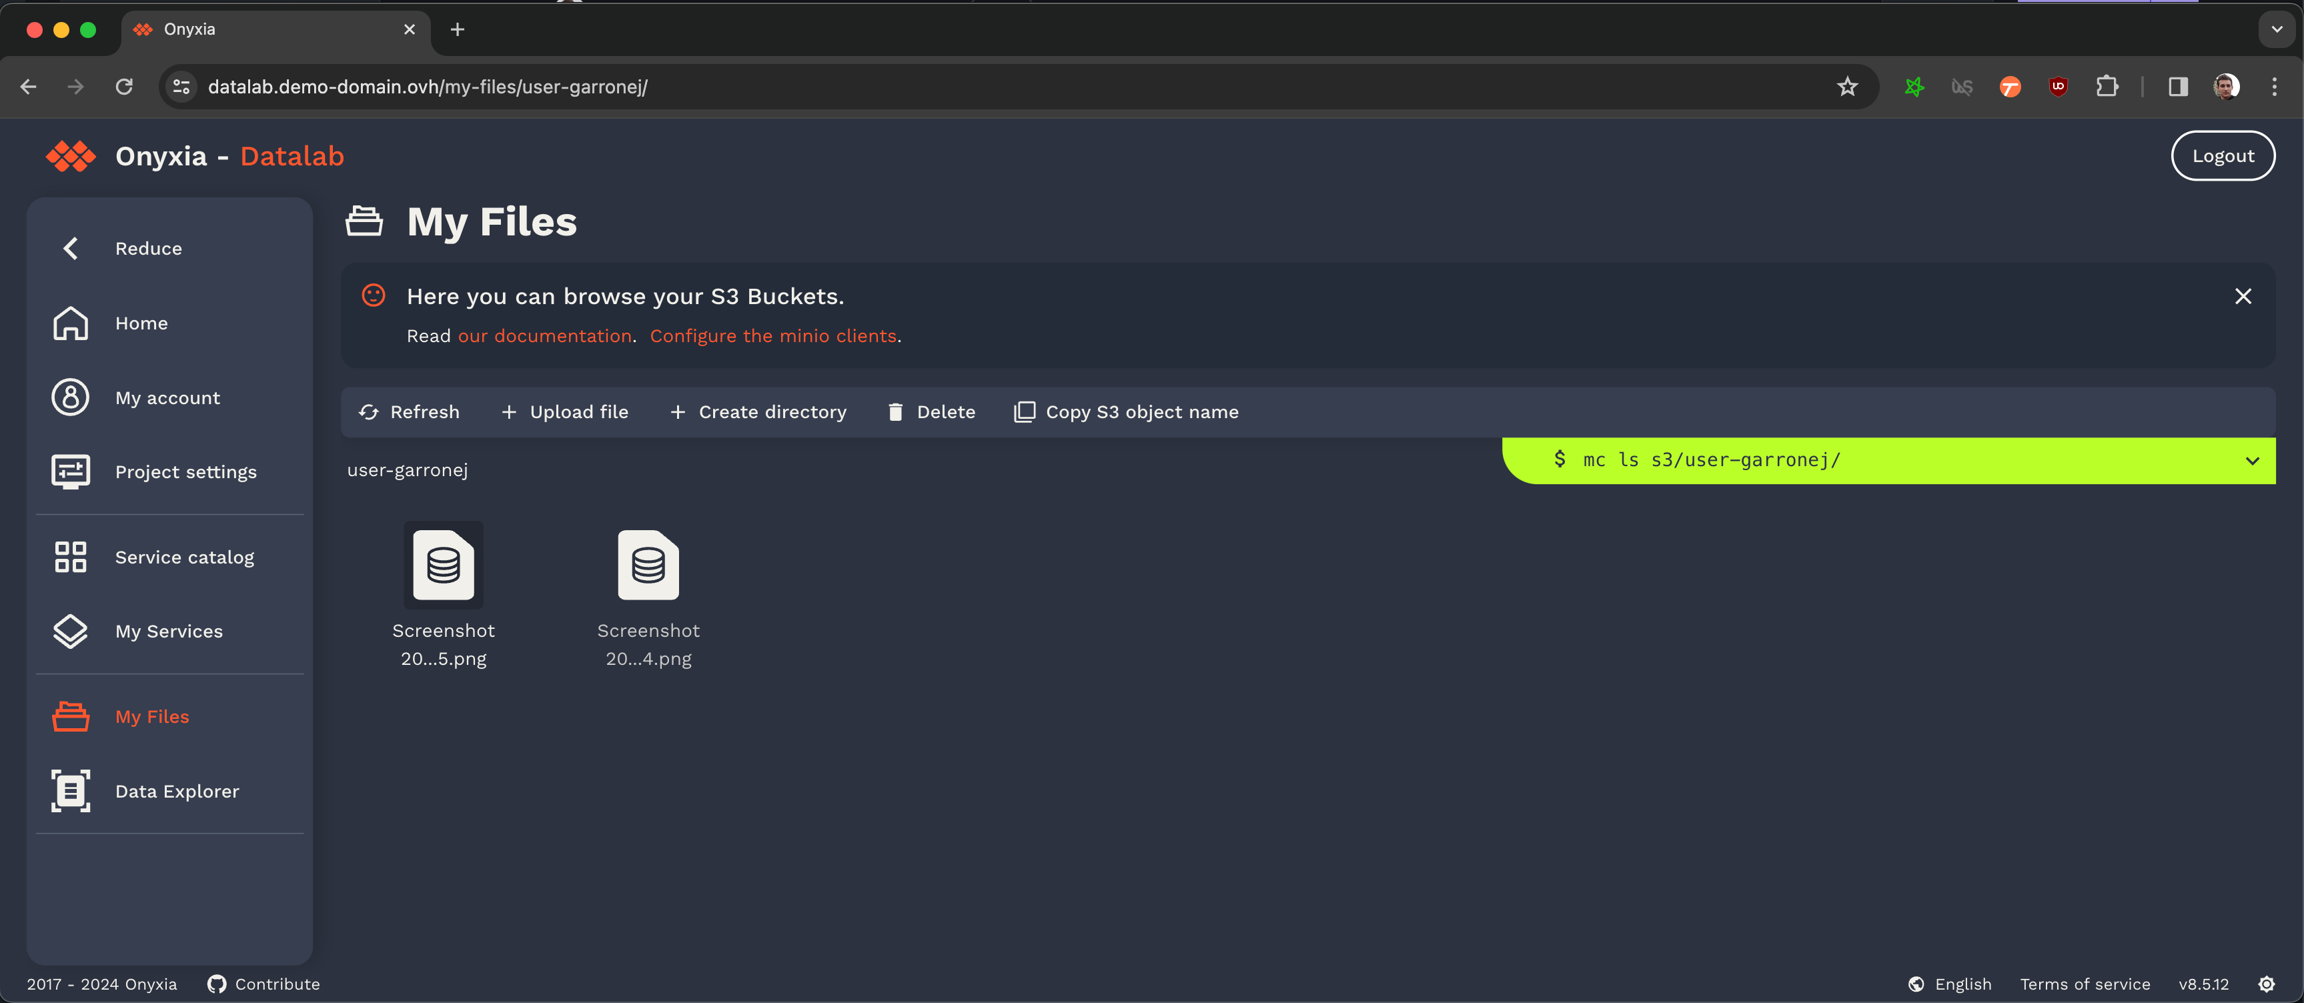
Using Onyxia (as a data scientist)
DOMAIN=my-domain.net

cat << EOF > ./argocd-values.yaml
server:
  extraArgs:
    - --insecure
  ingress:
    #ingressClassName: nginx
    enabled: true
    hostname: argocd.lab.$DOMAIN
    extraTls:
      - hosts:
          - argocd.lab.$DOMAIN
EOF

helm install argocd argo-cd \
  --repo https://argoproj.github.io/argo-helm \
  --version 6.0.9 \
-f ./argocd-values.yamlkubectl get secret argocd-initial-admin-secret \
-o jsonpath="{.data.password}" | base64 -d onyxia:
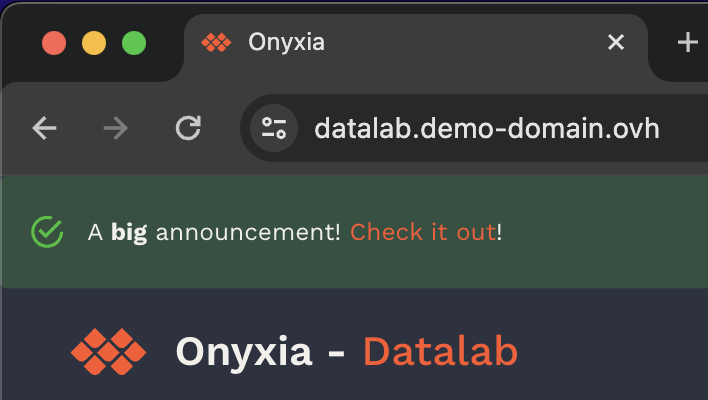
ingress:
enabled: true
hosts:
- host: datalab.demo-domain.ovh
web:
env:
+ GLOBAL_ALERT: |
+ {
+ severity: "success",
+ message: {
+ en: "A **big** announcement! [Check it out](https://example.com)!",
+ fr: "Une annonce **importante**! [Regardez](https://example.com)!"
+ }
+ }
api:
regions: [...]france theme: onyxia:
web:
env:
- THEME_ID: france
+ FONT: |
+ {
+ fontFamily: "Marianne",
+ dirUrl: "%PUBLIC_URL%/fonts/Marianne",
+ "400": "Marianne-Regular.woff2",
+ "400-italic": "Marianne-Regular_Italic.woff2",
+ "500": "Marianne-Medium.woff2",
+ "700": "Marianne-Bold.woff2",
+ "700-italic": "Marianne-Bold_Italic.woff2"
+ }
+ PALETTE_OVERRIDE: |
+ {
+ focus: {
+ main: "#000091",
+ light: "#9A9AFF",
+ light2: "#E5E5F4"
+ },
+ dark: {
+ main: "#2A2A2A",
+ light: "#383838",
+ greyVariant1: "#161616",
+ greyVariant2: "#9C9C9C",
+ greyVariant3: "#CECECE",
+ greyVariant4: "#E5E5E5"
+ },
+ light: {
+ main: "#F1F0EB",
+ light: "#FDFDFC",
+ greyVariant1: "#E6E6E6",
+ greyVariant2: "#C9C9C9",
+ greyVariant3: "#9E9E9E",
+ greyVariant4: "#747474"
+ }
+ }
+ SOCIAL_MEDIA_IMAGE: "%PUBLIC_URL%/preview-france.png" onyxia:
web:
env:
- THEME_ID: ultraviolet
+ PALETTE_OVERRIDE: |
+ {
+ focus: {
+ main: "#067A76",
+ light: "#0AD6CF",
+ light2: "#AEE4E3"
+ },
+ dark: {
+ main: "#2D1C3A",
+ light: "#4A3957",
+ greyVariant1: "#22122E",
+ greyVariant2: "#493E51",
+ greyVariant3: "#918A98",
+ greyVariant4: "#C0B8C6"
+ },
+ light: {
+ main: "#F7F5F4",
+ light: "#FDFDFC",
+ greyVariant1: "#E6E6E6",
+ greyVariant2: "#C9C9C9",
+ greyVariant3: "#9E9E9E",
+ greyVariant4: "#747474"
+ }
+ }
+ SOCIAL_MEDIA_IMAGE: "%PUBLIC_URL%/preview-ultraviolet.png" onyxia:
web:
env:
- THEME_ID: verdant
+ PALETTE_OVERRIDE: |
+ focus: {
+ main: "#1F8D49",
+ light: "#4EFB8D",
+ light2: "#DFFEE6"
+ },
+ light: {
+ main: "#F4F6FF",
+ light: "#F6F6F6",
+ greyVariant1: "#E6E6E6",
+ greyVariant2: "#C9C9C9",
+ greyVariant3: "#9E9E9E",
+ greyVariant4: "#747474"
+ } onyxia:
web:
env:
- HEADER_ORGANIZATION: SSP Cloud
+ HEADER_TEXT_BOLD: SSP Cloud
- HEADER_USECASE_DESCRIPTION: Datalab
+ HEADER_TEXT_FOCUS: Datalab
- DESCRIPTION: Shared platform for statistical data processing and data science services
+ SOCIAL_MEDIA_DESCRIPTION: Shared platform for statistical data processing and data science services
+ SOCIAL_MEDIA_TITLE: Datalab - SSP Cloud onyxia:
web:
env:
- EXTRA_LEFTBAR_ITEMS: |
+ LEFTBAR_LINKS: |-helm repo add inseefrlab https://inseefrlab.github.io/helm-charts
+helm repo add onyxia https://inseefrlab.github.io/onyxia
-helm install onyxia inseefrlab/helm-charts
+helm install onyxia onyxia/onyxia apiVersion: v2
name: onyxia
version: 1.0.0
dependencies:
- name: onyxia
- version: 4.1.0
+ version: 4.1.4
- repository: https://inseefrlab.github.io/helm-charts/
+ repository: https://inseefrlab.github.io/onyxia/Provision a Kubernetes cluster
  web:
    env:
      FONT: |
        {
          fontFamily: "Marianne",
          dirUrl: "%PUBLIC_URL%/fonts/Marianne",
          "400": "Marianne-Regular.woff2",
          "400-italic": "Marianne-Regular_Italic.woff2",
          "500": "Marianne-Medium.woff2",
          "700": "Marianne-Bold.woff2",
          "700-italic": "Marianne-Bold_Italic.woff2"
        }
      PALETTE_OVERRIDE: |
        {
          focus: {
            main: "#000091",
            light: "#9A9AFF",
            light2: "#E5E5F4"
          },
          dark: {
            main: "#2A2A2A",
            light: "#383838",
            greyVariant1: "#161616",
            greyVariant2: "#9C9C9C",
            greyVariant3: "#CECECE",
            greyVariant4: "#E5E5E5"
          },
          light: {
            main: "#F1F0EB",
            light: "#FDFDFC",
            greyVariant1: "#E6E6E6",
            greyVariant2: "#C9C9C9",
            greyVariant3: "#9E9E9E",
            greyVariant4: "#747474"
          }
        }
      SOCIAL_MEDIA_IMAGE: "%PUBLIC_URL%/preview-france.png"
HOMEPAGE_MAIN_ASSET: "false"web:
env:
FONT: |
{
fontFamily: "Geist",
dirUrl: "%PUBLIC_URL%/fonts/Geist",
"400": "Geist-Regular.woff2",
"500": "Geist-Medium.woff2",
"600": "Geist-SemiBold.woff2",
"700": "Geist-Bold.woff2"
}
PALETTE_OVERRIDE: |
{
focus: {
main: "#067A76",
light: "#0AD6CF",
light2: "#AEE4E3"
},
dark: {
main: "#2D1C3A",
light: "#4A3957",
greyVariant1: "#22122E",
greyVariant2: "#493E51",
greyVariant3: "#918A98",
greyVariant4: "#C0B8C6"
},
light: {
main: "#F7F5F4",
light: "#FDFDFC",
greyVariant1: "#E6E6E6",
greyVariant2: "#C9C9C9",
greyVariant3: "#9E9E9E",
greyVariant4: "#747474"
}
}
SOCIAL_MEDIA_IMAGE: "%PUBLIC_URL%/preview-ultraviolet.png"helm repo add onyxia https://inseefrlab.github.io/onyxia
DOMAIN=my-domain.net
cat << EOF > ./onyxia-values.yaml
# ...
web:
image:
- tag: 2.29.4
api:
image:
- tag: v0.32
# ...
EOF
helm install onyxia onyxia/onyxia -f onyxia-values.yamlhelm repo add codecentric https://codecentric.github.io/helm-charts
cat << EOF > ./keycloak-values.yaml
# ... See https://docs.onyxia.sh/#enabling-user-authentication
extraInitContainers: |
- name: realm-ext-provider
image: curlimages/curl
imagePullPolicy: IfNotPresent
command:
- sh
args:
- -c
- |
- curl -L -f -S -o /extensions/onyxia.jar https://github.com/InseeFrLab/onyxia/releases/download/v2.29.4/keycloak-theme.jar
+ curl -L -f -S -o /extensions/onyxia.jar https://github.com/InseeFrLab/onyxia/releases/download/v4.1.4/keycloak-theme.jar
volumeMounts:
- name: extensions
mountPath: /extensions
extraVolumeMounts: |
- name: extensions
mountPath: /opt/jboss/keycloak/standalone/deployments
extraVolumes: |
- name: extensions
emptyDir: {}
# ...
EOF
helm install keycloak codecentric/keycloak -f keycloak-values.yamlsrc/core directory.isUserLoggedIn is not a constant!datalab.my-domain.net CNAME jhon-doe-home.ddns.net.
*.lab.my-domain.net CNAME jhon-doe-home.ddnc.net.kubectl apply -f https://raw.githubusercontent.com/kubernetes/ingress-nginx/controller-v1.2.0/deploy/static/provider/aws/deploy.yamlkubectl get services -n ingress-nginxdatalab.my-domain.net CNAME xxx.elb.eu-west-1.amazonaws.com.
*.lab.my-domain.net CNAME xxx.elb.eu-west-1.amazonaws.com. brew install certbot #On Mac, lookup how to install certbot for your OS
#Because we need a wildcard certificate we have to complete the DNS callange.
sudo certbot certonly --manual --preferred-challenges dns
# When asked for the domains you wish to optains a certificate for enter:
# datalab.my-domain.net *.lab.my-domain.netDOMAIN=my-domain.net
sudo kubectl create secret tls onyxia-tls \
-n ingress-nginx \
--key /etc/letsencrypt/live/datalab.$DOMAIN/privkey.pem \
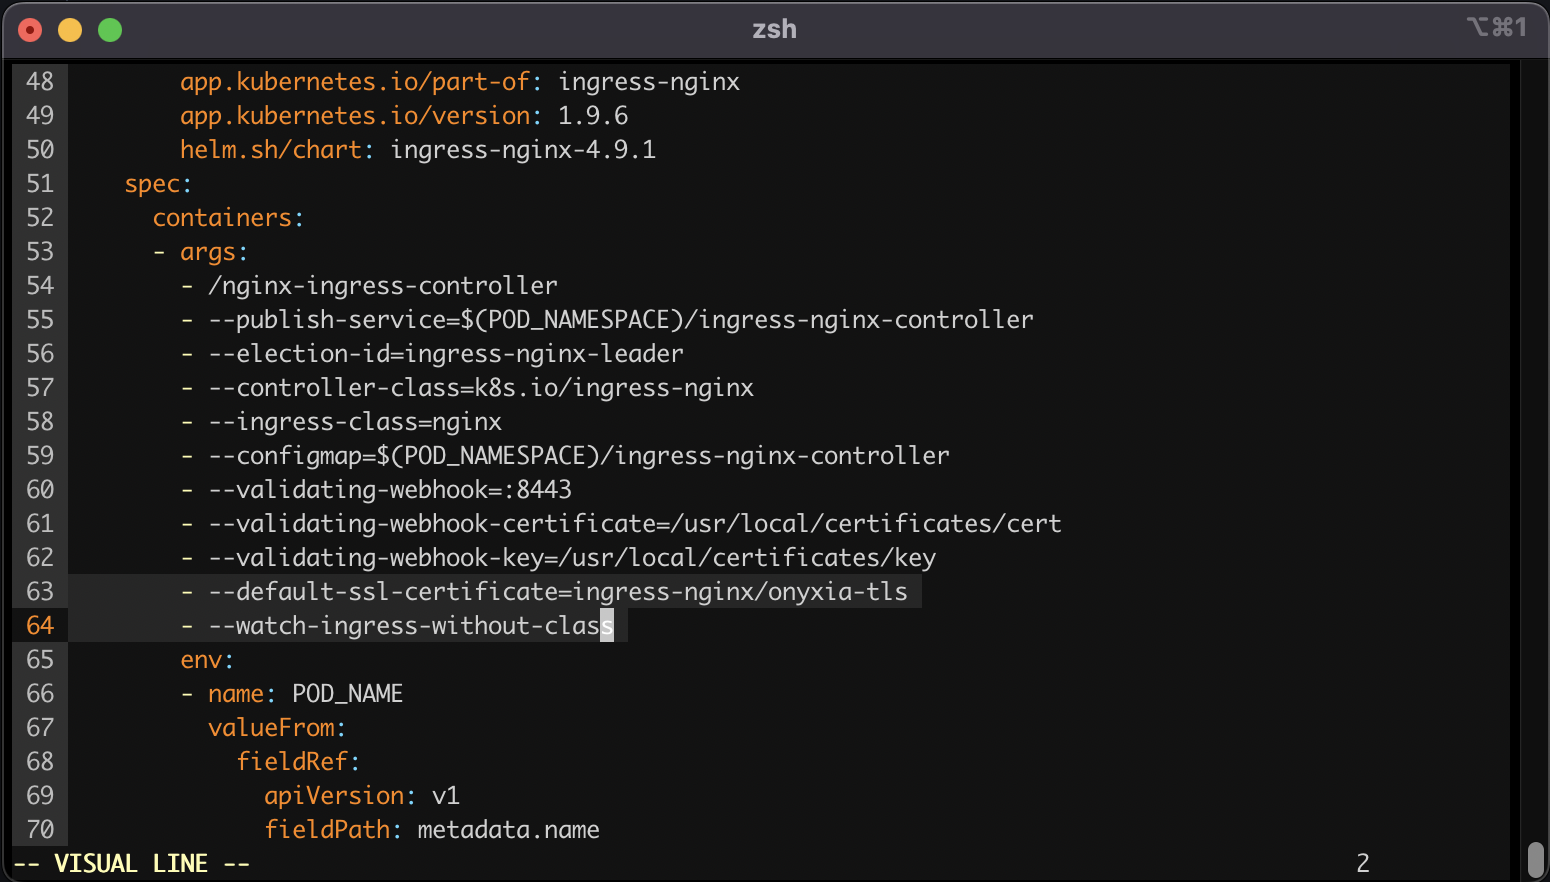
--cert /etc/letsencrypt/live/datalab.$DOMAIN/fullchain.pemkubectl edit deployment ingress-nginx-controller -n ingress-nginx - --default-ssl-certificate=ingress-nginx/onyxia-tls
- --watch-ingress-without-classdatalab.my-domain.net A <YOUR_IP>
*.lab.my-domain.net A <YOUR_IP>brew install certbot #On Mac, lookup how to install certbot for your OS
# Because we need a wildcard certificate we have to complete the DNS callange.
sudo certbot certonly --manual --preferred-challenges dns
# When asked for the domains you wish to optains a certificate for enter:
# datalab.my-domain.net *.lab.my-domain.net# First let's make sure we connect to our local Kube cluser
kubectl config use-context docker-desktop
kubectl create namespace ingress-nginx
DOMAIN=my-domain.net
sudo kubectl create secret tls onyxia-tls \
    -n ingress-nginx \
    --key /etc/letsencrypt/live/datalab.$DOMAIN/privkey.pem \
--cert /etc/letsencrypt/live/datalab.$DOMAIN/fullchain.pemcat << EOF > ./ingress-nginx-values.yaml
controller:
extraArgs:
default-ssl-certificate: "ingress-nginx/onyxia-tls"
watchIngressWithoutClass: true
EOF
helm install ingress-nginx ingress-nginx \
--repo https://kubernetes.github.io/ingress-nginx \
--version 4.9.1 \
--namespace ingress-nginx \
-f ./ingress-nginx-values.yaml{
"attributes": [
{
"name": "username",
"displayName": "${username}",
"validations": {
"length": {
"min": 3,
"max": 255
},
+ "pattern": {
+ "error-message": "${lowerCaseAlphanumericalCharsOnly}",
+ "pattern": "^[a-z0-9]*$"
+ },
"username-prohibited-characters": {}
}
},
{
"name": "email",
"displayName": "${email}",
"validations": {
"email": {},
+ "pattern": {
+ "pattern": "^[^@]+@([^.]+\\.)*((gmail\\.com)|(hotmail\\.com))$"
+ },
"length": {
"max": 255
}
}
},
...git clone https://github.com/<your-github-org>/onyxia-ops
cd onyxia-ops
cd apps/onyxia
mv values-keycloak-enabled.yaml values.yaml
git commit -am "Enable keycloak"
git pushconst { isUserLoggedIn } = useCoreState(state => state.userAuthentication);const { userAuthenticationThunks } = useThunks();
const isUserLoggedIn = userAuthenticationThunks.getIsUserLoggedIn(); web:
env:
MINIO_URL: https://minio.lab.sspcloud.fr
VAULT_URL: https://vault.lab.sspcloud.fr
OIDC_URL: https://auth.lab.sspcloud.fr/auth
OIDC_REALM: sspcloud
TITLE: SSP Cloud
ORG_NAME: InseeFrLab #<==========

Technologies at play in Onyxia-web
bottommargincd ~/github
git clone https//github.com/InseeFrLab/onyxia
cd onyxia/web
yarn install
cd ~/github/onyxia #This is just a suggestion, clone wherever you see fit.
git clone https://github.com/InseeFrLab/onyxia-ui ui
cd ui
yarn install
yarn build
yarn link-in-web
npx tsc -w
# Open a new terminal
cd ~/github/onyxia/web
yarn start
yarn storybookdocker run --env OIDC_URL="https://url-of-our-keycloak.fr/auth" InseeFrLab/onyxia-web web:
replicaCount: 2
env:
MINIO_URL: https://minio.lab.sspcloud.fr
VAULT_URL: https://vault.lab.sspcloud.fr
OIDC_URL: https://auth.lab.sspcloud.fr/auth
OIDC_REALM: sspcloud
TITLE: SSP Cloud

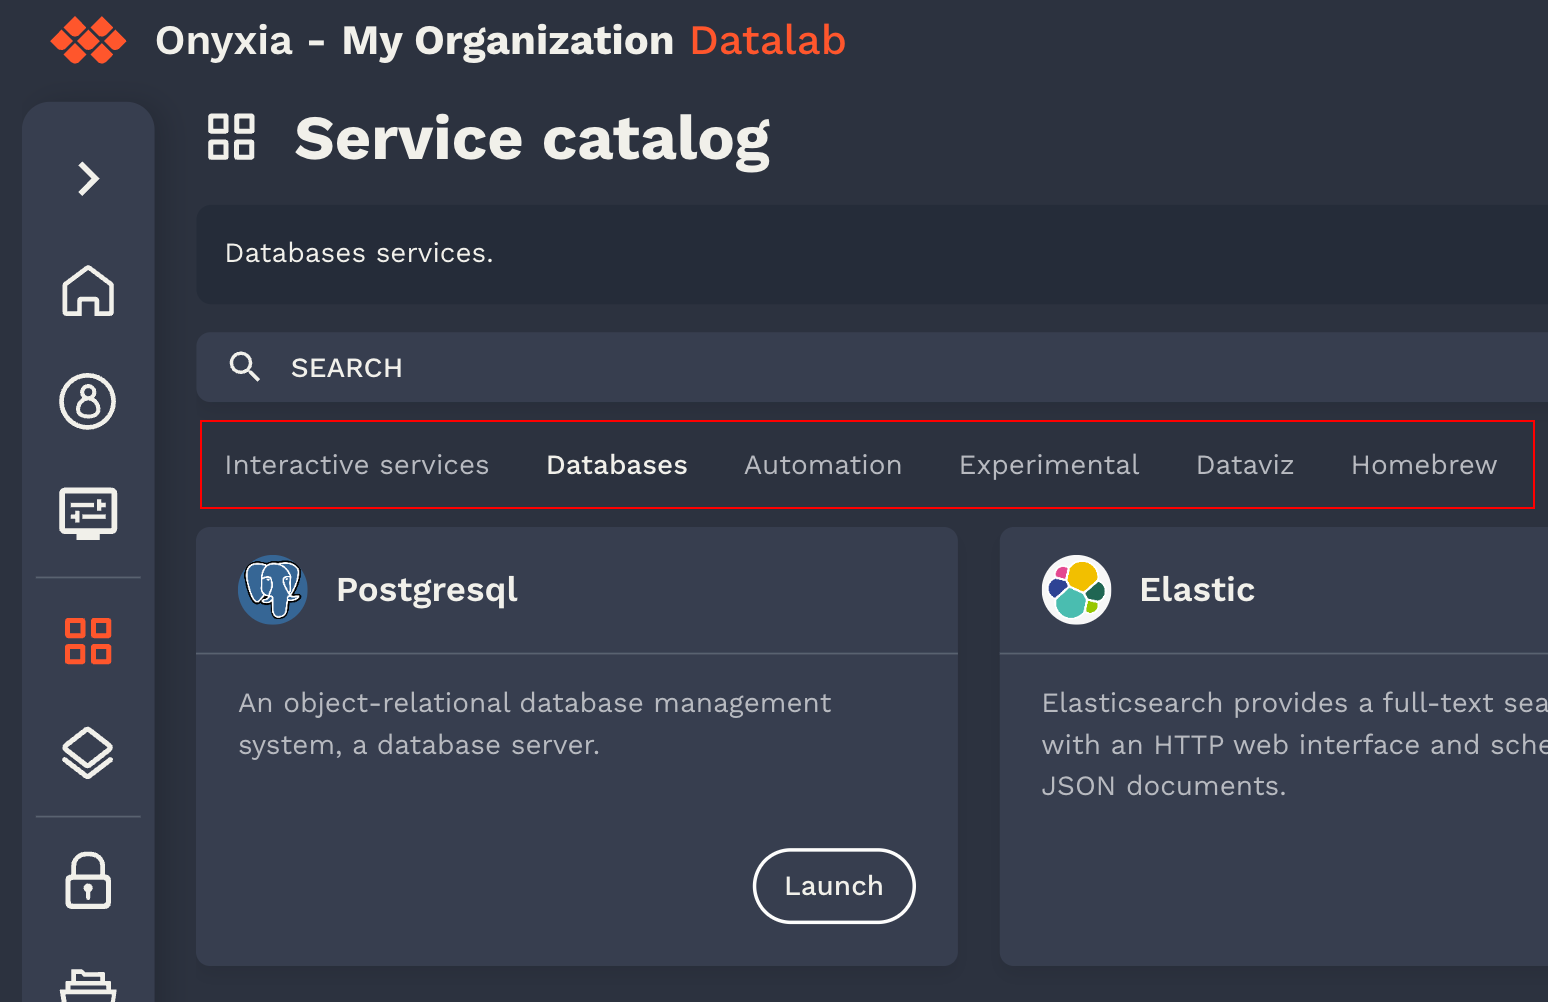
Unserstand how Onyxia catalogs work and potentially create your own!
onyxia:
  web:
    # ...
  api:
    # ...
    catalogs: [
      {
        type: "helm",
        id: "aerospace",
        # The url of the Helm chart repository
        location: "https://myorg.github.io/helm-charts-aerospace/",
        # Display under the search bar as selection tab:
        # https://github.com/InseeFrLab/onyxia/assets/6702424/a7247c7d-b0be-48db-893b-20c9352fdb94
        name: {
          en: "Aerospace services",
          fr: "Services aérospatiaux"
          # ... other languages your instance supports
        },
        # Optional. Defines the chart that should appear first
        highlightedCharts: ["jupyter-artemis", "rstudio-dragonfly"],
        # Optional. Defines the chart that should be excluded
        excludedCharts: ["a-vendor-locking-chart"],
        # Optional, If defined, displayed in the header of the catalog page:
        # https://github.com/InseeFrLab/onyxia/assets/6702424/57e32f44-b889-41b2-b0c7-727c35b07650
        # Is rendered as Markdown
        description: {
          en: "A catalog of services for aerospace engineers",
          fr: "Un catalogue de services pour les ingénieurs aérospatiaux"
          # ...
        },
        # Can be "PROD" or "TEST". If test the catalogs will be accessible if you type the url in the search bar
        # but you won't have a tab to select it.
        status": "PROD",
        # Optional. If true the certificate verification for `${location}/index.yaml` will be skipped.
        skipTlsVerify: false,
        # Optional. certificate authority file to use for the TLS verification
        caFile: "/path/to/ca.crt",
        # Optional: Enables you to a specific group of users.
        # You can match any claim in the JWT token.
        # If the claim's value is an array, it match if one of the value is the one you specified.
        # The match property can also be a regex.
        restrictions: [
          {
            userAttribute: {
              key: "groups",
              matches: "nasa-engineers"
            }
          }
        ]
      },
       # { ... } another catalog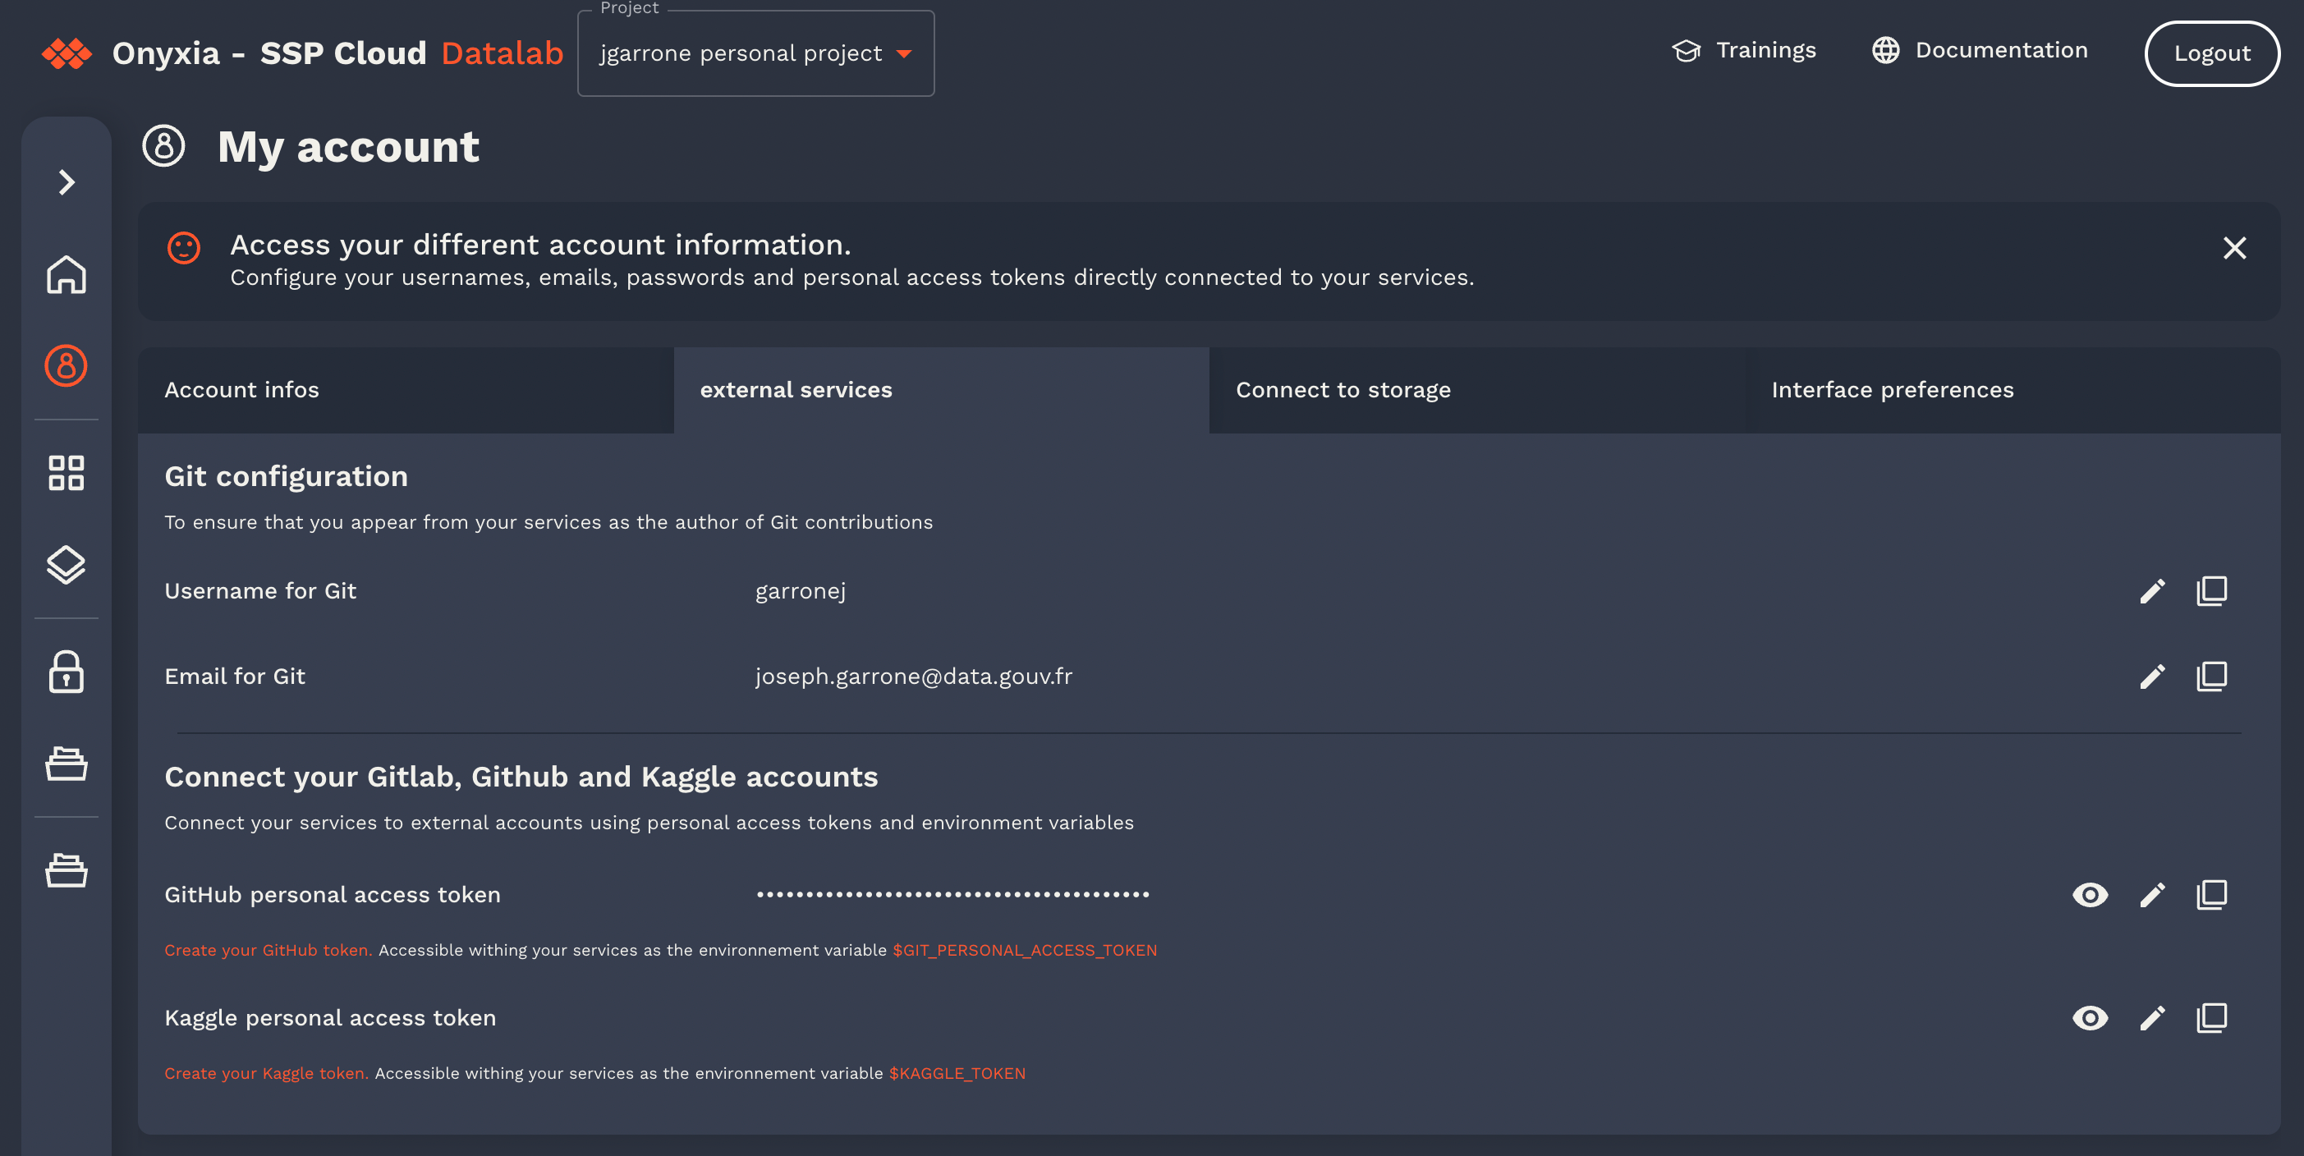
]"git": {
"description": "Git user configuration",
"type": "object",
"properties": {
"enabled": {
"type": "boolean",
"description": "Add git config inside your environment",
"default": true
},
"name": {
"type": "string",
"description": "user name for git",
"default": "",
"x-onyxia": {
"overwriteDefaultWith": "git.name"
},
"hidden": {
"value": false,
"path": "git/enabled"
}
},
"email": {
"type": "string",
"description": "user email for git",
"default": "",
"x-onyxia": {
"overwriteDefaultWith": "git.email"
},
"hidden": {
"value": false,
"path": "git/enabled"
}
},
"cache": {
"type": "string",
"description": "duration in seconds of the credentials cache duration",
"default": "",
"x-onyxia": {
"overwriteDefaultWith": "git.credentials_cache_duration"
},
"hidden": {
"value": false,
"path": "git/enabled"
}
},
"token": {
"type": "string",
"description": "personal access token",
"default": "",
"x-onyxia": {
"overwriteDefaultWith": "git.token"
},
"hidden": {
"value": false,
"path": "git/enabled"
}
},
"repository": {
"type": "string",
"description": "Repository url",
"default": "",
"hidden": {
"value": false,
"path": "git/enabled"
}
},
"branch": {
"type": "string",
"description": "Brach automatically checkout",
"default": "",
"hidden": {
"value": "",
"path": "git/repository"
}
}
}
},export type XOnyxiaParams = {
/**
* This is where you can reference values from the onyxia context so that they
* are dynamically injected by the Onyxia launcher.
*
* Examples:
* "overwriteDefaultWith": "user.email" ( You can also write "{{user.email}}" it's equivalent )
* "overwriteDefaultWith": "{{project.id}}-{{k8s.randomSubdomain}}.{{k8s.domain}}"
* "overwriteDefaultWith": [ "a hardcoded value", "some other hardcoded value", "{{region.oauth2.clientId}}" ]
* "overwriteDefaultWith": { "foo": "bar", "bar": "{{region.oauth2.clientId}}" }
*
*/
overwriteDefaultWith?:
| string
| number
| boolean
| unknown[]
| Record<string, unknown>;
overwriteListEnumWith?: unknown[] | string;
hidden?: boolean;
readonly?: boolean;
useRegionSliderConfig?: string;
};
export type XOnyxiaContext = {
user: {
idep: string;
name: string;
email: string;
password: string;
ip: string;
darkMode: boolean;
lang: "en" | "fr" | "zh-CN" | "no" | "fi" | "nl" | "it" | "es" | "de";
/**
* Decoded JWT OIDC ID token of the user launching the service.
*
* Sample value:
* {
* "sub": "9000ffa3-5fb8-45b5-88e4-e2e869ba3cfa",
* "name": "Joseph Garrone",
* "aud": ["onyxia", "minio-datanode"],
* "groups": [
* "USER_ONYXIA",
* "codegouv",
* "onyxia",
* "sspcloud-admin",
* ],
* "preferred_username": "jgarrone",
* "given_name": "Joseph",
* "locale": "en",
* "family_name": "Garrone",
* "email": "[email protected]",
* "policy": "stsonly",
* "typ": "ID",
* "azp": "onyxia",
* "email_verified": true,
* "realm_access": {
* "roles": ["offline_access", "uma_authorization", "default-roles-sspcloud"]
* }
* }
*/
decodedIdToken: Record<string, unknown>;
accessToken: string;
refreshToken: string;
};
service: {
oneTimePassword: string;
};
project: {
id: string;
password: string;
basic: string;
};
git: {
name: string;
email: string;
credentials_cache_duration: number;
token: string | undefined;
};
vault: {
VAULT_ADDR: string;
VAULT_TOKEN: string;
VAULT_MOUNT: string;
VAULT_TOP_DIR: string;
};
s3: {
AWS_ACCESS_KEY_ID: string;
AWS_SECRET_ACCESS_KEY: string;
AWS_SESSION_TOKEN: string;
AWS_DEFAULT_REGION: string;
AWS_S3_ENDPOINT: string;
AWS_BUCKET_NAME: string;
port: number;
pathStyleAccess: boolean;
/**
* The user is assumed to have read/write access on every
* object starting with this prefix on the bucket
**/
objectNamePrefix: string;
/**
* Only for making it easier for charts editors.
* <AWS_BUCKET_NAME>/<objectNamePrefix>
* */
workingDirectoryPath: string;
/**
* If true the bucket's (directory) should be accessible without any credentials.
* In this case s3.AWS_ACCESS_KEY_ID, s3.AWS_SECRET_ACCESS_KEY and s3.AWS_SESSION_TOKEN
* will be empty strings.
*/
isAnonymous: boolean;
};
region: {
defaultIpProtection: boolean | undefined;
defaultNetworkPolicy: boolean | undefined;
allowedURIPattern: string;
customValues: Record<string, unknown> | undefined;
kafka:
| {
url: string;
topicName: string;
}
| undefined;
tolerations: unknown[] | undefined;
from: unknown[] | undefined;
nodeSelector: Record<string, unknown> | undefined;
startupProbe: Record<string, unknown> | undefined;
sliders: Record<
string,
{
sliderMin: number;
sliderMax: number;
sliderStep: number;
sliderUnit: string;
}
>;
resources:
| {
cpuRequest?: `${number}${string}`;
cpuLimit?: `${number}${string}`;
memoryRequest?: `${number}${string}`;
memoryLimit?: `${number}${string}`;
disk?: `${number}${string}`;
gpu?: `${number}`;
}
| undefined;
};
k8s: {
domain: string;
ingressClassName: string | undefined;
ingress: boolean | undefined;
route: boolean | undefined;
istio:
| {
enabled: boolean;
gateways: string[];
}
| undefined;
randomSubdomain: string;
initScriptUrl: string;
useCertManager: boolean;
certManagerClusterIssuer: string | undefined;
};
proxyInjection:
| {
enabled: string | undefined;
httpProxyUrl: string | undefined;
httpsProxyUrl: string | undefined;
noProxy: string | undefined;
}
| undefined;
packageRepositoryInjection:
| {
cranProxyUrl: string | undefined;
condaProxyUrl: string | undefined;
packageManagerUrl: string | undefined;
pypiProxyUrl: string | undefined;
}
| undefined;
certificateAuthorityInjection:
| {
cacerts: string | undefined;
pathToCaBundle: string | undefined;
}
| undefined;
};"hostname": {
"type": "string",
"form": true,
"title": "Hostname",
"x-onyxia": {
"overwriteDefaultWith": "{{project.id}}-{{k8s.randomSubdomain}}.{{k8s.domain}}"
}
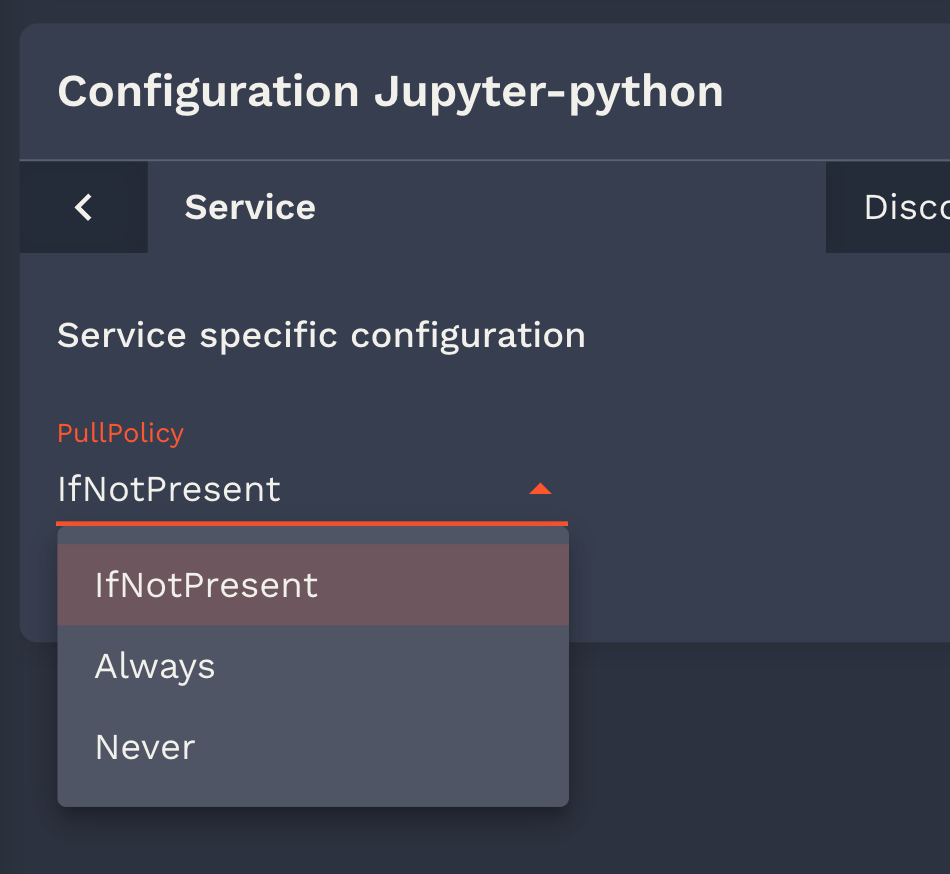
}"pullPolicy": {
"type": "string",
"default": "IfNotPresent",
"listEnum": [
"IfNotPresent",
"Always",
"Never"
]
}"group": {
"type": "string",
"default": "",
"listEnum": [""],
"x-onyxia": {
"overwriteDefaultWith": "user.decodedIdToken.groups[0]",
"overwriteListEnumWith": "user.decodedIdToken.groups"
}
}"nodeSelector": {
"type": "object",
"description": "NodeSelector",
"default": {},
"x-onyxia": {
"overwriteSchemaWith": "nodeSelector.json"
}
}{
"$schema": "http://json-schema.org/draft-07/schema#",
"title": "Node Selector",
"type": "object",
"description": "Node selector constraints for the pod",
"additionalProperties": {
"type": "string",
"description": "Key-value pairs to select nodes"
}
}{
"$schema": "http://json-schema.org/draft-07/schema#",
"title": "Node Selector",
"type": "object",
"properties": {
"disktype": {
"description": "The type of disk",
"type": "string",
"enum": ["ssd", "hdd"]
},
"gpu": {
"description": "The type of GPU",
"type": "string",
"enum": ["A2", "H100"]
}
},
"additionalProperties": false //any other label is disallowed
}{
"$schema": "http://json-schema.org/draft-07/schema#",
"title": "Role",
"type": "object",
"properties": {
"enabled": {
"type": "boolean",
"description": "allow your service to access your namespace ressources",
"default": true
},
"role": {
"type": "string",
"description": "bind your service account to this kubernetes default role",
"default": "view",
"enum": [
"view",
"edit",
"admin"
]
}
}
}
{
  "$schema": "http://json-schema.org/draft-07/schema#",
  "title": "Role",
  "type": "object",
  "properties": {
    "enabled": {
      "type": "boolean",
      "const": true,
      "description": "This value must always be true, allowing your service to access your namespace resources."
    },
    "role": {
      "type": "string",
      "const": "view",
      "description": "This value must always be 'view', binding your service account to this Kubernetes default role.",
    }
  }
}
{
    "$schema": "http://json-schema.org/draft-07/schema#",
    "title": "Resources",
    "description": "Your service will have at least the requested resources and never more than its limits. No limit for a resource and you can consume everything left on the host machine.",
    "type": "object",
    "properties": {
        "requests": {
            "description": "Guaranteed resources",
            "type": "object",
            "properties": {
                "cpu": {
                    "description": "The amount of cpu guaranteed",
                    "title": "CPU",
                    "type": "string",
                    "default": "100m",
                    "render": "slider",
                    "sliderMin": 50,
                    "sliderMax": 40000,
                    "sliderStep": 50,
                    "sliderUnit": "m",
                    "sliderExtremity": "down",
                    "sliderExtremitySemantic": "guaranteed",
                    "sliderRangeId": "cpu"
                },
                "memory": {
                    "description": "The amount of memory guaranteed",
                    "title": "memory",
                    "type": "string",
                    "default": "2Gi",
                    "render": "slider",
                    "sliderMin": 1,
                    "sliderMax": 200,
                    "sliderStep": 1,
                    "sliderUnit": "Gi",
                    "sliderExtremity": "down",
                    "sliderExtremitySemantic": "guaranteed",
                    "sliderRangeId": "memory"
                }
            }
        },
        "limits": {
            "description": "max resources",
            "type": "object",
            "properties": {
                "cpu": {
                    "description": "The maximum amount of cpu",
                    "title": "CPU",
                    "type": "string",
                    "default": "30000m",
                    "render": "slider",
                    "sliderMin": 50,
                    "sliderMax": 40000,
                    "sliderStep": 50,
                    "sliderUnit": "m",
                    "sliderExtremity": "up",
                    "sliderExtremitySemantic": "Maximum",
                    "sliderRangeId": "cpu"
                },
                "memory": {
                    "description": "The maximum amount of memory",
                    "title": "Memory",
                    "type": "string",
                    "default": "50Gi",
                    "render": "slider",
                    "sliderMin": 1,
                    "sliderMax": 200,
                    "sliderStep": 1,
                    "sliderUnit": "Gi",
                    "sliderExtremity": "up",
                    "sliderExtremitySemantic": "Maximum",
                    "sliderRangeId": "memory"
                }
            }
        }
    }
}
{
    "$schema": "http://json-schema.org/draft-07/schema#",
    "title": "Resources",
    "description": "Your service will have at least the requested resources and never more than its limits. No limit for a resource and you can consume everything left on the host machine.",
    "type": "object",
    "properties": {
        "requests": {
            "description": "Guaranteed resources",
            "type": "object",
            "properties": {
                "cpu": {
                    "description": "The amount of cpu guaranteed",
                    "title": "CPU",
                    "type": "string",
                    "default": "100m",
                    "render": "slider",
                    "sliderMin": 50,
                    "sliderMax": 10000,
                    "sliderStep": 50,
                    "sliderUnit": "m",
                    "sliderExtremity": "down",
                    "sliderExtremitySemantic": "guaranteed",
                    "sliderRangeId": "cpu"
                },
                "memory": {
                    "description": "The amount of memory guaranteed",
                    "title": "memory",
                    "type": "string",
                    "default": "2Gi",
                    "render": "slider",
                    "sliderMin": 1,
                    "sliderMax": 200,
                    "sliderStep": 1,
                    "sliderUnit": "Gi",
                    "sliderExtremity": "down",
                    "sliderExtremitySemantic": "guaranteed",
                    "sliderRangeId": "memory"
                }
            }
        },
        "limits": {
            "description": "max resources",
            "type": "object",
            "properties": {
                "cpu": {
                    "description": "The maximum amount of cpu",
                    "title": "CPU",
                    "type": "string",
                    "default": "5000m",
                    "render": "slider",
                    "sliderMin": 50,
                    "sliderMax": 10000,
                    "sliderStep": 50,
                    "sliderUnit": "m",
                    "sliderExtremity": "up",
                    "sliderExtremitySemantic": "Maximum",
                    "sliderRangeId": "cpu"
                },
                "memory": {
                    "description": "The maximum amount of memory",
                    "title": "Memory",
                    "type": "string",
                    "default": "50Gi",
                    "render": "slider",
                    "sliderMin": 1,
                    "sliderMax": 200,
                    "sliderStep": 1,
                    "sliderUnit": "Gi",
                    "sliderExtremity": "up",
                    "sliderExtremitySemantic": "Maximum",
                    "sliderRangeId": "memory"
                }
            }
        }
    }
}onyxia:
web:
# ...
api:
# ...
schemas:
enabled: true
files:
- relativePath: ide/resources.json
content: |
{
"$schema": "http://json-schema.org/draft-07/schema#",
"title": "Resources",
"description": "Your service will have at least the requested resources and never more than its limits. No limit for a resource and you can consume everything left on the host machine.",
"type": "object",
"properties": {
"requests": {
"description": "Guaranteed resources",
"type": "object",
"properties": {
"cpu": {
"description": "The amount of cpu guaranteed",
"title": "CPU",
"type": "string",
"default": "100m",
"render": "slider",
"sliderMin": 50,
"sliderMax": 10000,
"sliderStep": 50,
"sliderUnit": "m",
"sliderExtremity": "down",
"sliderExtremitySemantic": "guaranteed",
"sliderRangeId": "cpu"
},
"memory": {
"description": "The amount of memory guaranteed",
"title": "memory",
"type": "string",
"default": "2Gi",
"render": "slider",
"sliderMin": 1,
"sliderMax": 200,
"sliderStep": 1,
"sliderUnit": "Gi",
"sliderExtremity": "down",
"sliderExtremitySemantic": "guaranteed",
"sliderRangeId": "memory"
}
}
},
"limits": {
"description": "max resources",
"type": "object",
"properties": {
"cpu": {
"description": "The maximum amount of cpu",
"title": "CPU",
"type": "string",
"default": "5000m",
"render": "slider",
"sliderMin": 50,
"sliderMax": 10000,
"sliderStep": 50,
"sliderUnit": "m",
"sliderExtremity": "up",
"sliderExtremitySemantic": "Maximum",
"sliderRangeId": "cpu"
},
"memory": {
"description": "The maximum amount of memory",
"title": "Memory",
"type": "string",
"default": "50Gi",
"render": "slider",
"sliderMin": 1,
"sliderMax": 200,
"sliderStep": 1,
"sliderUnit": "Gi",
"sliderExtremity": "up",
"sliderExtremitySemantic": "Maximum",
"sliderRangeId": "memory"
}
}
}
}
}
- relativePath: nodeSelector.json
content: |
{
"$schema": "http://json-schema.org/draft-07/schema#",
"title": "Node Selector",
"type": "object",
"properties": {
"disktype": {
"description": "The type of disk",
"type": "string",
"enum": ["ssd", "hdd"]
},
"gpu": {
"description": "The type of GPU",
"type": "string",
"enum": ["A2", "H100"]
}
},
"additionalProperties": false
}
- relativePath: ide/role.json
content: |
{
"$schema": "http://json-schema.org/draft-07/schema#",
"title": "Role",
"type": "object",
"properties": {
"enabled": {
"type": "boolean",
"description": "allow your service to access your namespace ressources",
"default": true
},
"role": {
"type": "string",
"description": "bind your service account to this kubernetes default role",
"default": "view",
"hidden": {
"value": false,
"path": "kubernetes/enabled"
},
"enum": [
"view"
]
}
}
}
