Convinced by Onyxia? Let's see how you can get your own instance today!
If you are already familiar with Kubernetes and Helm, here's how you can get an Onyxia instance up and running in just a matter of seconds.
helm repo add onyxia https://inseefrlab.github.io/onyxia

cat << EOF > ./onyxia-values.yaml
ingress:
  enabled: true
  hosts:
    - host: onyxia.my-domain.net
EOF

helm install onyxia onyxia/onyxia -f onyxia-values.yaml

# Navigate to https://onyxia.my-domain.net
With this minimal configuration, you'll have an Onyxia instance operating in a degraded mode, which lacks features such as authentication, S3 explorer, secret management, etc. However, you will still retain the capability to launch services from the catalog.
Whether you are a Kubernetes veteran or a beginner with cloud technologies, this guide aims to guide you through the instantiation and configuration of an Onyxia instance with it's full range of features enabled. Let's dive right in! 🤿
First let's make sure we have a suitable deployment environement to work with!
Provision a Kubernetes cluster
First you'll need a Kubernetes cluster. If you have one already you can skip and directly go to the Onyxia installation section.
Hashicorp maintains great tutorials for terraforming Kubernetes clusters on AWS, GCP or Azure.
Pick one of the three and follow the guide.
You can stop after the configure kubectl section.
Ingress controller
Let's install ingress-ngnix on our newly created cluster:
kubectl apply -f https://raw.githubusercontent.com/kubernetes/ingress-nginx/controller-v1.2.0/deploy/static/provider/aws/deploy.yamlDNS
Let's assume you own the domain name my-domain.net, for the rest of the guide you should replace my-domain.net by a domain you actually own.
Now you need to get the external address of your cluster, run the command
kubectl get services -n ingress-nginxand write down the External IP assigned to the LoadBalancer.
Depending on the cloud provider you are using it can be an IPv4, an IPv6 or a domain. On AWS for example, it will be a domain like xxx.elb.eu-west-1.amazonaws.com.
If you see <pending>, wait a few seconds and try again.
Once you have the address, create the following DNS records:
datalab.my-domain.net CNAME xxx.elb.eu-west-1.amazonaws.com.
*.lab.my-domain.net   CNAME xxx.elb.eu-west-1.amazonaws.com.
If the address you got was an IPv4 (x.x.x.x), create a A record instead of a CNAME.
If the address you got was ans IPv6 (y:y:y:y:y:y:y:y), create a AAAA record.
https://datalab.my-domain.net will be the URL for your instance of Onyxia. The URL of the services created by Onyxia are going to look like: https://<something>.lab.my-domain.net
SSL
In this section we will obtain a TLS certificate issued by LetsEncrypt using the certbot commend line tool then get our ingress controller to use it.
If you are already familiar with certbot you're probably used to run it on a remote host via SSH. In this case you are expected to run it on your own machine, we'll use the DNS chalenge instead of the HTTP chalenge.
brew install certbot #On Mac, lookup how to install certbot for your OS

#Because we need a wildcard certificate we have to complete the DNS callange.
sudo certbot certonly --manual --preferred-challenges dns

# When asked for the domains you wish to optains a certificate for enter:
# datalab.my-domain.net *.lab.my-domain.netNow we want to create a Kubernetes secret containing our newly obtained certificate:
DOMAIN=my-domain.net
sudo kubectl create secret tls onyxia-tls \
    -n ingress-nginx \
    --key /etc/letsencrypt/live/datalab.$DOMAIN/privkey.pem \
    --cert /etc/letsencrypt/live/datalab.$DOMAIN/fullchain.pem
Lastly, we want to tell our ingress controller to use this TLS certificate, to do so run:
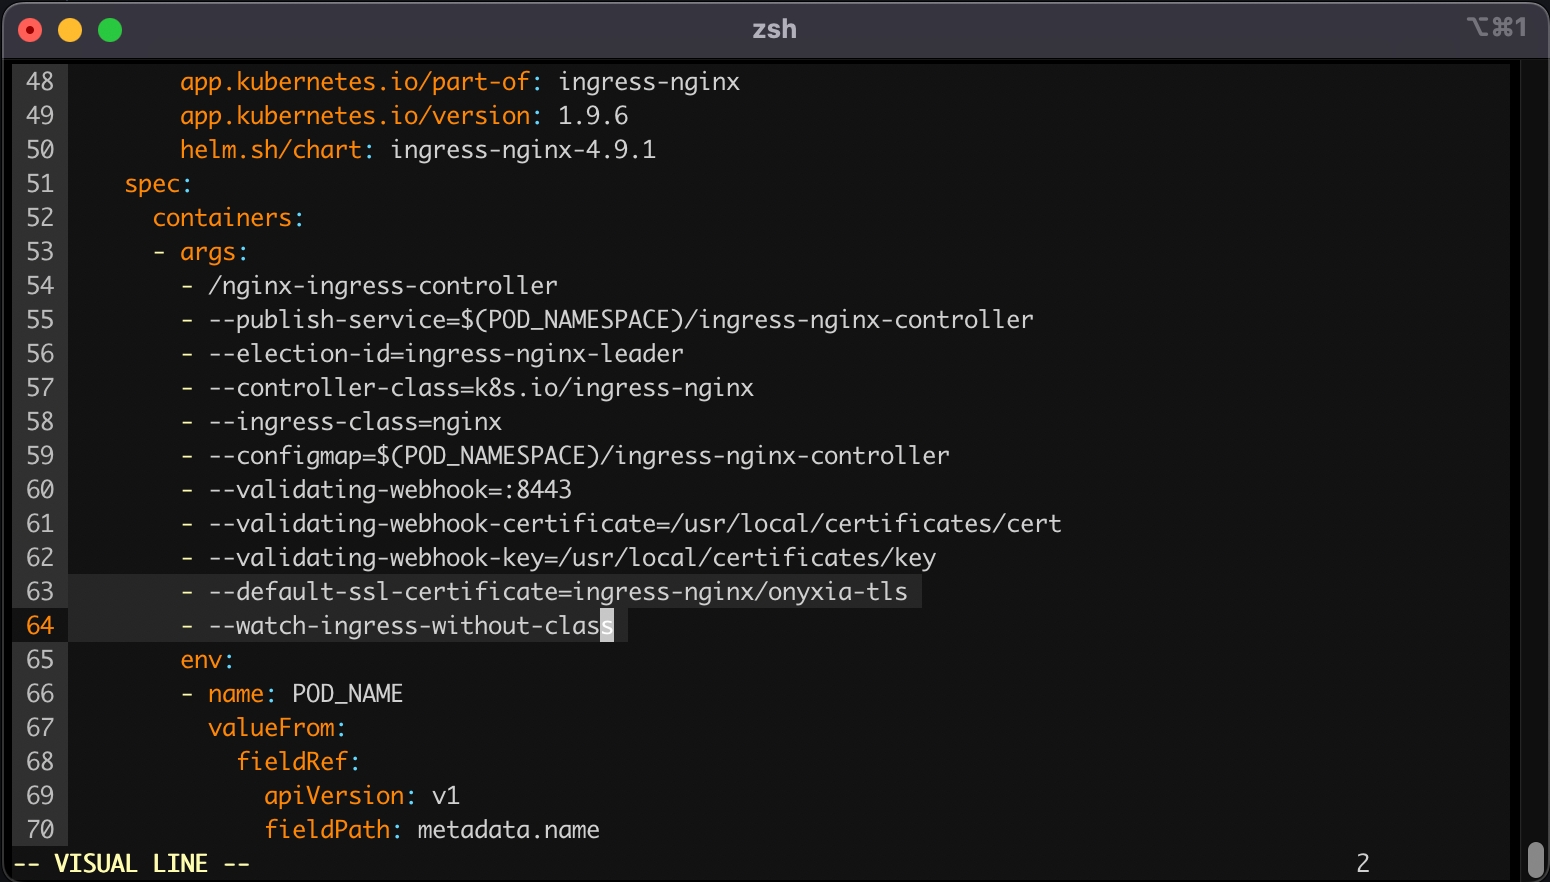
kubectl edit deployment ingress-nginx-controller -n ingress-nginxThis command will open your configured text editor, go to containers -> args and add:
      - --default-ssl-certificate=ingress-nginx/onyxia-tls
      - --watch-ingress-without-class
Save and quit. Done 🎉 We installed the ingress-nginx in our cluster, (but note that any other ingress controller could have been used as well). The configuration was adjusted to handle all ingress objects, even those lacking a specified class, and to employ our SSL certificate for our wildcard certificate. This strategy facilitated an effortless SSL termination, managed by the reverse proxy for both *.lab.my-domain.net and datalab.my-domain.net, thus removing any additional SSL configuration concerns.
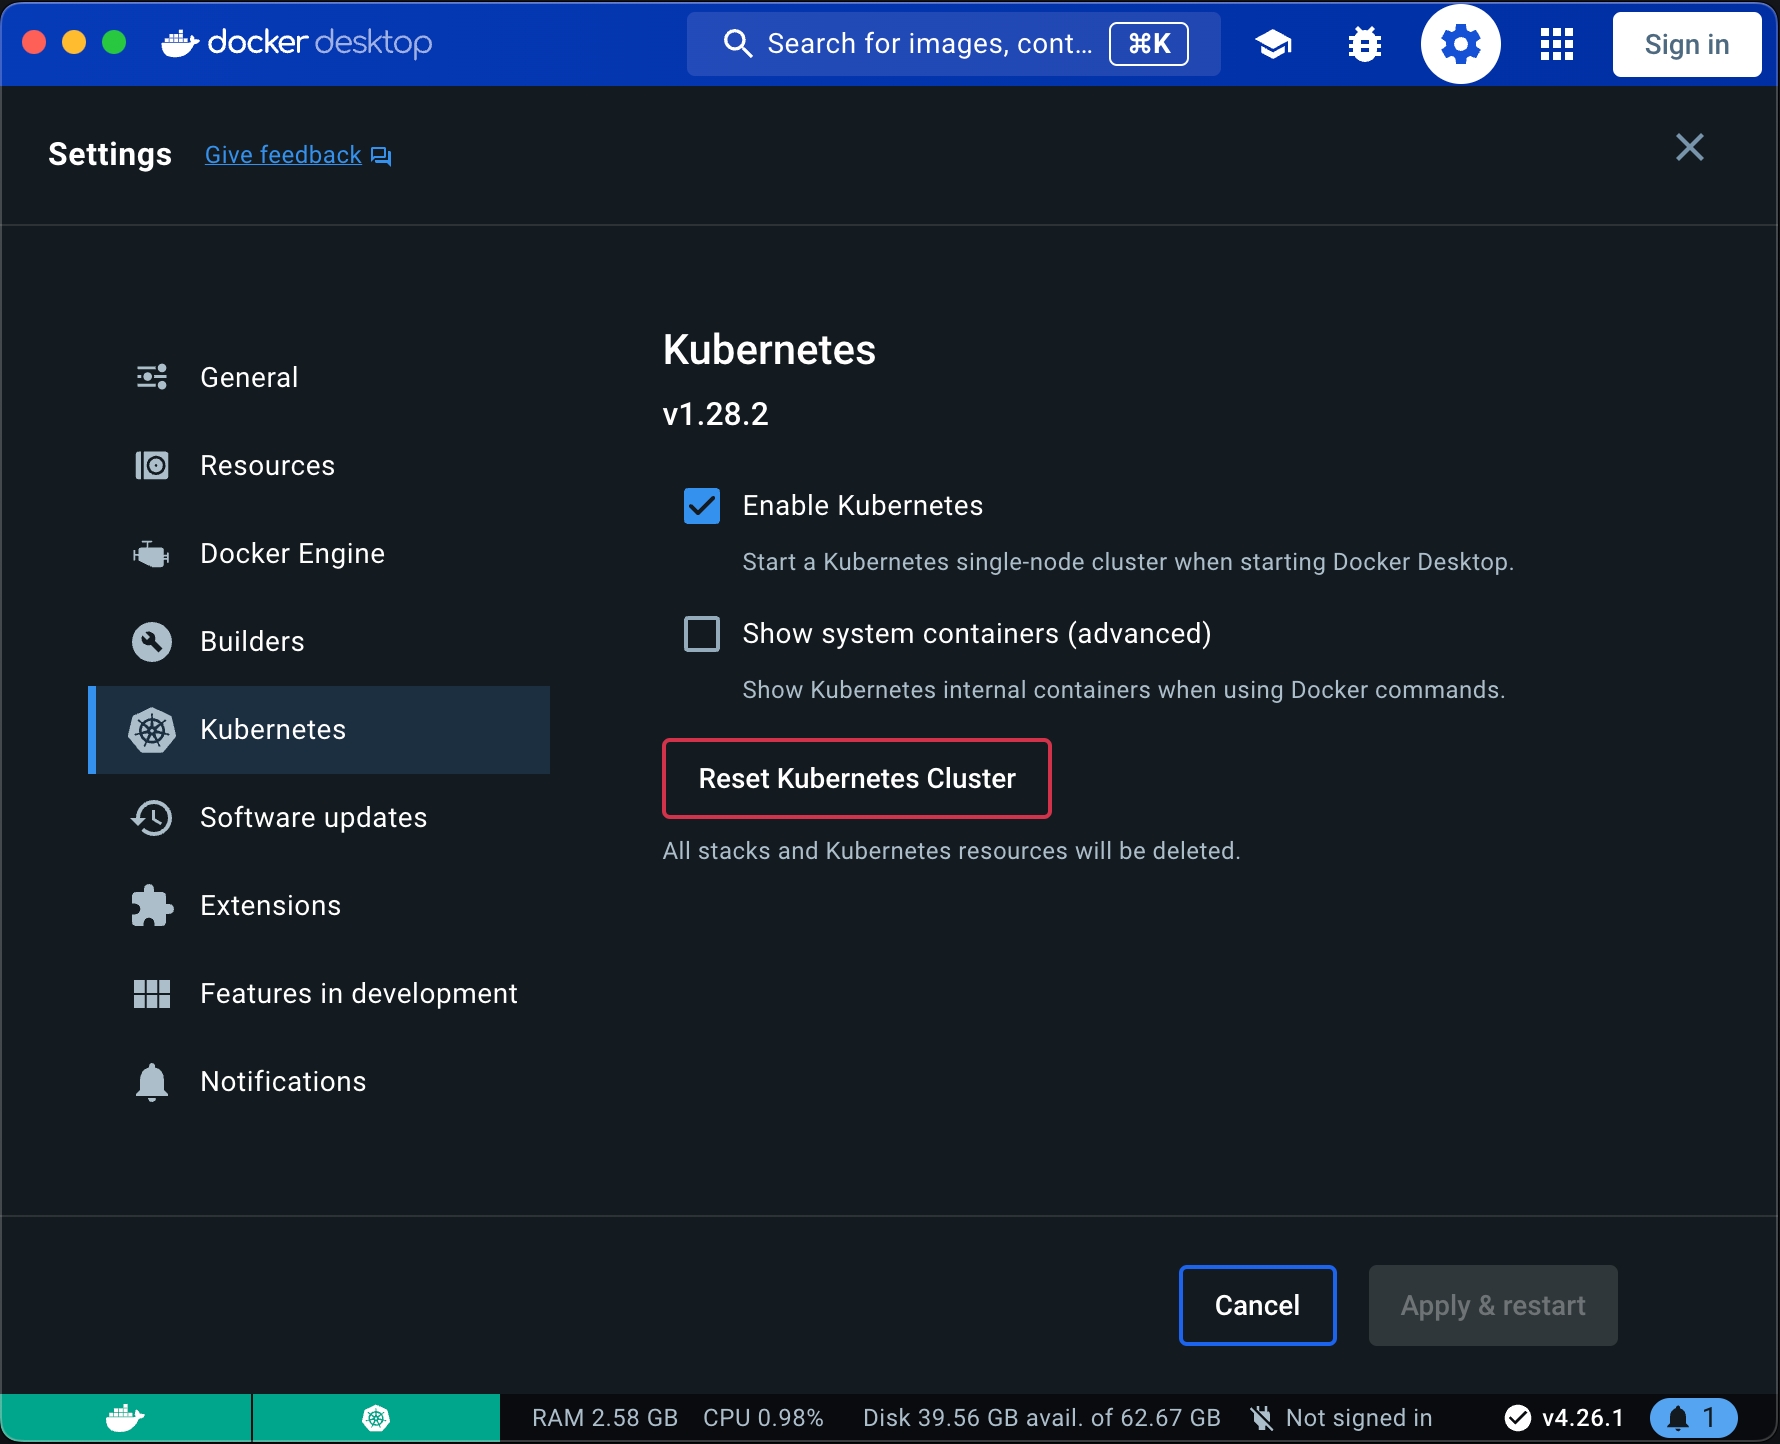
If you are on a Mac or Window computer you can install Docker desktop then enable Kubernetes.
WARNING: If you are folowing this installating guide on an Apple Sillicon Mac, be aware that many of the services that comes by default with Onyxia like Jupyter RStudio and VSCode won't run because we do not yet compile our datacience stack for the ARM64 architecture. If you would like to see this change please sumit an issue about it.
Port Forwarding
You'll need to forward the TCP ports 80 and 443 to your local machine. It's done from the administration panel of your domestic internet Box. If you're on a corporate network you'll have to test onyxia on a remote Kubernetes cluster.
DNS
Let's assume you own the domain name my-domain.net, for the rest of the guide you should replace my-domain.net by a domain you actually own.
Get your internet box routable IP and create the following DNS records:
datalab.my-domain.net A <YOUR_IP>
*.lab.my-domain.net   A <YOUR_IP>
If you have DDNS domain you can create CNAME instead example:
datalab.my-domain.net CNAME jhon-doe-home.ddns.net.
*.lab.my-domain.net   CNAME jhon-doe-home.ddnc.net.
https://datalab.my-domain.net will be the URL for your instance of Onyxia.
The URL of the services created by Onyxia are going to look like: https://xxx.lab.my-domain.net
SSL
In this section we will obtain a TLS certificate issued by LetsEncrypt using the certbot commend line tool.
brew install certbot #On Mac, lookup how to install certbot for your OS

# Because we need a wildcard certificate we have to complete the DNS callange.
sudo certbot certonly --manual --preferred-challenges dns

# When asked for the domains you wish to optains a certificate for enter:
# datalab.my-domain.net *.lab.my-domain.netNow we want to create a Kubernetes secret containing our newly obtained certificate:
# First let's make sure we connect to our local Kube cluser
kubectl config use-context docker-desktop

kubectl create namespace ingress-nginx
DOMAIN=my-domain.net
sudo kubectl create secret tls onyxia-tls \
    -n ingress-nginx \
    --key /etc/letsencrypt/live/datalab.$DOMAIN/privkey.pem \
    --cert /etc/letsencrypt/live/datalab.$DOMAIN/fullchain.pem
Ingress controller
We will install ingress-nginx in our cluster, although any other ingress controller would be suitable as well. The configuration will be set up to handle all ingress objects, including those without a specified class, and to utilize our SSL certificate for our wildcard certificate. This approach ensures a straightforward SSL termination managed by the reverse proxy for both *.lab.my-domain.net and datalab.my-domain.net, eliminating any further concerns regarding SSL setup.
cat << EOF > ./ingress-nginx-values.yaml
controller:
  extraArgs:
    default-ssl-certificate: "ingress-nginx/onyxia-tls"
  watchIngressWithoutClass: true
EOF

helm install ingress-nginx ingress-nginx \
    --repo https://kubernetes.github.io/ingress-nginx \
    --version 4.9.1 \
    --namespace ingress-nginx \
    -f ./ingress-nginx-values.yaml
Now that we have a Kubernetes cluster ready to use let's levrage ArgoCD and GitOps practices to deploy and monitor the core services of our Onyxia Datalab.
Enable S3 storage via MinIO S3
Onyxia uses AWS Security Token Service API to obtain S3 tokens on behalf of your users. We support any S3 storage compatible with this API. In this context, we are using MinIO, which is compatible with the Amazon S3 storage service and we demonstrate how to integrate it with Keycloak.
Before configuring MinIO, let's create a new Keycloak client (from the previous existing "datalab" realm).
Before deploying MinIO on the cluster let's set, in the MinIO configuration file, the OIDC client secret we have copied in the previous step.
git clone https://github.com/<your-github-org>/onyxia-ops
cd onyxia-ops
cd apps/minio
# In the values.yaml file replace `$KEYCLOAK_MINIO_CLIENT_SECRET` by the value
# you have copied in the previous step.
git commit -am "Set minio OIDC client secret"
git push
Once you've done that you can deploy MinIO!
Before configuring the onyxia region to create tokens we should go back to Keycloak and create a new client to enable onyxia-web to request token for MinIO. This client is a little bit more complex than other if you want to manage durations (here 7 days) and this client should have a claim name policy and with a value of stsonly according to our last deployment of MinIO.
Now let's update our Onyxia configuration to let it know that there is now a S3 server available on the cluster.
git clone https://github.com/<your-github-org>/onyxia-ops
cd onyxia-ops
cd apps/onyxia
mv values-minio-enabled.yaml.yaml values.yaml
git commit -am "Enable MinIO"
git push
Diff of the changes applied to the Onyxia configuration:
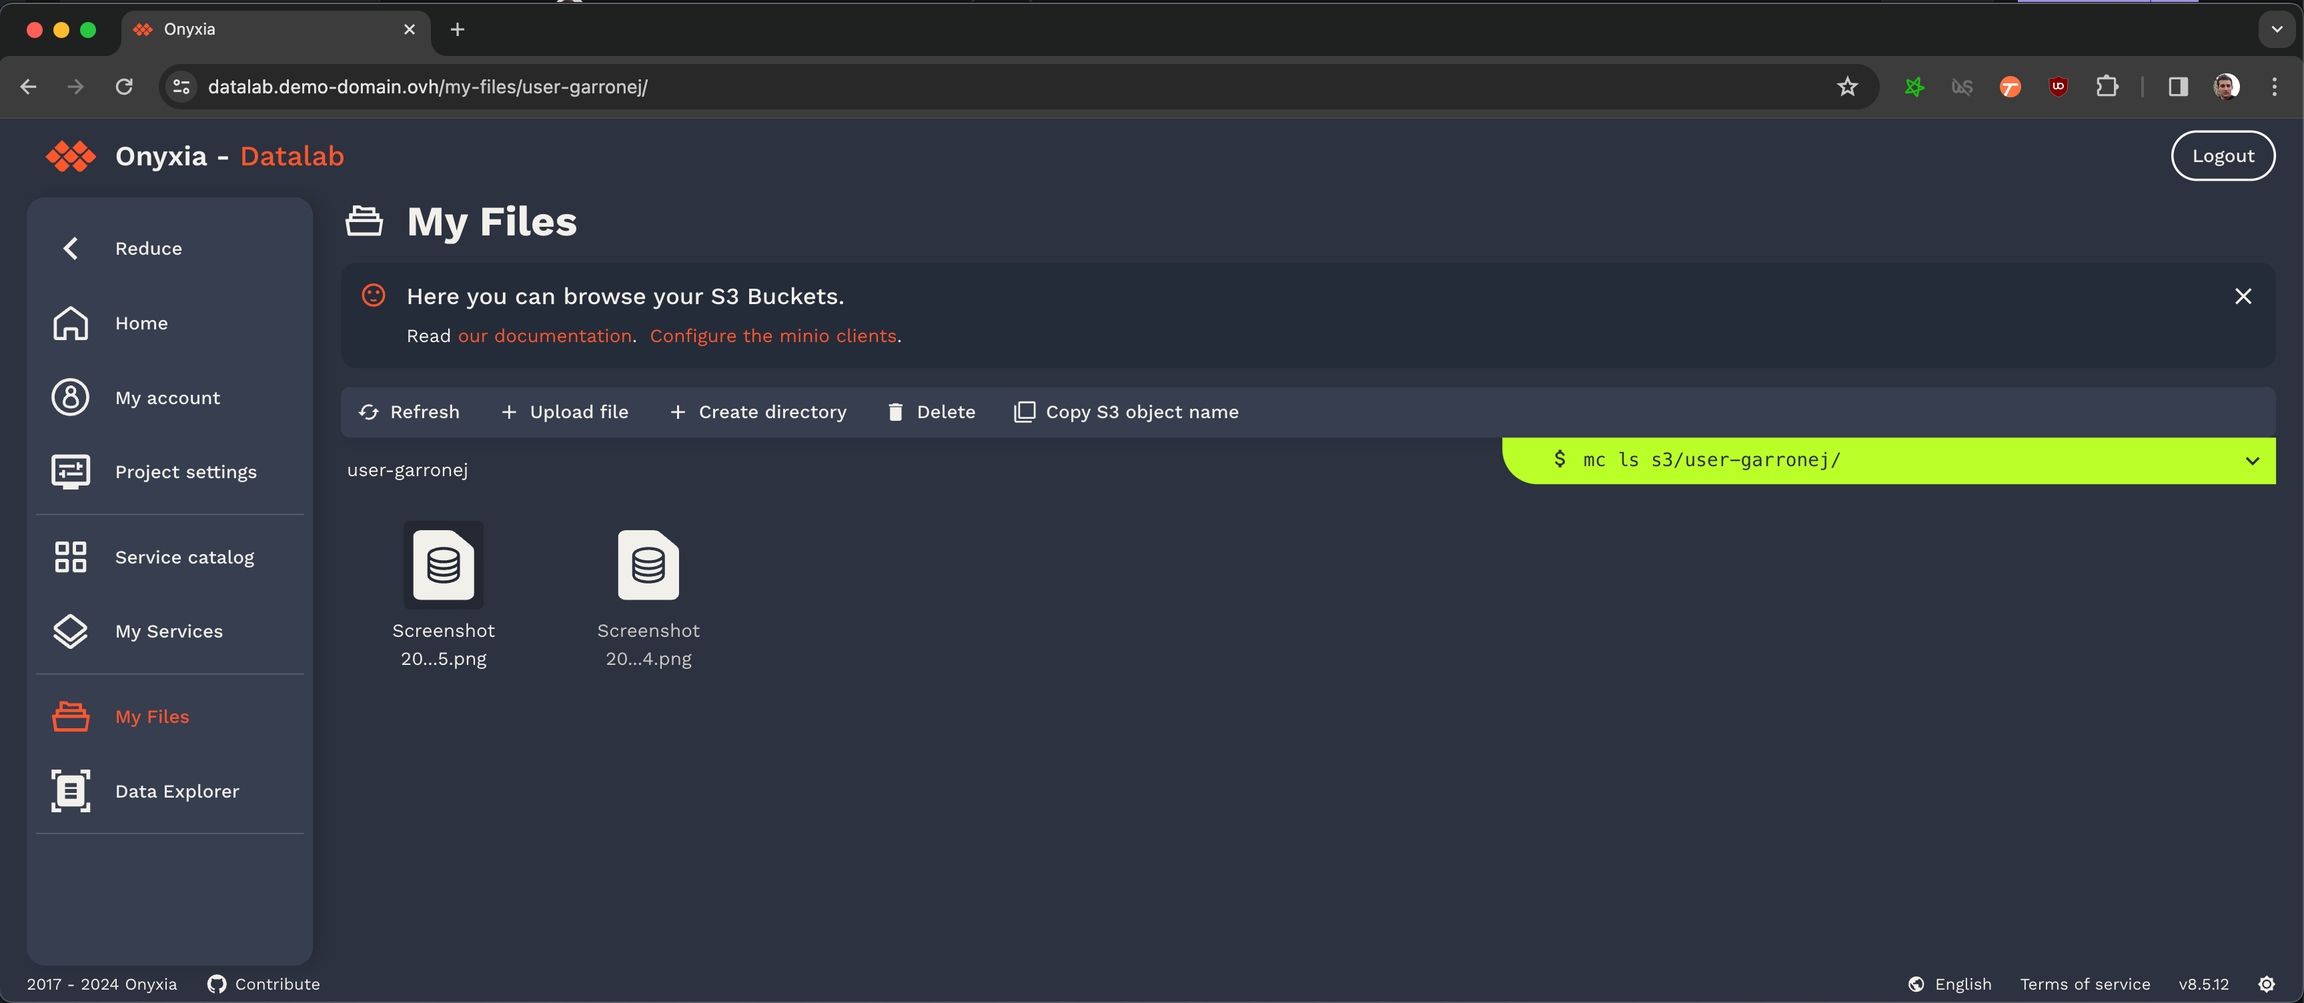
Congratulation, all the S3 related features of Onyxia are now enabled in your instance! Now if you navigate to your Onyxia instance you should have My Files in the left menu.
Next step in the installation process is to setup Vault to provide a way to your user so store secret and also to provide something that Onyxia can use as a persistance layer for user configurations.
Using Keycloak to enable user authentication
Let's setup Keycloak to enable users to create account and login to our Onyxia instance.
Note that in this installation guide we make you use Keycloak but you can use any OIDC compliant provider like Entra ID or Auth0. See the following gide for specific instructions for different provider and detailed authentication related configuration options.
We're going to install Keycloak just like we installed Onyxia.
Before anything open apps/keycloak/values.yaml in your onyxia-ops repo and . Also write down the keycloak.auth.adminPassword, you'll need it to connect to the Keycloak console.
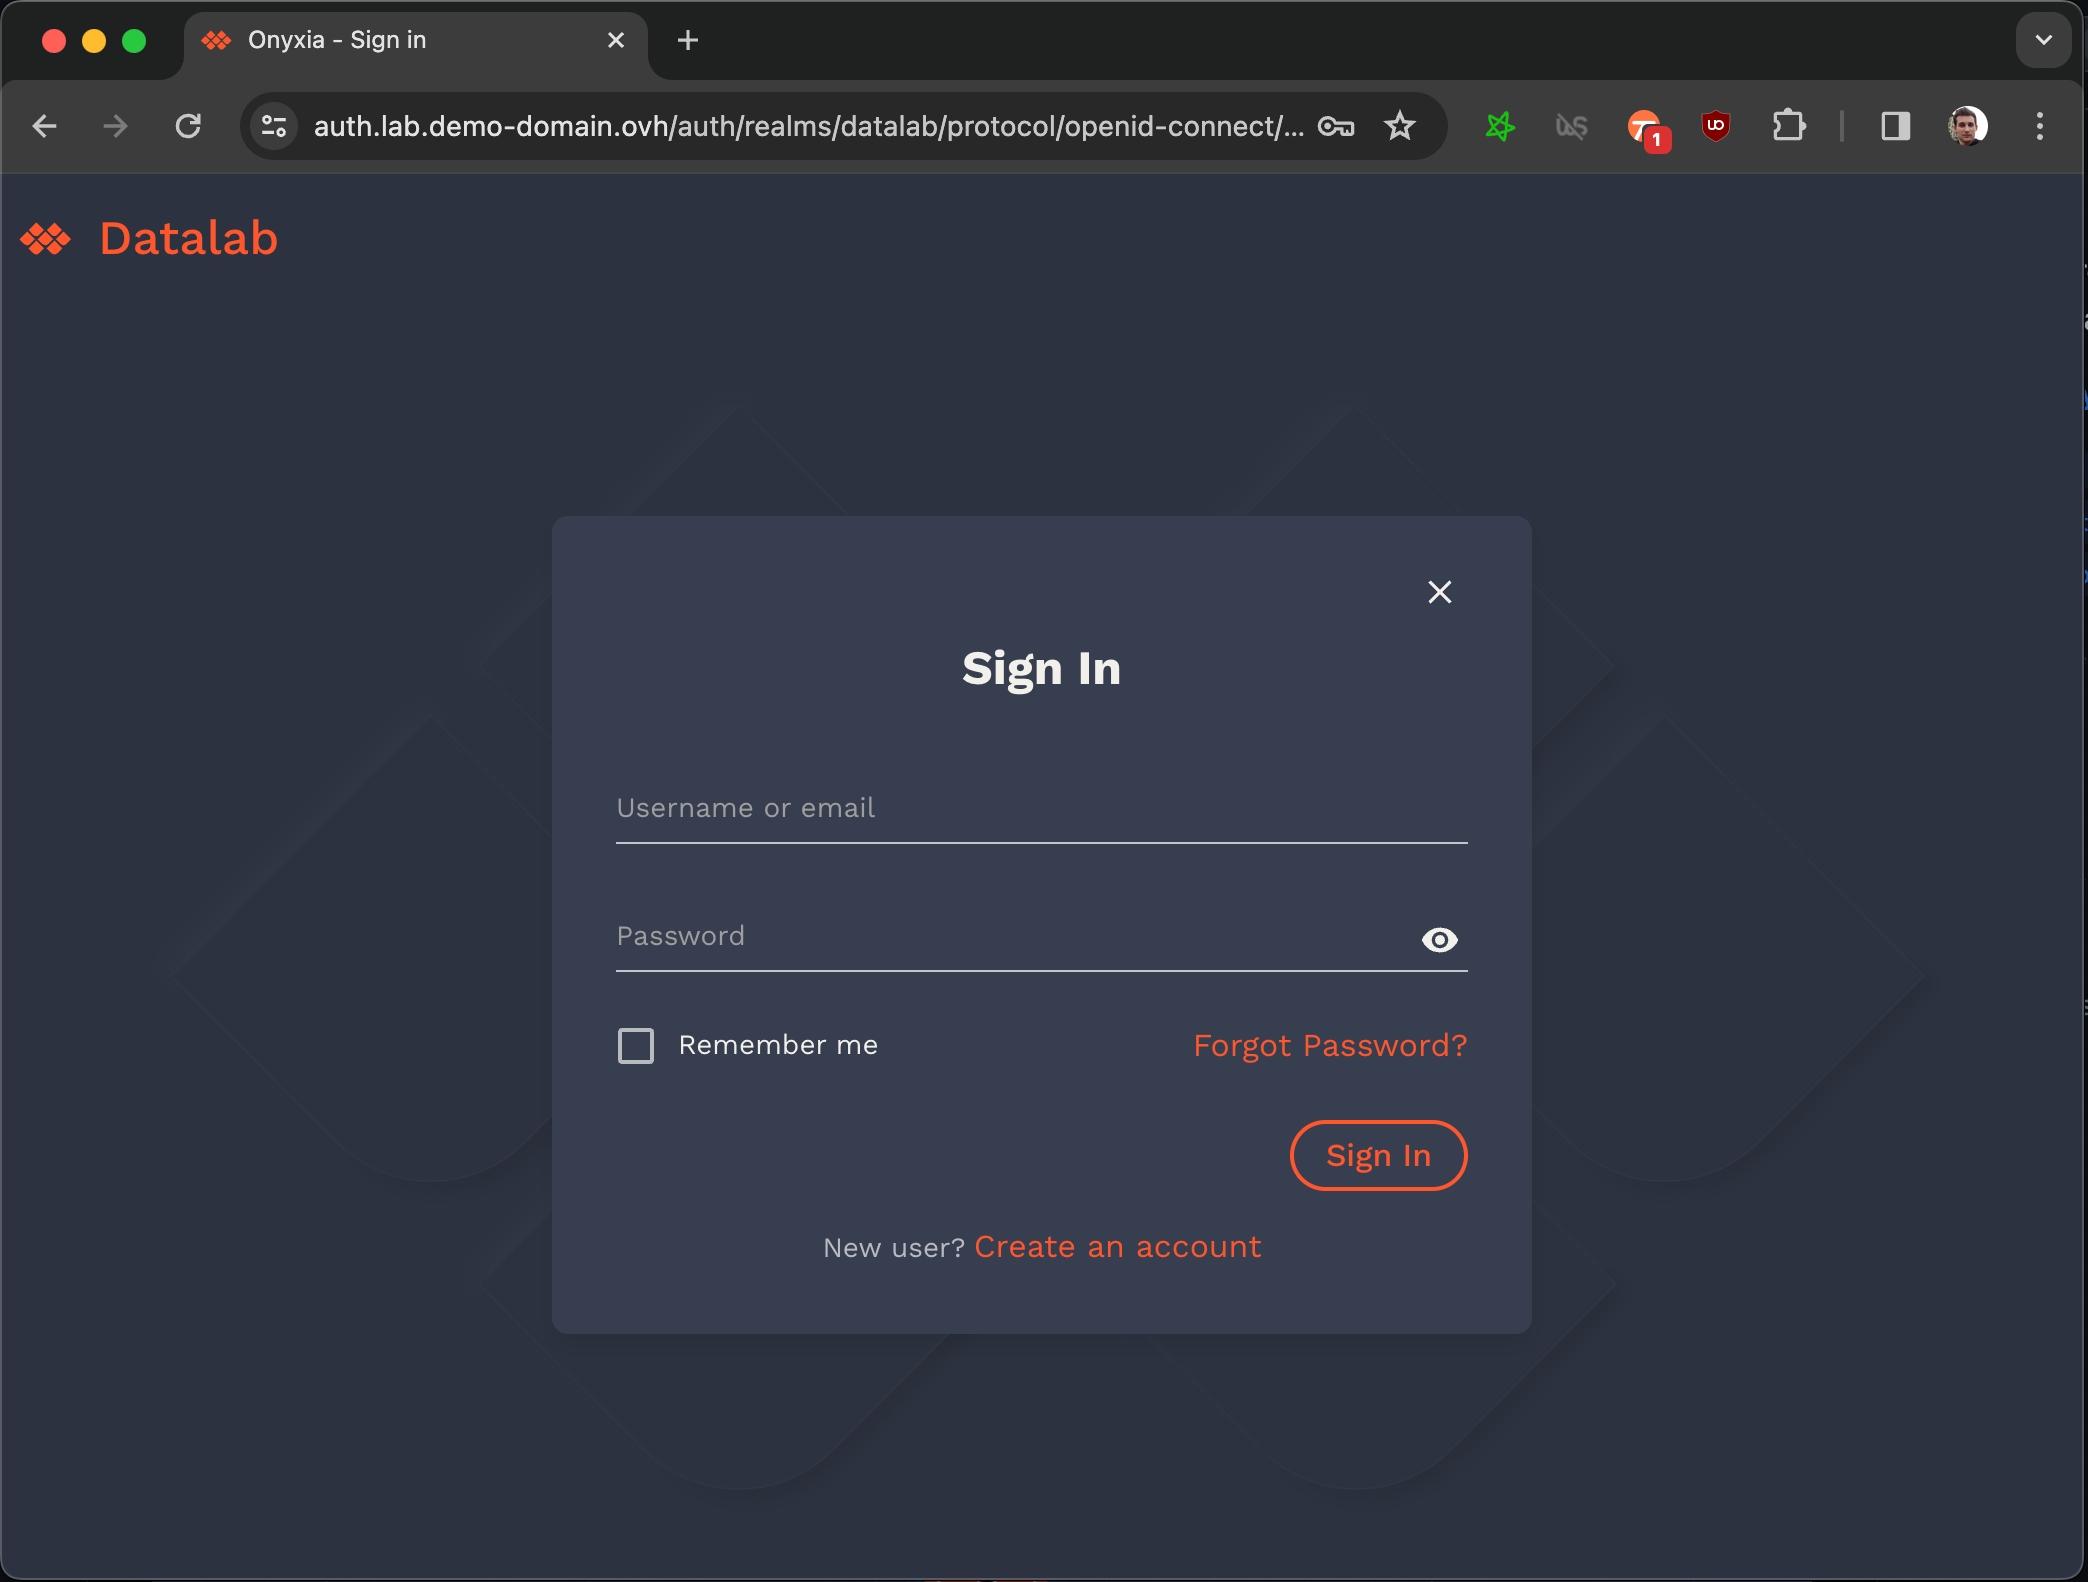
You can now login to the administration console of https://auth.lab.my-domain.net/auth/ and login using username: keycloak and password: <the one you've wrote down earlier>.
Create a realm called "datalab" (or something else), go to Realm settings
On the tab General
User Profile Enabled: On
On the tab login
User registration: On
Forgot password: On
Remember me: On
On the tab email, we give an example with AWS SES, if you don't have a SMTP server at hand you can skip this by going to Authentication (on the left panel) -> Tab Required Actions -> Uncheck "set as default action" Verify Email. Be aware that with email verification disable, anyone will be able to sign up to your service.
From: [email protected]
Host: email-smtp.us-east-2.amazonaws.com
Port: 465
Authentication: enabled
Username: **************
Password: ***************************************
When clicking "save" you'll be asked for a test email, you have to provide one that correspond to a pre-existing user or you will get a silent error and the credentials won't be saved.
On the tab Themes
Login theme: onyxia-web (you can also select the login theme on a per client basis)
Email theme: onyxia-web
On the tab Localization
Internationalization: Enabled
Supported locales: <Select the languages you wish to support>
On the tab Session.
Users without "Remember Me" will need to log in every 2 weeks:
Set Session idle timeout: 14 days.
Set Session max idle timeout: 14 days.
Users who checked "Remember Me" should stay logged in for 1 year:
Set Session idle timeout (Remember Me): 365 days.
Set Session max idle timeout (Remember Me): 365 days.
Create a client with client ID "onyxia"
Root URL: https://datalab.my-domain.net/
Valid redirect URIs: https://datalab.my-domain.net/
Login theme: onyxia-web
In Authentication (on the left panel) -> Tab Required Actions enable and set as default action Therms and Conditions.
Now you want to ensure that the username chosen by your users complies with Onyxia requirement (only alphanumerical characters) and define a list of email domain allowed to register to your service.
Go to Realm Settings (on the left panel) -> Tab User Profile -> JSON Editor.
Now you can edit the file as suggested in the following DIFF snippet. Be mindful that in this example we only allow emails @gmail.com and @hotmail.com to register you want to edit that.
{
  "attributes": [
    {
      "name": "username",
      "displayName": "${username}",
      "validations": {
        "length": {
          "min": 3,
          "max": 255
        },
+       "pattern": {
+         "error-message": "${lowerCaseAlphanumericalCharsOnly}",
+         "pattern": "^[a-z0-9]*$"
+       },
        "username-prohibited-characters": {}
      }
    },
    {
      "name": "email",
      "displayName": "${email}",
      "validations": {
        "email": {},
+       "pattern": {
+         "pattern": "^[^@]+@([^.]+\\.)*((gmail\\.com)|(hotmail\\.com))$"
+       },
        "length": {
          "max": 255
        }
      }
    },
...
Now our Keycloak server is fully configured we just need to update our Onyxia deployment to let it know about it.
In your GitOps repo you now want to update your onyxia configuration.
git clone https://github.com/<your-github-org>/onyxia-ops
cd onyxia-ops
cd apps/onyxia
mv values-keycloak-enabled.yaml values.yaml
git commit -am "Enable keycloak"
git push
Here is the DIFF of the onyxia configuration:
Now your users should be able to create account, log-in, and start services on their own Kubernetes namespace.
Next step in the installation proccess it to enable all the S3 related features of Onyxia:
Onyxia-web uses vault as a storage for two kinds of secrets: 1. secrets or information generated by Onyxia to store different values (S3 sources configuration) 2. user secrets\
Onyxia uses the KV version 2 secret engine. Vault must be configured with JWT or OIDC authentification methods.
As Vault needs to be initialized with a master key, it can't be directly configured with all parameters such as oidc or access policies and roles. So first step we create a vault with dev mode (do not use this in production and do your initialization with any of the recommanded configuration: Shamir, gcp, another vault).
helm repo add hashicorp https://helm.releases.hashicorp.com

DOMAIN=my-domain.net

cat << EOF > ./vault-values.yaml
server:
  dev:
    enabled: true
    # Set VAULT_DEV_ROOT_TOKEN_ID value
    devRootToken: "root"
  ingress:
    enabled: true
    annotations:
      kubernetes.io/ingress.class: nginx
    hosts:
      - host: "vault.lab.$DOMAIN"
    tls:
      - hosts:
          - vault.lab.$DOMAIN
EOF

helm install vault hashicorp/vault -f vault-values.yamlFrom Keycloak, create a client called "vault" (realm "datalab" as usually in this documentation)
Root URL: https://vault.lab.my-domain.net/
Valid redirect URIs: https://vault.lab.my-domain.net/* and https://datalab.my-domain.net/*
Web origins: *
The expected value for the audience (aud) field of the JWT token by Vault is vault. You need to configure this in Keycloak.
Create a new Client scope: vault
Add Mapper by configuration
Choose Audience
Name: Audience for Vault
Included Client Audience: vault
Save
Choose Clients: vault
Add Client Scope: vault
We will now configure Vault to enable JWT support, set policies for users permissions and initialize the secret engine.
You will need the Vault CLI. You can either download it here and configure VAULT_ADDR=https://vault.lab.my-domain.net and VAULT_TOKEN=root or exec into the vault pod kubectl exec -it vault-0 -n vault -- /bin/sh which will have vault CLI installed and pre-configured.
First, we start by creating a JWT endpoint in Vault, and writing information about Keycloak to the configuration. We use the same realm as usually in this documentation.
vault auth enable jwtvault write auth/jwt/config \
oidc_discovery_url="https://auth.lab.my-domain.net/auth/realms/datalab" \
default_role="onyxia-user"Onyxia uses only one single role for every user in Vault. This is in this tutorial onyxia-user`. To provide an authorization mechanism a policy is used that will depend on claims inside the JWT token.
First you need to get the identifier (mount accessor) for the JWT authentification just created. You can use :
vault auth list -format=json | jq -r '.["jwt/"].accessor'which should provide you something like auth_jwt_xyz. You will need it to write a proper policy by replacing the auth_jwt_xyz content with your own value.
Create locally a file named onyxia-policy.hcl.
You can notice that this policy is written for a KV version 2 secret engine mounted to the onyxia-kv path. The following policy is only working for personnal access because the entity name will be the preferred username in the JWT token.
path "onyxia-kv/user-{{identity.entity.aliases.auth_jwt_xyz.name}}/*" {
  capabilities = ["create","update","read","delete","list"]
}

path "onyxia-kv/data/user-{{identity.entity.aliases.auth_jwt_xyz.name}}/*" {
  capabilities = ["create","update","read"]
}

path "onyxia-kv/metadata/user-{{identity.entity.aliases.auth_jwt_xyz.name}}/*" {
  capabilities = ["delete", "list", "read"]
}Allowing personal Vault tokens to access group storage in Vault is a bit more complex. We will map the group from the token into the entity’s metadata. The following policy maps the first 10 groups statically.
If you have suggestions for a better authorization mechanism within Vault, please share them with us on Slack, as the current approach is not ideal.
path "onyxia-kv/user-{{identity.entity.aliases.auth_jwt_xyz.name}}/*" {
  capabilities = ["create","update","read","delete","list"]
}

path "onyxia-kv/data/user-{{identity.entity.aliases.auth_jwt_xyz.name}}/*" {
  capabilities = ["create","update","read"]
}

path "onyxia-kv/metadata/user-{{identity.entity.aliases.auth_jwt_xyz.name}}/*" {
  capabilities = ["delete", "list", "read"]
}

path "onyxia-kv/projet-{{identity.entity.aliases.auth_jwt_xyz.metadata.group0}}/*" {
  capabilities = ["create","update","read","delete","list"]
}

path "onyxia-kv/data/projet-{{identity.entity.aliases.auth_jwt_xyz.metadata.group0}}/*" {
  capabilities = ["create","update","read"]
}

path "onyxia-kv/metadata/projet-{{identity.entity.aliases.auth_jwt_xyz.metadata.group0}}/*" {
  capabilities = ["delete", "list", "read"]
}

path "onyxia-kv/projet-{{identity.entity.aliases.auth_jwt_xyz.metadata.group1}}/*" {
  capabilities = ["create","update","read","delete","list"]
}

path "onyxia-kv/data/projet-{{identity.entity.aliases.auth_jwt_xyz.metadata.group1}}/*" {
  capabilities = ["create","update","read"]
}

path "onyxia-kv/metadata/projet-{{identity.entity.aliases.auth_jwt_xyz.metadata.group1}}/*" {
  capabilities = ["delete", "list", "read"]
}

path "onyxia-kv/projet-{{identity.entity.aliases.auth_jwt_xyz.metadata.group2}}/*" {
  capabilities = ["create","update","read","delete","list"]
}

path "onyxia-kv/data/projet-{{identity.entity.aliases.auth_jwt_xyz.metadata.group2}}/*" {
  capabilities = ["create","update","read"]
}

path "onyxia-kv/metadata/projet-{{identity.entity.aliases.auth_jwt_xyz.metadata.group2}}/*" {
  capabilities = ["delete", "list", "read"]
}

path "onyxia-kv/projet-{{identity.entity.aliases.auth_jwt_xyz.metadata.group3}}/*" {
  capabilities = ["create","update","read","delete","list"]
}

path "onyxia-kv/data/projet-{{identity.entity.aliases.auth_jwt_xyz.metadata.group3}}/*" {
  capabilities = ["create","update","read"]
}

path "onyxia-kv/metadata/projet-{{identity.entity.aliases.auth_jwt_xyz.metadata.group3}}/*" {
  capabilities = ["delete", "list", "read"]
}

path "onyxia-kv/projet-{{identity.entity.aliases.auth_jwt_xyz.metadata.group4}}/*" {
  capabilities = ["create","update","read","delete","list"]
}

path "onyxia-kv/data/projet-{{identity.entity.aliases.auth_jwt_xyz.metadata.group4}}/*" {
  capabilities = ["create","update","read"]
}

path "onyxia-kv/metadata/projet-{{identity.entity.aliases.auth_jwt_xyz.metadata.group4}}/*" {
  capabilities = ["delete", "list", "read"]
}

path "onyxia-kv/projet-{{identity.entity.aliases.auth_jwt_xyz.metadata.group5}}/*" {
  capabilities = ["create","update","read","delete","list"]
}

path "onyxia-kv/data/projet-{{identity.entity.aliases.auth_jwt_xyz.metadata.group5}}/*" {
  capabilities = ["create","update","read"]
}

path "onyxia-kv/metadata/projet-{{identity.entity.aliases.auth_jwt_xyz.metadata.group5}}/*" {
  capabilities = ["delete", "list", "read"]
}

path "onyxia-kv/projet-{{identity.entity.aliases.auth_jwt_xyz.metadata.group6}}/*" {
  capabilities = ["create","update","read","delete","list"]
}

path "onyxia-kv/data/projet-{{identity.entity.aliases.auth_jwt_xyz.metadata.group6}}/*" {
  capabilities = ["create","update","read"]
}

path "onyxia-kv/metadata/projet-{{identity.entity.aliases.auth_jwt_xyz.metadata.group6}}/*" {
  capabilities = ["delete", "list", "read"]
}

path "onyxia-kv/projet-{{identity.entity.aliases.auth_jwt_xyz.metadata.group7}}/*" {
  capabilities = ["create","update","read","delete","list"]
}

path "onyxia-kv/data/projet-{{identity.entity.aliases.auth_jwt_xyz.metadata.group7}}/*" {
  capabilities = ["create","update","read"]
}

path "onyxia-kv/metadata/projet-{{identity.entity.aliases.auth_jwt_xyz.metadata.group7}}/*" {
  capabilities = ["delete", "list", "read"]
}

path "onyxia-kv/projet-{{identity.entity.aliases.auth_jwt_xyz.metadata.group8}}/*" {
  capabilities = ["create","update","read","delete","list"]
}

path "onyxia-kv/data/projet-{{identity.entity.aliases.auth_jwt_xyz.metadata.group8}}/*" {
  capabilities = ["create","update","read"]
}

path "onyxia-kv/metadata/projet-{{identity.entity.aliases.auth_jwt_xyz.metadata.group8}}/*" {
  capabilities = ["delete", "list", "read"]
}

path "onyxia-kv/projet-{{identity.entity.aliases.auth_jwt_xyz.metadata.group9}}/*" {
  capabilities = ["create","update","read","delete","list"]
}

path "onyxia-kv/data/projet-{{identity.entity.aliases.auth_jwt_xyz.metadata.group9}}/*" {
  capabilities = ["create","update","read"]
}

path "onyxia-kv/metadata/projet-{{identity.entity.aliases.auth_jwt_xyz.metadata.group9}}/*" {
  capabilities = ["delete", "list", "read"]
}
Once the policy file is created, we can proceed with creating the policy.
vault policy write onyxia-policy onyxia-policy.hclWe can go on with the role onyxia-user.
vault write auth/jwt/role/onyxia-user \
    role_type="jwt" \
    bound_audiences="vault" \
    user_claim="preferred_username" \
    claim_mappings="/groups/0=group0,/groups/1=group1,/groups/2=group2,/groups/3=group3,/groups/4=group4,/groups/5=group5,/groups/6=group6,/groups/7=group7,/groups/8=group8,/groups/9=group9" \
    token_policies="onyxia-policy"
We need to enable the secret engine.
vault secrets enable -path=onyxia-kv kv-v2Then, you need to allow the URL https://datalab.my-domain.net in Vault's CORS settings.
vault write sys/config/cors allowed_origins="https://datalab.my-domain.net" enabled=trueYou can finally modify your onyxia config file (in the helm values) 🎉
onyxia:
  web:
    # ...
  api:
    # ...
    regions:
      [
        {
          "id": "paris",
          ...
          "services": {...},
          "data": {...},
          "vault": {
              "URL": "https://vault.lab.my-domain.net",
              "kvEngine": "onyxia-kv",
              "role": "onyxia-user",
              "authPath": "jwt",
              "prefix": "user-",
              "groupPrefix" : "",
              "oidcConfiguration":
                {
                  "issuerURI": "https://auth.lab.my-domain.net/auth/realms/datalab",
                  "clientID": "vault",
                }
          }

    ]

Let's install ArgoCD to manage and monitor our Onyxia Datalab deployment!
We can proceed with manually installing various services via Helm to set up the datalab. However, it's more convenient and reproducible to maintain a Git repository that outlines the required services that we need for our datalab, allowing ArgoCD to handle the deployment for us.
To clarify, using ArgoCD is merely an approach that we recommend, but it is by no means a requirement. Feel free to manually helm install the different services using the values.yaml from InseeFrLab/onyxia-ops!
Let's install ArgoCD on the cluster.
DOMAIN=my-domain.net
cat << EOF > ./argocd-values.yaml
server:
extraArgs:
- --insecure
ingress:
#ingressClassName: nginx
enabled: true
hostname: argocd.lab.$DOMAIN
extraTls:
- hosts:
- argocd.lab.$DOMAIN
EOF
helm install argocd argo-cd \
--repo https://argoproj.github.io/argo-helm \
--version 6.0.9 \
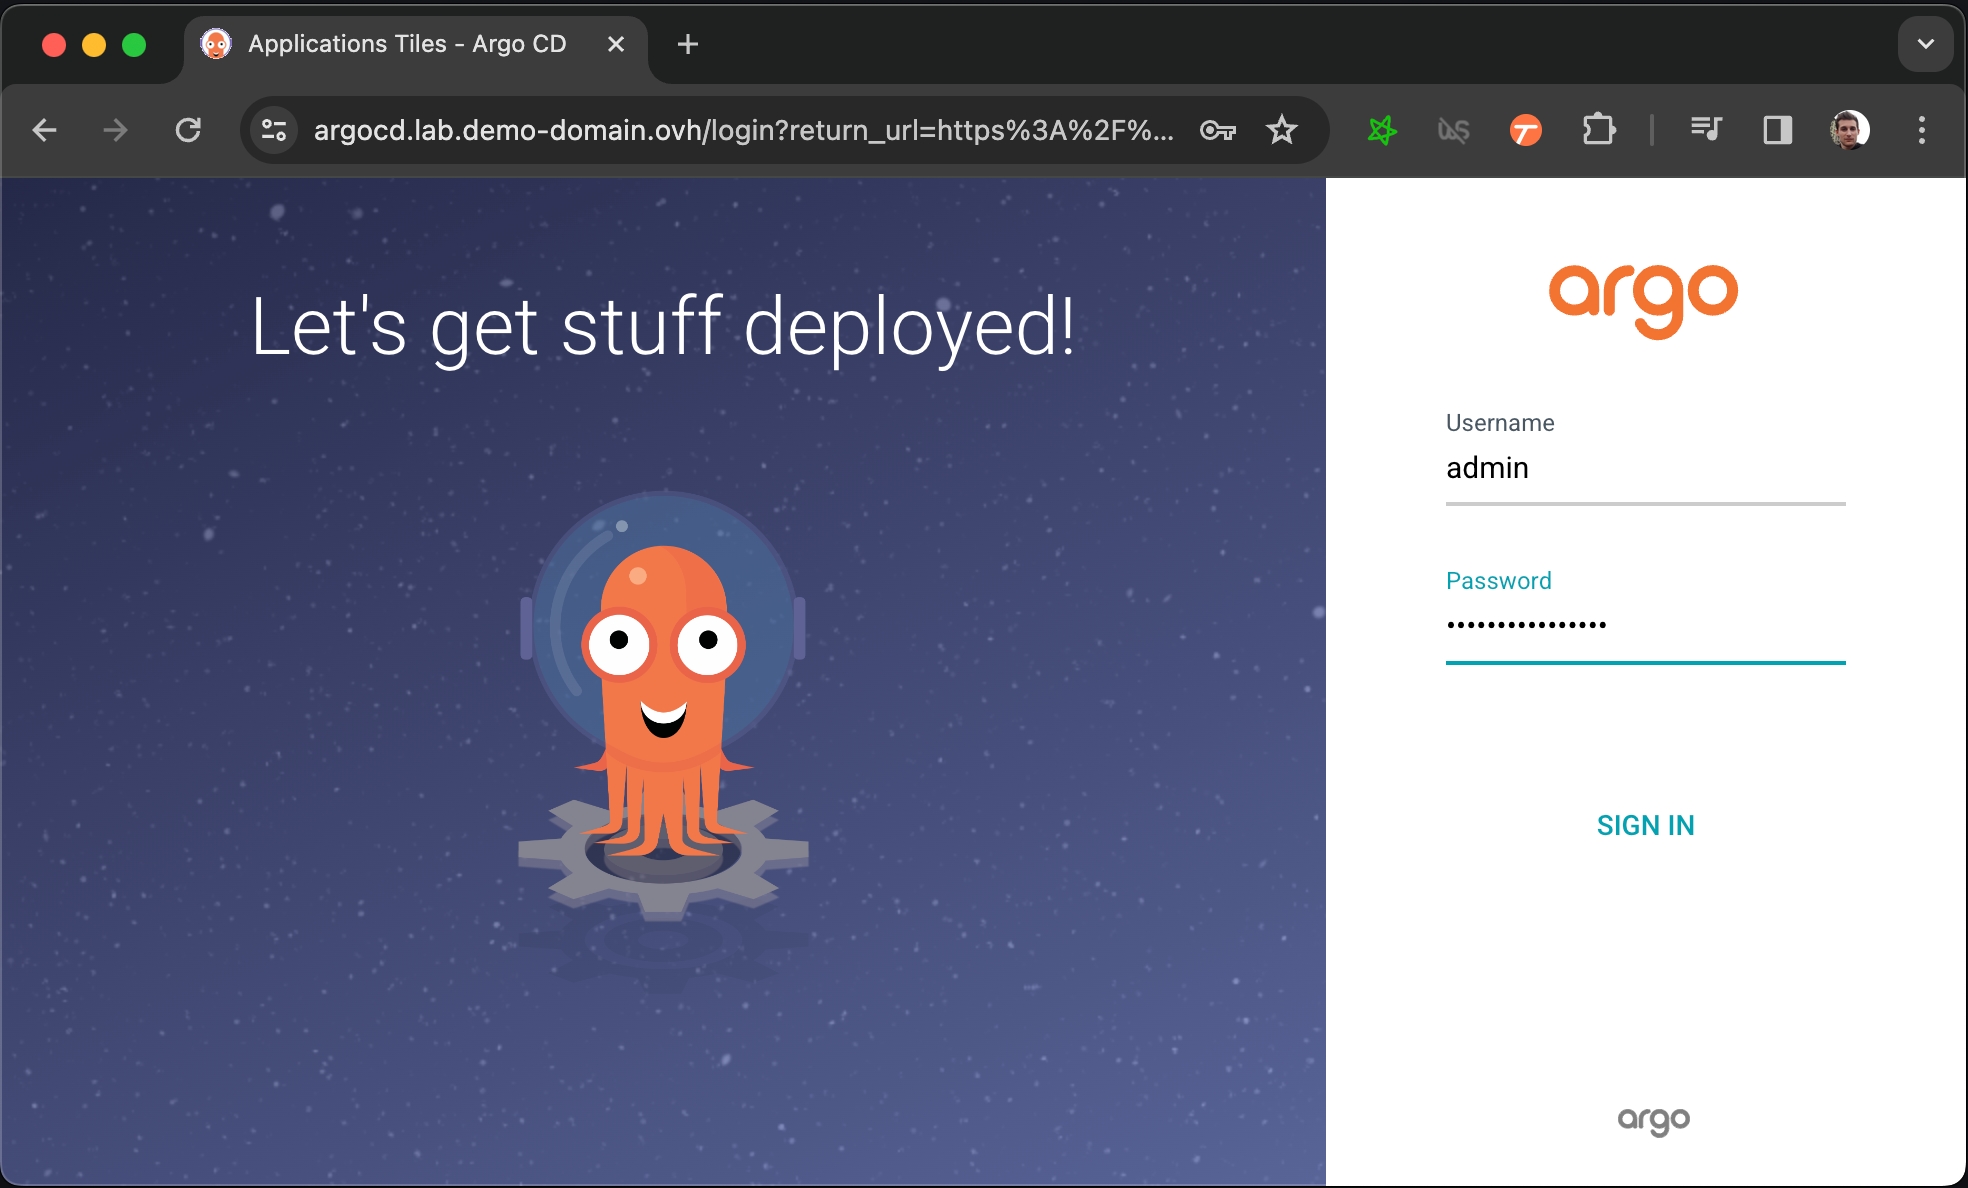
-f ./argocd-values.yamlNow you have to get the password that have been automatically generated to protect ArgoCD's admin console.
Allow some time for ArgoCD to start, you can follow the progress by running kubectl get pods and making sure that all pod are ready 1/1. After that running this command will print the password:
kubectl get secret argocd-initial-admin-secret \
  -o jsonpath="{.data.password}" | base64 -d
You can now login to https://argocd.lab.my-domain.net using:
username: admin
password: <the output of the previous command (without the % at the end)>
Now that we have an ArgoCD we want to connect it to a Git repository that will describe what services we want to be running on our cluster.
Let's fork the onyxia-ops GitHub repo and use it to deploy an Onyxia instance!
At this point you should have a very bare bone Onyxia instance that you can use to launch services.
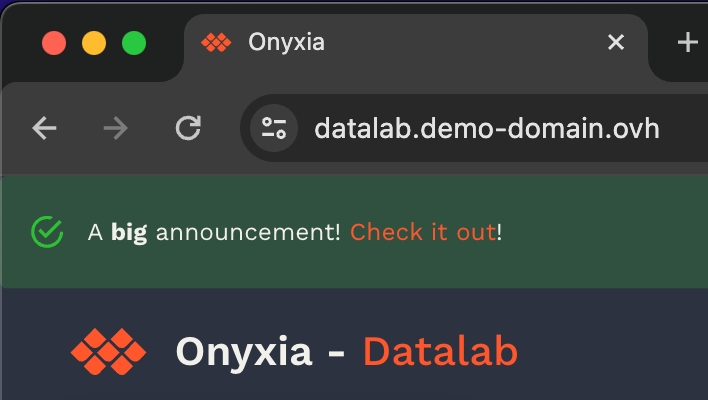
What's great, is that now, if you want to update the configuration of your Onyxia instance you only have to commit the change to your GitOps repo, ArgoCD will takes charge of restarting the service for you with the new configuration. To put that to the test try to modify your Onyxia configuration by setting up a global alert that will be shown as a banner to all users!
 onyxia:
   ingress:
     enabled: true
     hosts:
       - host: datalab.demo-domain.ovh
   web:
     env:
+      GLOBAL_ALERT: |
+       {
+         severity: "success",
+         message: {
+           en: "A **big** announcement! [Check it out](https://example.com)!",
+           fr: "Une annonce **importante**! [Regardez](https://example.com)!"
+         }
+       }
   api:
     regions: [...]
After a few seconds, if you reload https://datalab.my-domain.net you should see the message!\
Next step is to see how to enable your user to authenticate themselvs to your datalab!