Loading...
Loading...
Loading...
Loading...
Loading...
Loading...
Loading...
Loading...
Loading...
Loading...
Loading...
Loading...
Loading...
Loading...
Loading...
Loading...
Loading...
Loading...
Loading...
Loading...
Loading...
Loading...
Loading...
Loading...
Loading...
Loading...
Loading...
Loading...
Loading...
Loading...
Loading...
Loading...
Loading...
Loading...
Loading...
Loading...
Loading...
Loading...
Loading...
Let's install ArgoCD to manage and monitor our Onyxia Datalab deployment!
We can proceed with manually installing various services via Helm to set up the datalab. However, it's more convenient and reproducible to maintain a Git repository that outlines the required services that we need for our datalab, allowing ArgoCD to handle the deployment for us.
To clarify, using ArgoCD is merely an approach that we recommend, but it is by no means a requirement. Feel free to manually helm install the different services using the values.yaml from InseeFrLab/onyxia-ops!
Let's install ArgoCD on the cluster.
DOMAIN=my-domain.net
cat << EOF > ./argocd-values.yaml
server:
extraArgs:
- --insecure
ingress:
#ingressClassName: nginx
enabled: true
hostname: argocd.lab.$DOMAIN
extraTls:
- hosts:
- argocd.lab.$DOMAIN
EOF
helm install argocd argo-cd \
--repo https://argoproj.github.io/argo-helm \
--version 6.0.9 \
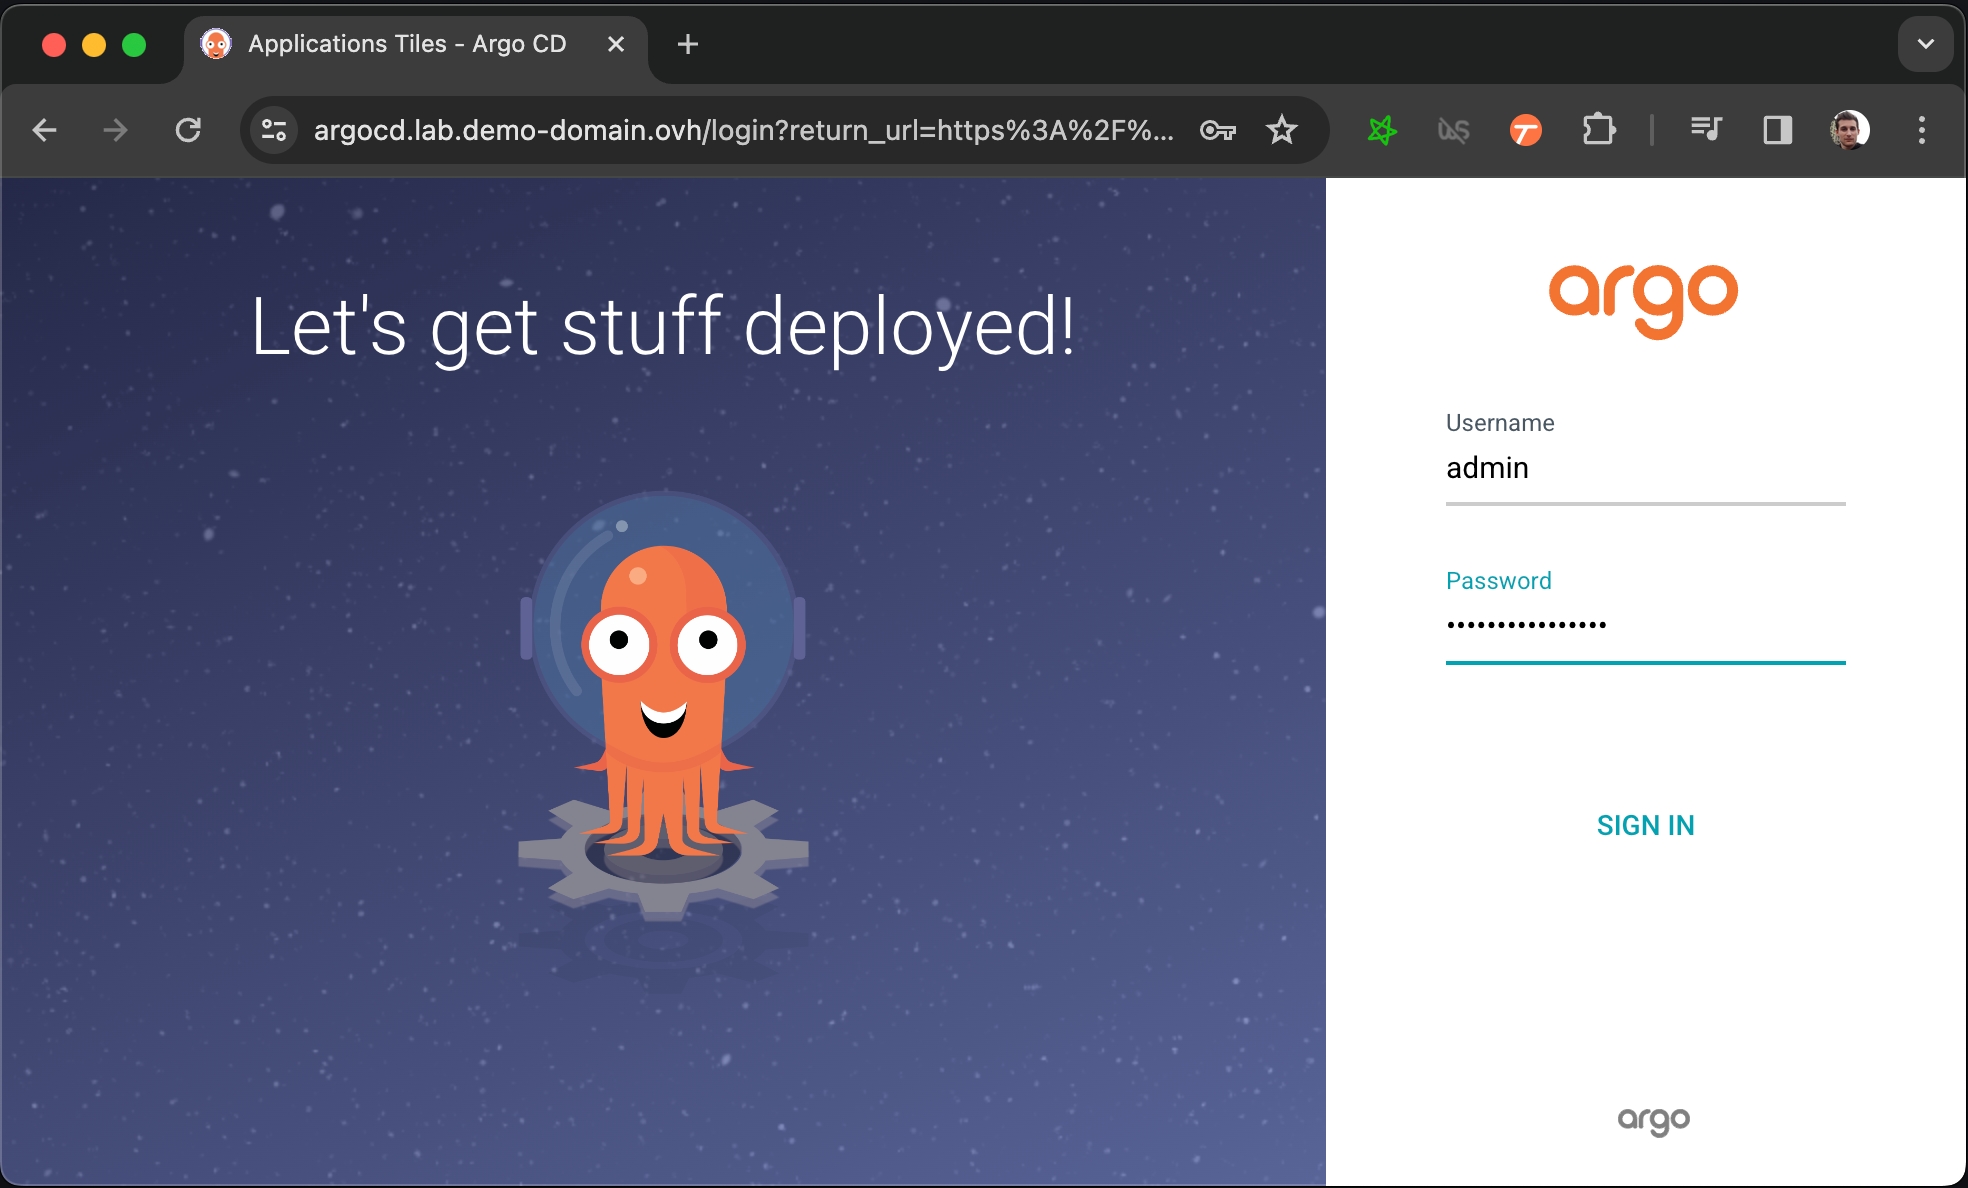
-f ./argocd-values.yamlNow you have to get the password that have been automatically generated to protect ArgoCD's admin console.
Allow some time for ArgoCD to start, you can follow the progress by running kubectl get pods and making sure that all pod are ready 1/1. After that running this command will print the password:
kubectl get secret argocd-initial-admin-secret \
  -o jsonpath="{.data.password}" | base64 -d
You can now login to https://argocd.lab.my-domain.net using:
username: admin
password: <the output of the previous command (without the % at the end)>
Now that we have an ArgoCD we want to connect it to a Git repository that will describe what services we want to be running on our cluster.
Let's fork the onyxia-ops GitHub repo and use it to deploy an Onyxia instance!
At this point you should have a very bare bone Onyxia instance that you can use to launch services.
What's great, is that now, if you want to update the configuration of your Onyxia instance you only have to commit the change to your GitOps repo, ArgoCD will takes charge of restarting the service for you with the new configuration. To put that to the test try to modify your Onyxia configuration by setting up a global alert that will be shown as a banner to all users!
 onyxia:
   ingress:
     enabled: true
     hosts:
       - host: datalab.demo-domain.ovh
   web:
     env:
+      GLOBAL_ALERT: |
+       {
+         severity: "success",
+         message: {
+           en: "A **big** announcement! [Check it out](https://example.com)!",
+           fr: "Une annonce **importante**! [Regardez](https://example.com)!"
+         }
+       }
   api:
     regions: [...]
After a few seconds, if you reload https://datalab.my-domain.net you should see the message!\
Next step is to see how to enable your user to authenticate themselvs to your datalab!
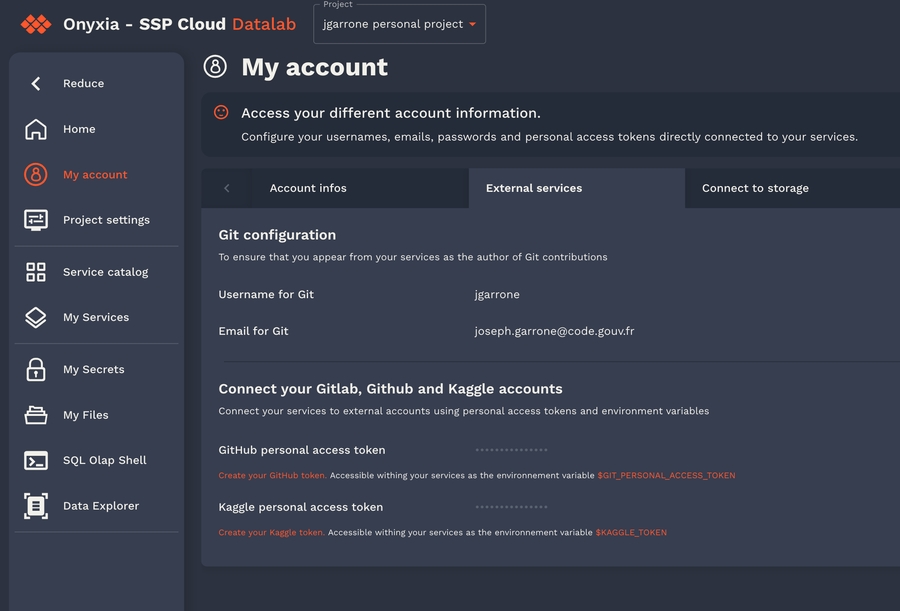
Enable S3 storage via MinIO S3
Onyxia uses AWS Security Token Service API to obtain S3 tokens on behalf of your users. We support any S3 storage compatible with this API. In this context, we are using MinIO, which is compatible with the Amazon S3 storage service and we demonstrate how to integrate it with Keycloak.
Before configuring MinIO, let's create a new Keycloak client (from the previous existing "datalab" realm).
Before deploying MinIO on the cluster let's set, in the MinIO configuration file, the OIDC client secret we have copied in the previous step.
git clone https://github.com/<your-github-org>/onyxia-ops
cd onyxia-ops
cd apps/minio
# In the values.yaml file replace `$KEYCLOAK_MINIO_CLIENT_SECRET` by the value
# you have copied in the previous step.
git commit -am "Set minio OIDC client secret"
git push
Once you've done that you can deploy MinIO!
Before configuring the onyxia region to create tokens we should go back to Keycloak and create a new client to enable onyxia-web to request token for MinIO. This client is a little bit more complex than other if you want to manage durations (here 7 days) and this client should have a claim name policy and with a value of stsonly according to our last deployment of MinIO.
Now let's update our Onyxia configuration to let it know that there is now a S3 server available on the cluster.
git clone https://github.com/<your-github-org>/onyxia-ops
cd onyxia-ops
cd apps/onyxia
mv values-minio-enabled.yaml.yaml values.yaml
git commit -am "Enable MinIO"
git push
Diff of the changes applied to the Onyxia configuration:
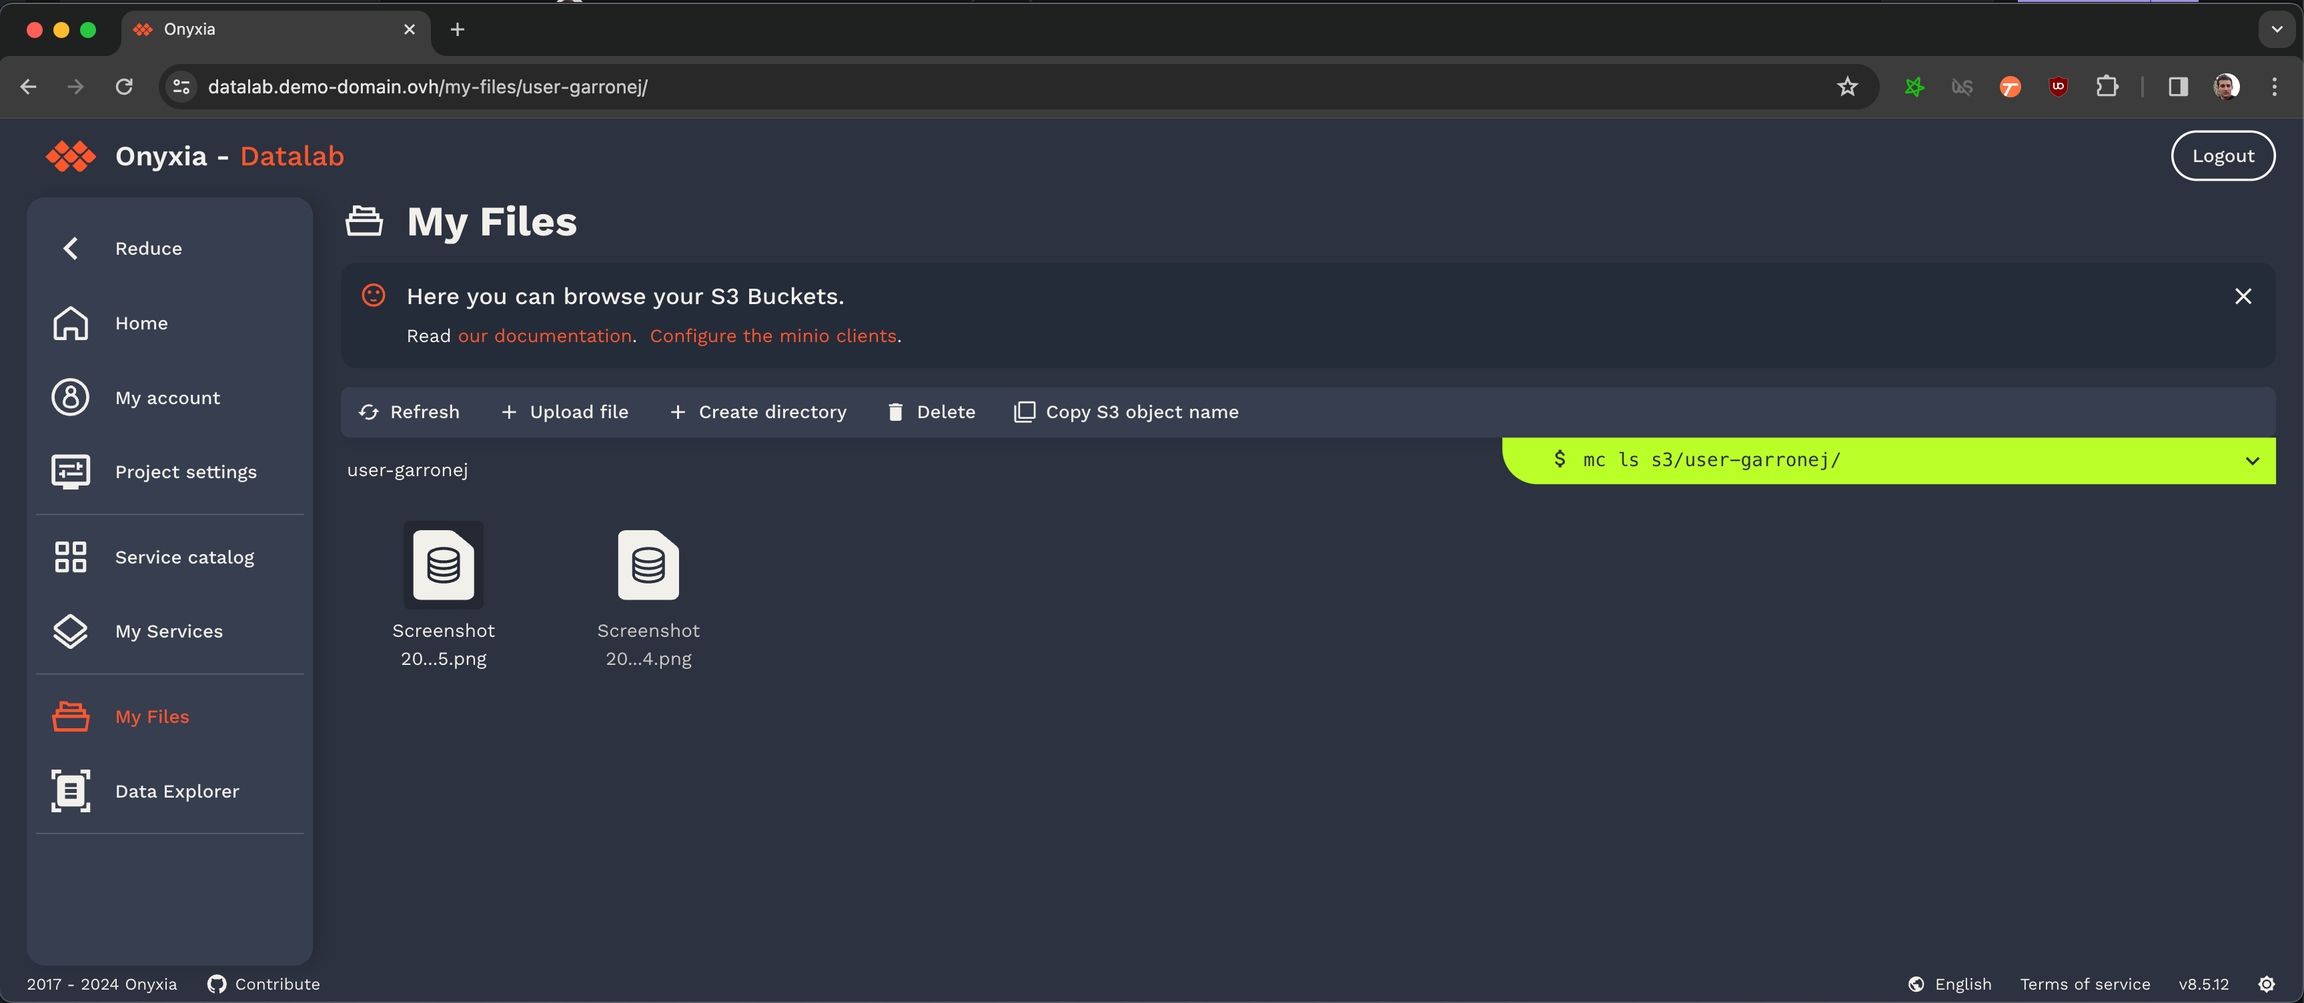
Congratulation, all the S3 related features of Onyxia are now enabled in your instance! Now if you navigate to your Onyxia instance you should have My Files in the left menu.
Next step in the installation process is to setup Vault to provide a way to your user so store secret and also to provide something that Onyxia can use as a persistance layer for user configurations.
Convinced by Onyxia? Let's see how you can get your own instance today!
If you are already familiar with Kubernetes and Helm, here's how you can get an Onyxia instance up and running in just a matter of seconds.
With this minimal configuration, you'll have an Onyxia instance operating in a degraded mode, which lacks features such as authentication, S3 explorer, secret management, etc. However, you will still retain the capability to launch services from the catalog.
Whether you are a Kubernetes veteran or a beginner with cloud technologies, this guide aims to guide you through the instantiation and configuration of an Onyxia instance with it's full range of features enabled. Let's dive right in! 🤿
First let's make sure we have a suitable deployment environement to work with!
helm repo add onyxia https://inseefrlab.github.io/onyxia

cat << EOF > ./onyxia-values.yaml
ingress:
  enabled: true
  hosts:
    - host: onyxia.my-domain.net
EOF

helm install onyxia onyxia/onyxia -f onyxia-values.yaml

# Navigate to https://onyxia.my-domain.netIn Onyxia we use the values.schema.json file to know what options should be displayed to the user at and what default value Onyxia should inject.
Community call 07/31/2025 Project news
Release v10.25
API v4.8.0 : cache for packages retrieval (recommended update !)
S3 bookmarks + dynamic
New onboarding module in Go available for testing : https://github.com/onyxia-datalab/onyxia-onboarding , chart with new module as an option WIP (will be merged soon (tm) to the regular Helm chart) : https://github.com/InseeFrLab/helm-charts-dev/tree/main/charts/onyxia
Poster session at kubecon North America in Atlanta from 10 to 13 Nov
Unserstand how Onyxia catalogs work and potentially create your own!
Every Onyxia instance may or may not have it's own catalog. There are four default catalogs :
This collection of charts helps users to launch many IDE with various binary stacks (python , R) with or without GPU support. Docker images are built here and help us to give a homogeneous stack.
This collection of charts helps users to launch many databases system. Most of them are based on bitnami/charts.
This collection of charts helps users to start automation tools for their datascience activity.
This collection of charts helps users to launch tools to visualize and share data insights.
You can always find the source of the catalog by clicking on the "contribute to the... " link.
Provision a Kubernetes cluster
First you'll need a Kubernetes cluster. If you have one already you can skip and directly go to .
maintains great tutorials for Kubernetes clusters on , or .
Pick one of the three and follow the guide.
You can stop after the .
Ingress controller
Let's install ingress-ngnix on our newly created cluster:
The following command is .
For GCP use .
For Azure use .
DNS
Let's assume you own the domain name my-domain.net, for the rest of the guide you should replace my-domain.net by a domain you actually own.
Now you need to get the external address of your cluster, run the command
and write down the External IP assigned to the LoadBalancer.
Depending on the cloud provider you are using it can be an IPv4, an IPv6 or a domain. On AWS for example, it will be a domain like xxx.elb.eu-west-1.amazonaws.com.
If you see <pending>, wait a few seconds and try again.
Once you have the address, create the following DNS records:
If the address you got was an IPv4 (x.x.x.x), create a A record instead of a CNAME.
If the address you got was ans IPv6 (y:y:y:y:y:y:y:y), create a AAAA record.
https://datalab.my-domain.net will be the URL for your instance of Onyxia. The URL of the services created by Onyxia are going to look like: https://<something>.lab.my-domain.net
SSL
In this section we will obtain a TLS certificate issued by using the commend line tool then get our ingress controller to use it.
If you are already familiar with certbot you're probably used to run it on a remote host via SSH. In this case you are expected to run it on your own machine, we'll use the DNS chalenge instead of the HTTP chalenge.
Now we want to create a Kubernetes secret containing our newly obtained certificate:
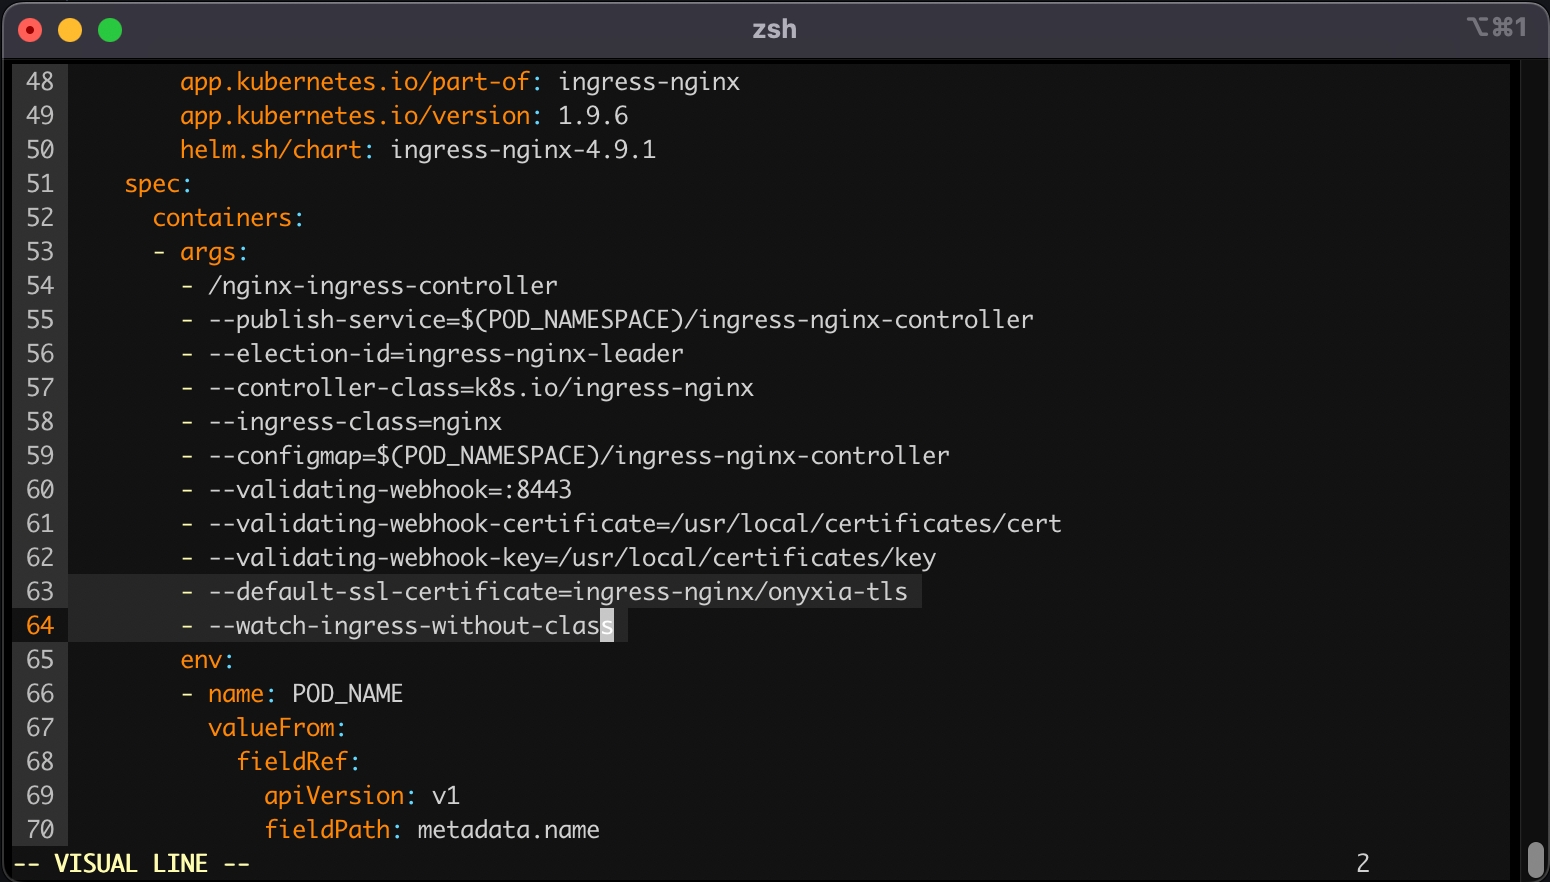
Lastly, we want to tell our ingress controller to use this TLS certificate, to do so run:
This command will open your configured text editor, go to containers -> args and add:
Save and quit. Done 🎉 We installed the ingress-nginx in our cluster, (but note that any other ingress controller could have been used as well). The configuration was adjusted to handle all ingress objects, even those lacking a specified class, and to employ our SSL certificate for our wildcard certificate. This strategy facilitated an effortless SSL termination, managed by the reverse proxy for both *.lab.my-domain.net and datalab.my-domain.net, thus removing any additional SSL configuration concerns.
If you are on a Mac or Window computer you can install then enable Kubernetes.
WARNING: If you are folowing this installating guide on an Apple Sillicon Mac, be aware that many of the services that comes by default with Onyxia like Jupyter RStudio and VSCode won't run because we do not yet compile our datacience stack for the ARM64 architecture. If you would like to see this change please .
Port Forwarding
You'll need to . It's done from the administration panel of your domestic internet Box. If you're on a corporate network you'll have to .
DNS
Let's assume you own the domain name my-domain.net, for the rest of the guide you should replace my-domain.net by a domain you actually own.
Get and create the following DNS records:
If you have DDNS domain you can create CNAME instead example:
https://datalab.my-domain.net will be the URL for your instance of Onyxia.
The URL of the services created by Onyxia are going to look like: https://xxx.lab.my-domain.net
SSL
In this section we will obtain a TLS certificate issued by using the commend line tool.
Now we want to create a Kubernetes secret containing our newly obtained certificate:
Ingress controller
We will install ingress-nginx in our cluster, although any other ingress controller would be suitable as well. The configuration will be set up to handle all ingress objects, including those without a specified class, and to utilize our SSL certificate for our wildcard certificate. This approach ensures a straightforward SSL termination managed by the reverse proxy for both *.lab.my-domain.net and datalab.my-domain.net, eliminating any further concerns regarding SSL setup.
Now that we have a Kubernetes cluster ready to use let's levrage ArgoCD and GitOps practices to deploy and monitor the core services of our Onyxia Datalab.
Using Keycloak to enable user authentication
Let's setup Keycloak to enable users to create account and login to our Onyxia instance.
Note that in this installation guide we make you use Keycloak but you can use any OIDC compliant provider like Entra ID or Auth0. See the following gide for specific instructions for different provider and detailed authentication related configuration options.
We're going to install Keycloak just like we installed Onyxia.
Before anything open in your onyxia-ops repo and . Also write down the , you'll need it to connect to the Keycloak console.
You can now login to the administration console of https://auth.lab.my-domain.net/auth/ and login using username: keycloak and password: <the one you've wrote down earlier>.
Create a realm called "datalab" (or something else), go to Realm settings
On the tab General
User Profile Enabled: On
On the tab login
User registration: On
Forgot password: On
Remember me: On
On the tab email, we give an example with , if you don't have a SMTP server at hand you can skip this by going to Authentication (on the left panel) -> Tab Required Actions -> Uncheck "set as default action" Verify Email. Be aware that with email verification disable, anyone will be able to sign up to your service.
From: [email protected]
Host: email-smtp.us-east-2.amazonaws.com
Port: 465
Authentication: enabled
Username: **************
Password: ***************************************
When clicking "save" you'll be asked for a test email, you have to provide one that correspond to a pre-existing user or you will get a silent error and the credentials won't be saved.
On the tab Themes
Login theme: onyxia-web (you can also select the login theme on a per client basis)
Email theme: onyxia-web
On the tab Localization
Internationalization: Enabled
Supported locales: <Select the languages you wish to support>
On the tab Session.
Users without "Remember Me" will need to log in every 2 weeks:
Set Session idle timeout: 14 days.
Set Session max idle timeout: 14 days.
Users who checked "Remember Me" should stay logged in for 1 year:
Set Session idle timeout (Remember Me): 365 days.
Set Session max idle timeout (Remember Me): 365 days.
Create a client with client ID "onyxia"
Root URL: https://datalab.my-domain.net/
Valid redirect URIs: https://datalab.my-domain.net/
Login theme: onyxia-web
In Authentication (on the left panel) -> Tab Required Actions enable and set as default action Therms and Conditions.
Now you want to ensure that the username chosen by your users complies with Onyxia requirement (only alphanumerical characters) and define a list of email domain allowed to register to your service.
Go to Realm Settings (on the left panel) -> Tab User Profile -> JSON Editor.
Now you can edit the file as suggested in the following DIFF snippet. Be mindful that in this example we only allow emails @gmail.com and @hotmail.com to register you want to edit that.
Now our Keycloak server is fully configured we just need to update our Onyxia deployment to let it know about it.
In your GitOps repo you now want to update your onyxia configuration.
Here is the DIFF of the onyxia configuration:
Now your users should be able to create account, log-in, and start services on their own Kubernetes namespace.
Next step in the installation proccess it to enable all the S3 related features of Onyxia:
Information about security considerations
The autolaunch feature empowers you to create HTTP links that automatically deploy an environment. This is an invaluable tool for initiating trainings effortlessly. However, exercise caution while using it as it could pose a security risk to the user. Consider disabling this feature if it doesn't suit your requirements or if security is a primary concern.
Onyxia is primarily designed to allocate resources such as a namespace and an S3 bucket to an individual user for work purposes. Additionally, it incorporates a feature that allows multiple users to share access to the same resources within a project. While this can be extremely beneficial for collaboration, be aware that it might be exploited by a malicious user within the group to leverage the privileges of another project member. Always monitor shared resources and maintain proper user access control to prevent such security breaches.
Community call 09/25/2025
Private helm repository credentials leak : only affected if you were using private helm catalogs (specifying credentials in the catalogs json). Patched on Onyxia 10.28. Take a look at our "vulnerability disclosure" documentation page and feel free to register to our security mailing to be notified when a vulnerability is discovered : https://docs.onyxia.sh/vulnerability-disclosure
working on data catolog https://github.com/InseeFrLab/onyxia/issues/1021
Reminder : the onboarding module, rewritten in go, is up for testing and use. It has been in use in production at SSPCloud for a month now. To test it, set onboarding.enabled=true in your chart values https://github.com/InseeFrLab/onyxia/blob/eeb00ae9d7047849b06dd5244eb1c4a4806db4ae/helm-chart/values.yaml#L317 no additional change is needed, we aimed for fully compatibility with the existing onboarding behaviour. Feedback welcome ! Onboarding code is hosted on the onyxia-datalab org on github : https://github.com/onyxia-datalab/onyxia-onboarding
More work in progress in the go migration / rewrite, now working on the "main" API (services, my-lab ...) and moving onto a monorepo for all backend modules (onboarding, services ...) : https://github.com/onyxia-datalab/onyxia-backend Feel free to join the team :)
Community call 05/26/2025 Project news :
Release v10.23
Work in progress
You can find extra information on how to use Onyxia as a datascientist by checking out the community website of the french statistician workforce. It's in french though.
Want to share something you've done with Onyxia? You can click on "edit this page on GitHub" and submit a pull request!
The backend REST API in Java
This is the documentation for .
It's the part of the App that runs in the clusters. It handles the things that can't be done directly from the frontend.
Declare your own repository of charts
If you do not specify catalogs in your onyxia/values.yaml, these are the ones that are used by default: See file.
To configure your onyxia instance to use your own custom helm repositories as onyxia catalogs you need to use the onyxia configuration onyxia.api.catalogs.
Let's say we're NASA and we want to have an "Aerospace services" catalog on our onyxia instance. Our onyxia configuration would look a bit like this:
onyxia:
  web:
    # ...
  api:
    # ...
    catalogs: [
      {
        type: "helm",
        id: "aerospace",
        # The url of the Helm chart repository
        location: "https://myorg.github.io/helm-charts-aerospace/",
        # Display under the search bar as selection tab:
        # https://github.com/InseeFrLab/onyxia/assets/6702424/a7247c7d-b0be-48db-893b-20c9352fdb94
        name: {
          en: "Aerospace services",
          fr: "Services aérospatiaux"
          # ... other languages your instance supports
        },
        # Optional. Defines the chart that should appear first
        highlightedCharts: ["jupyter-artemis", "rstudio-dragonfly"],
        # Optional. Defines the chart that should be excluded
        excludedCharts: ["a-vendor-locking-chart"],
        # Optional, If defined, displayed in the header of the catalog page:
        # https://github.com/InseeFrLab/onyxia/assets/6702424/57e32f44-b889-41b2-b0c7-727c35b07650
        # Is rendered as Markdown
        description: {
          en: "A catalog of services for aerospace engineers",
          fr: "Un catalogue de services pour les ingénieurs aérospatiaux"
          # ...
        },
        # Can be "PROD" or "TEST". If test the catalogs will be accessible if you type the url in the search bar
        # but you won't have a tab to select it.
        status: "PROD",
        # Optional. If true the certificate verification for `${location}/index.yaml` will be skipped.
        skipTlsVerify: false,
        # Optional. certificate authority file to use for the TLS verification
        caFile: "/path/to/ca.crt",
        # Optional: Enables you to a specific group of users.
        # You can match any claim in the JWT token.
        # If the claim's value is an array, it match if one of the value is the one you specified.
        # The match property can also be a regex.
        restrictions: [
          {
            userAttribute: {
              key: "groups",
              matches: "nasa-engineers"
            }
          }
        ]
      },
       # { ... } another catalog
]Onyxia can be installed in constrained environments such as behind a proxy, offline or airgap. This page aims at listing various things and configurations to have in mind when installing Onyxia in such environments.
By default, Onyxia (Onyxia-API to be precise) is configured to use Inseefrlab Opensource catalogs straight from Github
This won't work if you don't have access to internet.
If behind a proxy, you can configure the proxy by using the corresponding API env variables.
You can configure your own catalogs by using the catalogs key from the Helm chart :
A catalog is a regular Helm charts repository, see here for more details on how to create your own catalog.
Note that Onyxia does not currently support OCI-based repositories, you need to have an index.yaml based repository. See this issue to track progress on this.
If you are using non-public (internal) certificates, you need to either mount them (recommended) or skip tls validation (not recommended).
Certificates can be mounted on the API pod :
api:
  extraVolumeMounts:
    - mountPath: "/usr/local/share/ca-certificates"
      name: ca-bundle
  extraVolumes:
    - name: ca-bundle
      secret:
secretName: ca-bundleTo disable tls validation for the API ⇒ OIDC provider : oidc.skip-tls-verify
To disable tls validation for Helm (catalogs retrieval) : skipTlsVerify
Currently, Onyxia's images and images used by our opensource catalogs are hosted on Dockerhub.
Make sure your cluster nodes are configured to pull from a mirror or prepull the corresponding images.
If needed, you can override the images Onyxia uses in the values.yaml and the images of your services in your catalogs values.yaml / values.schema.json
Community call 03/28/2025
Project's news :
New repo ! Awesome Onyxia : https://github.com/onyxia-datalab/awesome-onyxia Listing of resources related to the Onyxia ecosystem. Feel free to contribute :)
Onboarding module in go : still WIP, not much this month. Contributions welcome, please join #dev-rewrite-to-go on Slack
Feature request : Customizable User Profile. https://github.com/InseeFrLab/onyxia/discussions/954 . Work currently in progress to implement this using json schemas. Admin of the instance would specify a json schema describing the user profile. UI would render it and let user customize their profile (e.g git configuration). All the data would be then available for injection in the service launcher form.
Debate : overwriteSchemaWith / patchSchemaWith (@Gaspard) : https://github.com/InseeFrLab/onyxia-api/pull/573 Currently Onyxia is relying on overwriteSchemaWith that only allow to replace a schema part while discarding the existing one. Patchschemawith would allow to keep the existing definition (e.g when using Onyxia's opensource catalogs) and upstream changes while patching only what's necessary. Would also reduce duplication.
New customization features:
Different palette for the dark and light mode
Gradiant background color
Desktop App:
It would be an electron wrapper around Onyxia Web
The main goal would be to be able to bypass CORS issues (that are a blocker for accessing public S3 Bucket through the Onyxia UI)
New button for accessing Keycloak user profile (when applicable). Do you want an option to disable it?
Community discussions :
SSB : plugin showcase : https://github.com/statisticsnorway/onyxia/tree/ssb-assets/web/public/custom-resources
Community call 04/24/2025
Project's news :
New schedule for community calls ! Last thursday of the month at 16:30 Paris time. ICS calendar available : https://docs.onyxia.sh/contributors-doc/community-calls
Various improvements to My files
WIP : Multiple STS configuration support. Still needs work especially on User interface and catalogs configuration / injection. Need to figure out what to do with the dropdown menu that currently allows switching between S3 configurations. Almost all the services (python, R ...) are ready to support multiple STS configurations but duckdb is not, an issue is currently open on their side.
Work has started on "User profile" feature (https://github.com/InseeFrLab/onyxia/discussions/954). Not testable yet but feedback welcome on usecase, would you use it ?
Onyxia support for charts without values.schema.json by fallbacking into the the new YAML editor.
Possibility to see all defaults in the text editor, including the ones defined in the values.yaml.
Customization: Possibility to define different color palettes for dark and light mode. Possibility to add custom CSS for light and dark mode.
Community discussions :
Data(S3) configuration should allow configurations that don't contain prefix/ prefixGroup or bucketNamePrefix/ bucketNamePrefixGroup. Basically keeping S3 configuration / STS / injection but disabling user bucket / working directory path … In this setup, users will then run things like mc ls s3 and have access to mulitple buckets not tied to their username.
Document Group Projects : documentation is lackluster on how to configure / enable groups feature and what the feature is about (what the group gives access to, how it's supposed to be used …)
Community call 08/28/2025
Release v10.27
Onboarding as a separate go module (test it, onboarding.enabled=true in your values : https://github.com/InseeFrLab/onyxia/blob/ba06172cba57b6893d0646f6521a1895532d844a/helm-chart/values.yaml#L316)
State of go :
Onboarding is functional and at (almost, mainly missing events support) parity with current API
Work is now on services API
Code is available on a monorepo : https://github.com/onyxia-datalab/onyxia-backend
Feedback and contributions welcome ! #dev-rewrite-to-go on slack to discuss
Bitnamigate happening today 😱 : https://github.com/bitnami/charts/issues/35164
Bitnami dropping / reducing docker & helm charts availability and support
Inseefrlab (defaults for Onyxia) catalogs have been updated this week to use bitnamilegacy (mainly for databases catalog)
Future : we will try to remove catalog dependencies to bitnami wherever and whenever it's feasible
kubectl apply -f https://raw.githubusercontent.com/kubernetes/ingress-nginx/controller-v1.2.0/deploy/static/provider/aws/deploy.yamlkubectl get services -n ingress-nginxdatalab.my-domain.net CNAME xxx.elb.eu-west-1.amazonaws.com.
*.lab.my-domain.net CNAME xxx.elb.eu-west-1.amazonaws.com. brew install certbot #On Mac, lookup how to install certbot for your OS
#Because we need a wildcard certificate we have to complete the DNS callange.
sudo certbot certonly --manual --preferred-challenges dns
# When asked for the domains you wish to optains a certificate for enter:
# datalab.my-domain.net *.lab.my-domain.netDOMAIN=my-domain.net
sudo kubectl create secret tls onyxia-tls \
-n ingress-nginx \
--key /etc/letsencrypt/live/datalab.$DOMAIN/privkey.pem \
--cert /etc/letsencrypt/live/datalab.$DOMAIN/fullchain.pemkubectl edit deployment ingress-nginx-controller -n ingress-nginx - --default-ssl-certificate=ingress-nginx/onyxia-tls
- --watch-ingress-without-classdatalab.my-domain.net A <YOUR_IP>
*.lab.my-domain.net A <YOUR_IP>datalab.my-domain.net CNAME jhon-doe-home.ddns.net.
*.lab.my-domain.net CNAME jhon-doe-home.ddnc.net.brew install certbot #On Mac, lookup how to install certbot for your OS
# Because we need a wildcard certificate we have to complete the DNS callange.
sudo certbot certonly --manual --preferred-challenges dns
# When asked for the domains you wish to optains a certificate for enter:
# datalab.my-domain.net *.lab.my-domain.net# First let's make sure we connect to our local Kube cluser
kubectl config use-context docker-desktop
kubectl create namespace ingress-nginx
DOMAIN=my-domain.net
sudo kubectl create secret tls onyxia-tls \
    -n ingress-nginx \
    --key /etc/letsencrypt/live/datalab.$DOMAIN/privkey.pem \
--cert /etc/letsencrypt/live/datalab.$DOMAIN/fullchain.pemcat << EOF > ./ingress-nginx-values.yaml
controller:
extraArgs:
default-ssl-certificate: "ingress-nginx/onyxia-tls"
watchIngressWithoutClass: true
EOF
helm install ingress-nginx ingress-nginx \
--repo https://kubernetes.github.io/ingress-nginx \
--version 4.9.1 \
--namespace ingress-nginx \
-f ./ingress-nginx-values.yaml{
"attributes": [
{
"name": "username",
"displayName": "${username}",
"validations": {
"length": {
"min": 3,
"max": 255
},
+ "pattern": {
+ "error-message": "${lowerCaseAlphanumericalCharsOnly}",
+ "pattern": "^[a-z0-9]*$"
+ },
"username-prohibited-characters": {}
}
},
{
"name": "email",
"displayName": "${email}",
"validations": {
"email": {},
+ "pattern": {
+ "pattern": "^[^@]+@([^.]+\\.)*((gmail\\.com)|(hotmail\\.com))$"
+ },
"length": {
"max": 255
}
}
},
...git clone https://github.com/<your-github-org>/onyxia-ops
cd onyxia-ops
cd apps/onyxia
mv values-keycloak-enabled.yaml values.yaml
git commit -am "Enable keycloak"
git push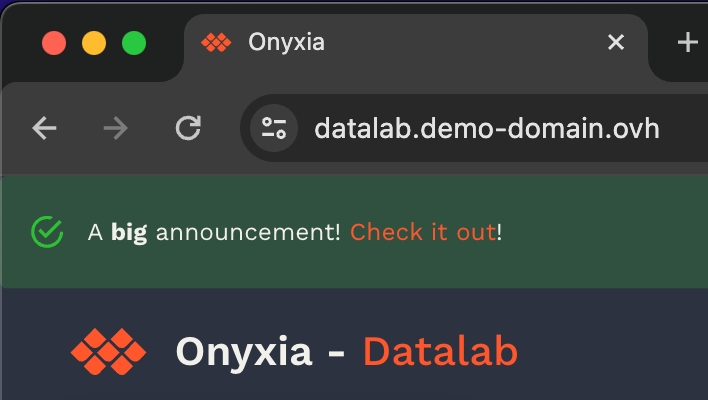
Onyxia Project Core Team Future Developments Roadmap
Want to know what we are up to?
Checkout our Milestones on GitHub:
Roadmap is also often discussed during our monthly public community calls, feel free to attend.
Do not hesitate to vote or comment on the issues that are the most important to you. We prioritize our work based on community feedback !
Or you can ask us on Slack, we're very prompt to respond !
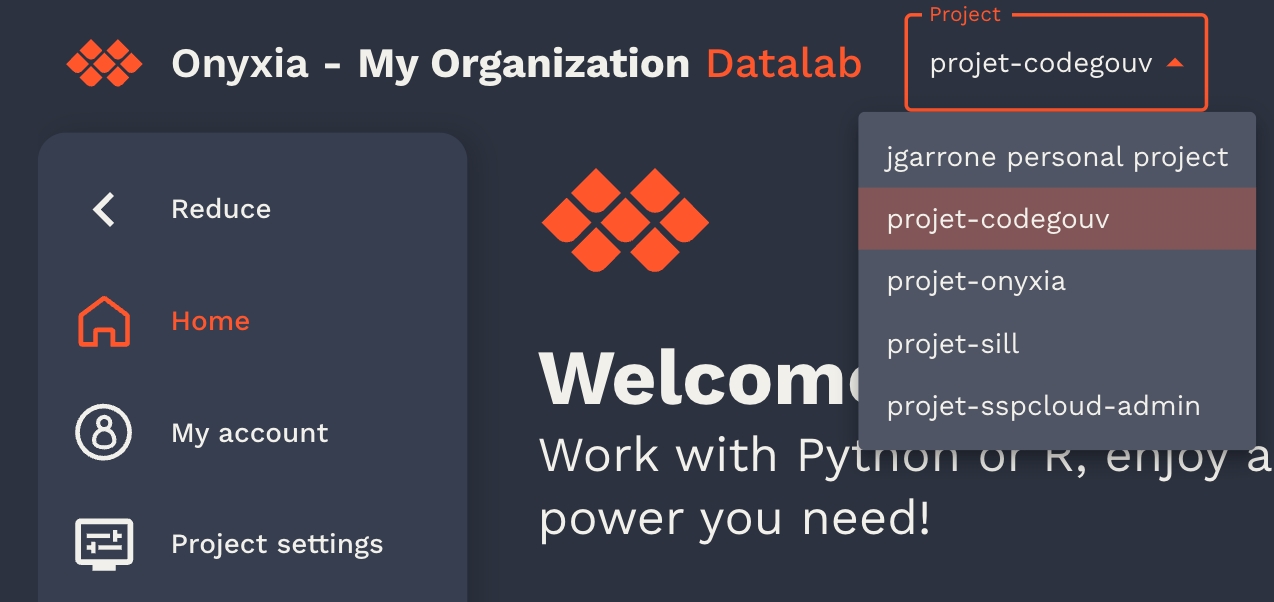
Enabling a group of users to share the same Kubernetes namespace to work on something together.
The user interface of onyxia enables to create projects for groups of Onyxia users.
Users will be able to dynamically switch from one project to another using a select input in the header.
This select doesn't appear when the user isn't in any group project.
All users of a group project share:
The Kubernetes namespace, in "My Services" you can see everything that's running, including services launched by other person of the group.
Project settings. If a user change a project setting, it affects every member of the group.
Secrets
S3 Bucket (or an S3 subpath)
As of today, new group can only be created by Onyxia instance administrator, on demand and the procedure to create group is not publicly documented yet because we're still actively working on it. However, if you want to enable this feature for your users, reach us, we will guide you through it!
Our community calls take place on the last Thursday of each month at 16:30 (Paris time).
These calls are open to everyone — a great opportunity to:
Get the latest project updates
Ask questions
Discuss the roadmap
Showcase how you're using the project
To join, simply head over to our Slack workspace and join the #community-meeting channel.
List of previous community calls minutes :
Community call 05/29/2025
Project's news :
WIP : User profile : https://github.com/InseeFrLab/onyxia/pull/980 . Feedback / usecases welcome
WIP : bookmarks for file explorer : https://github.com/InseeFrLab/onyxia/issues/968
In this video, we guide you through setting up your development environment in Onyxia. We demonstrate how to automatically clone your Git repository, install any missing dependencies, and open a port for your development server.
You can also find initialization scripts of interactive services here.
The TypeScript App that runs in the browser.
This is the documentation for InseeFrLab/onyxia -> web/.
git clone https://github.com/InseeFrLab/onyxia
cd onyxia/web

yarn install

# To start the app locally
yarn dev

# If you want to test against your own Onyxia instance edit the .env.local.yaml
# file (created automatically the first time you run `yarn dev`)
You have a video here where we guide you through the setup of the dev environnement:
The Onyxia team maintain a catalog of training and tutorials with several practical exercices that can be performed on an Onyxia instance!
Community call 01/31/25
CVE A 9.4 vulnerability has been found (thanks team norway !) in Onyxia-API at the end of December. Read more here : We created a new section on the docs for everything related to security including a mailing list :
API rewrite Java => Go We started the process of rewriting the Onyxia-API that is currently written in Java to Golang as go is a lot more integrated with cloud native technologies. It would greatly improve performance, maintainability (letting us get rid of the Helm wrapper we built) and security. We take this opportunity to also split the API into separated modules, starting with the Onboarding. See discussion here : Feel free to join the effort by joining the #dev-rewrite-to-go channel on Slack Also we created the org
YAML editor
New feature ! Making progress towards more support for advanced users such as developpers. Letting them directly modify values instead of using the UI form. Also support for charts that don't have a values.schema.json.
Parquet Improvements on how parquet are displayed in the Data explorer, also improvements on file format detection
Mercator :
Updated their fork from v9 => v10. Quite some work was needed but happy with the new features.
API rewrite from Java to Go is not just a rewrite in another language, it's also an opportunity to change the architecture. Discussions on key points such as if / how we should support things other than helm packages are currently taking place so anyone interested in this are more than welcome to join the discussion #dev-rewrite-to-go and
Community call 02/28/2025
News :
Rewrite of the onboarding as a go module : Going well, first version has been released yesterday : . Current work is on the Helm chart with a standalone version already published and integration of this module as a optional dependency in the main Onyxia chart should arrive soon. Slack channel for discussion on the rewrite effort : #dev-rewrite-to-go
Onyxia-web : Work on improving support for OIDC providers other than Keycloak. In particular Entra ID (Microsoft) and Auth0. Thoughough documentation will be added to the docs.onyxia.dev website shortly.
Community contributions :
Trygve : Great work on the new Go-based onboarding API so far! We just need to make sure the test coverage for the go rewrite is maintained at a good level to avoid reproducing the same mistakes as the current Java Onyxia-API (which has a ridiculous low level of test)
Trygve : they developped a custom web plugin to display the estimated cost of running the service based on resources (cpu / mem) beside the resources slider. Really interesting but may be hard to opensource properly due to variety in setups and Charts
Discussion on how to get billing usage : prometheus, opencost. Also hard to opensource / bundle to Onyxia / make it generic
Trygve : 200 users daily ❤️
NTTS (eurostat conference) 11-13 march 2025. Come and say hi ☺️
CSTB () : approx 1000 employees including datascientists. Currently running Jupyterhub and other tools. Interested in Onyxia for unifying tools among all projects and embrace opensource ecosystems. Welcome ☺️


This section describes JSON Schema support in the launcher.
Onyxia uses JSON Schema to dynamically create its service launch interface, often referred to as the "launcher." By defining parameters and configurations in JSON Schema, Onyxia can automatically generate forms and interfaces that guide users through setting up and deploying services.
The JSON Schema draft Onyxia follows is largely based on Draft 7, but it only implements a subset of the specification. This means that while Onyxia’s schema supports many core features of Draft 7—like data types, required fields, and basic validations—it may not include every feature or validation option found in the full Draft 7 specification. This subset approach keeps the schema manageable and efficient for the specific needs of Onyxia's interface generation and deployment configurations. In the following section, you’ll also see that Onyxia adds additional semantic layers.
String: Supports plain text input
Number / Integer: Allows numerical input.
Boolean: Renders a toggle.
Array: Supported for list-like inputs, often used for specifying multiple items (e.g., environments, tags). Onyxia provide a way to add or remove item.
Items: Onyxia supports homogenous arrays, where all items are expected to be of the same type.
Object: Forms the basis for grouping multiple fields together.
Properties: Each property in an object renders as an individual input element within the launcher.
In Onyxia’s JSON Schema implementation, string elements include various render types to adjust the input style based on each field’s function, creating a more intuitive user experience. Here are the primary render types supported for string fields:
Dropdown Selection (render: "list"): Displays a dropdown menu for selecting from a set of predefined values, which is useful for fields like software versions or configurations.
Example with schema validation :
{
  "type": "string",
  "enum": ["version1", "version2", "version3"],
  "default": "version1",
  "description": "Choose a software version"
}
Example without schema validation (usefull if your chart are reused in other context and you want people to specify other value):
{
  "type": "string",
  "render": "list",
  "listEnum": ["version1", "version2", "version3"], // this is onyxia specification
  "default": "version1",
  "description": "Choose a software version"
}
Password Field (render: "password"): Provides a masked input field to secure sensitive data, such as passwords or API keys.
{
  "type": "string",
  "render": "password",
  "description": "Enter your API key"
}
Multi-line Text (render: "textArea"): Creates a resizable, multi-line text box for longer text entries, such as configuration scripts or notes, enhancing readability and usability.
{
  "type": "string",
  "render": "textArea",
  "description": "Enter configuration details\n Thank you!"
}
Slider (render: "slider"): For numeric inputs (stored as strings), render: "slider" allows users to select a value within a specified range using a slider, commonly used for resource allocation (e.g., CPU, memory). This includes additional attributes like sliderMin, sliderMax, sliderStep, and sliderUnit to configure the slider's behavior.
{
  "type": "string",
  "render": "slider",
  "sliderMin": 50,
  "sliderMax": 40000,
  "sliderStep": 50,
  "sliderUnit": "m",
  "description": "Set the CPU limit"
}
Onyxia also define some extention to the JSON Schema standard in order to let you pre-fill some values levraging what we know about the user.
You can host your own custom documentation pages directly within your Onyxia instance. This is ideal if you want to provide onboarding instructions or write step-by-step tutorials specifically tailored to your users.
Your documentation must consist of Markdown files. These files will be rendered as HTML within the Onyxia UI.
The documents must be hosted within your Onyxia instance; external links are not supported. You need to include them in the custom-resources.zip file, provided through the CUSTOM_RESOURCES configuration key.
More details are available in the theme and branding documentation.
You can link to your Markdown files from any customizable section of the interface: header, sidebar, footer, and even from other Markdown files.
Assume we include the following files in custom-resources.zip:
/onboarding_en.md
/onboarding_fr.md
We can reference them in our configuration:
onyxia:
  web:
    env:
      CUSTOM_RESOURCES: "https://.../custom-resources.zip"
      HEADER_TEXT_BOLD: My Organization
      HEADER_TEXT_FOCUS: Datalab
      HEADER_LINKS: |
        [
          {
            label: {
              en: "Onboarding Guide",
              fr: "Guide d'intégration"
            },
            icon: "School",
            url: {
              en: "%PUBLIC_URL%/custom-resources/onboarding_en.md",
              fr: "%PUBLIC_URL%/custom-resources/onboarding_fr.md"
            }
          }
        ]
      FOOTER_LINKS: |
        [
          {
            label: {
              en: "Onboarding Guide",
              fr: "Guide d'intégration"
            },
            icon: "School",
            url: {
              en: "%PUBLIC_URL%/custom-resources/onboarding_en.md",
              fr: "%PUBLIC_URL%/custom-resources/onboarding_fr.md"
            }
          }
        ]
      HOMEPAGE_BELOW_HERO_TEXT: |
        {
          en: "See our [onboarding guide](%PUBLIC_URL%/custom-resources/onboarding_en.md)",
          fr: "Consultez notre [guide d'intégration](%PUBLIC_URL%/custom-resources/onboarding_fr.md)"
        }
      HOMEPAGE_CALL_TO_ACTION_BUTTON: |
        {
          label: {
            en: "Read our get started guide",
            fr: "Lire notre guide de démarrage"
          },
          startIcon: "School",
          url: {
            en: "%PUBLIC_URL%/custom-resources/onboarding_en.md",
            fr: "%PUBLIC_URL%/custom-resources/onboarding_fr.md"
          }
        }
      TERMS_OF_SERVICES: "%PUBLIC_URL%/custom-resources/tos_fr.md"
Example of Mardown document
# This is a test document in english

This could be for example a guide specific to your Onyxia instance.

## It's standard markdown

You can embed images, including with HTML syntax:

<img src="%PUBLIC_URL%/custom-resources/preview.png" width="100%">

You can render code snippets:

```bash
echo "Hello world"
```

You can also link to pages of your instance: [Catalog](/catalog).

You can link to [another document](%PUBLIC_URL%/custom-resources/onboarding_sub_en.md).

<a href="%PUBLIC_URL%/launcher/ide/rstudio?name=rstudio&version=2.3.2&s3=region-ec97c721&resources.limits.cpu=«22700m»&autoLaunch=true">
    <img height=20 src="https://user-images.githubusercontent.com/6702424/173724486-30b6232a-c5d2-40da-a0cc-4d4a11824135.png">
</a>Onyxia-web uses vault as a storage for two kinds of secrets: 1. secrets or information generated by Onyxia to store different values (S3 sources configuration) 2. user secrets\
Onyxia uses the KV version 2 secret engine. Vault must be configured with JWT or OIDC authentification methods.
As Vault needs to be initialized with a master key, it can't be directly configured with all parameters such as oidc or access policies and roles. So first step we create a vault with dev mode (do not use this in production and do your initialization with any of the recommanded configuration: Shamir, gcp, another vault).
From Keycloak, create a client called "vault" (realm "datalab" as usually in this documentation)
Root URL: https://vault.lab.my-domain.net/
Valid redirect URIs: https://vault.lab.my-domain.net/* and https://datalab.my-domain.net/*
Web origins: *
The expected value for the audience (aud) field of the JWT token by Vault is vault. You need to configure this in Keycloak.
Create a new Client scope: vault
Add Mapper by configuration
Choose Audience
Name: Audience for Vault
Included Client Audience: vault
Save
Choose Clients: vault
Add Client Scope: vault
We will now configure Vault to enable JWT support, set policies for users permissions and initialize the secret engine.
You will need the Vault CLI. You can either download it and configure VAULT_ADDR=https://vault.lab.my-domain.net and VAULT_TOKEN=root or exec into the vault pod kubectl exec -it vault-0 -n vault -- /bin/sh which will have vault CLI installed and pre-configured.
First, we start by creating a JWT endpoint in Vault, and writing information about Keycloak to the configuration. We use the same realm as usually in this documentation.
Onyxia uses only one single role for every user in Vault. This is in this tutorial onyxia-user`. To provide an authorization mechanism a policy is used that will depend on claims inside the JWT token.
First you need to get the identifier (mount accessor) for the JWT authentification just created. You can use :
which should provide you something like auth_jwt_xyz. You will need it to write a proper policy by replacing the auth_jwt_xyz content with your own value.
Create locally a file named onyxia-policy.hcl.
You can notice that this policy is written for a KV version 2 secret engine mounted to the onyxia-kv path. The following policy is only working for personnal access because the entity name will be the preferred username in the JWT token.
Allowing personal Vault tokens to access group storage in Vault is a bit more complex. We will map the group from the token into the entity’s metadata. The following policy maps the first 10 groups statically.
If you have suggestions for a better authorization mechanism within Vault, please share them with us on Slack, as the current approach is not ideal.
Once the policy file is created, we can proceed with creating the policy.
We can go on with the role onyxia-user.
We need to enable the secret engine.
Then, you need to allow the URL https://datalab.my-domain.net in Vault's CORS settings.
You can finally modify your onyxia config file (in the helm values) 🎉
You can define a custom user profile form that appears directly within the user interface.
This form is configured using a JSON Schema provided via your Onyxia values.yaml. Here's an example that produces the form shown above:
Once defined, this form allows users to fill in personal and development-related information. These values become programmatically accessible, enabling dynamic behavior within your charts and deployments.
For example, with the schema above, and assuming the user has filled out the form as shown in the screenshot, the following values will be available in the Onyxia context:
These values can be injected into Helm charts. For instance:
This will auto-fill the corresponding field with "Garrone".
(Here this example is not very inspired since we already have a Git configuration tab so there's no reason to define a Git configuration section in the declarative user profile but you get the idea)
Each time you update the JSON Schema you provide to define the user profile, all existing values that the user might have filled will be lost.
Define your schema in onyxia.values.yaml.
Enable role-based customization if needed.
Use the collected values in your Helm charts for a tailored, user-aware deployment experience.
helm repo add hashicorp https://helm.releases.hashicorp.com

DOMAIN=my-domain.net

cat << EOF > ./vault-values.yaml
server:
  dev:
    enabled: true
    # Set VAULT_DEV_ROOT_TOKEN_ID value
    devRootToken: "root"
  ingress:
    enabled: true
    annotations:
      kubernetes.io/ingress.class: nginx
    hosts:
      - host: "vault.lab.$DOMAIN"
    tls:
      - hosts:
          - vault.lab.$DOMAIN
EOF

helm install vault hashicorp/vault -f vault-values.yamlvault auth enable jwtvault write auth/jwt/config \
oidc_discovery_url="https://auth.lab.my-domain.net/auth/realms/datalab" \
default_role="onyxia-user"vault auth list -format=json | jq -r '.["jwt/"].accessor'path "onyxia-kv/user-{{identity.entity.aliases.auth_jwt_xyz.name}}/*" {
capabilities = ["create","update","read","delete","list"]
}
path "onyxia-kv/data/user-{{identity.entity.aliases.auth_jwt_xyz.name}}/*" {
capabilities = ["create","update","read"]
}
path "onyxia-kv/metadata/user-{{identity.entity.aliases.auth_jwt_xyz.name}}/*" {
capabilities = ["delete", "list", "read"]
}path "onyxia-kv/user-{{identity.entity.aliases.auth_jwt_xyz.name}}/*" {
capabilities = ["create","update","read","delete","list"]
}
path "onyxia-kv/data/user-{{identity.entity.aliases.auth_jwt_xyz.name}}/*" {
capabilities = ["create","update","read"]
}
path "onyxia-kv/metadata/user-{{identity.entity.aliases.auth_jwt_xyz.name}}/*" {
capabilities = ["delete", "list", "read"]
}
path "onyxia-kv/projet-{{identity.entity.aliases.auth_jwt_xyz.metadata.group0}}/*" {
capabilities = ["create","update","read","delete","list"]
}
path "onyxia-kv/data/projet-{{identity.entity.aliases.auth_jwt_xyz.metadata.group0}}/*" {
capabilities = ["create","update","read"]
}
path "onyxia-kv/metadata/projet-{{identity.entity.aliases.auth_jwt_xyz.metadata.group0}}/*" {
capabilities = ["delete", "list", "read"]
}
path "onyxia-kv/projet-{{identity.entity.aliases.auth_jwt_xyz.metadata.group1}}/*" {
capabilities = ["create","update","read","delete","list"]
}
path "onyxia-kv/data/projet-{{identity.entity.aliases.auth_jwt_xyz.metadata.group1}}/*" {
capabilities = ["create","update","read"]
}
path "onyxia-kv/metadata/projet-{{identity.entity.aliases.auth_jwt_xyz.metadata.group1}}/*" {
capabilities = ["delete", "list", "read"]
}
path "onyxia-kv/projet-{{identity.entity.aliases.auth_jwt_xyz.metadata.group2}}/*" {
capabilities = ["create","update","read","delete","list"]
}
path "onyxia-kv/data/projet-{{identity.entity.aliases.auth_jwt_xyz.metadata.group2}}/*" {
capabilities = ["create","update","read"]
}
path "onyxia-kv/metadata/projet-{{identity.entity.aliases.auth_jwt_xyz.metadata.group2}}/*" {
capabilities = ["delete", "list", "read"]
}
path "onyxia-kv/projet-{{identity.entity.aliases.auth_jwt_xyz.metadata.group3}}/*" {
capabilities = ["create","update","read","delete","list"]
}
path "onyxia-kv/data/projet-{{identity.entity.aliases.auth_jwt_xyz.metadata.group3}}/*" {
capabilities = ["create","update","read"]
}
path "onyxia-kv/metadata/projet-{{identity.entity.aliases.auth_jwt_xyz.metadata.group3}}/*" {
capabilities = ["delete", "list", "read"]
}
path "onyxia-kv/projet-{{identity.entity.aliases.auth_jwt_xyz.metadata.group4}}/*" {
capabilities = ["create","update","read","delete","list"]
}
path "onyxia-kv/data/projet-{{identity.entity.aliases.auth_jwt_xyz.metadata.group4}}/*" {
capabilities = ["create","update","read"]
}
path "onyxia-kv/metadata/projet-{{identity.entity.aliases.auth_jwt_xyz.metadata.group4}}/*" {
capabilities = ["delete", "list", "read"]
}
path "onyxia-kv/projet-{{identity.entity.aliases.auth_jwt_xyz.metadata.group5}}/*" {
capabilities = ["create","update","read","delete","list"]
}
path "onyxia-kv/data/projet-{{identity.entity.aliases.auth_jwt_xyz.metadata.group5}}/*" {
capabilities = ["create","update","read"]
}
path "onyxia-kv/metadata/projet-{{identity.entity.aliases.auth_jwt_xyz.metadata.group5}}/*" {
capabilities = ["delete", "list", "read"]
}
path "onyxia-kv/projet-{{identity.entity.aliases.auth_jwt_xyz.metadata.group6}}/*" {
capabilities = ["create","update","read","delete","list"]
}
path "onyxia-kv/data/projet-{{identity.entity.aliases.auth_jwt_xyz.metadata.group6}}/*" {
capabilities = ["create","update","read"]
}
path "onyxia-kv/metadata/projet-{{identity.entity.aliases.auth_jwt_xyz.metadata.group6}}/*" {
capabilities = ["delete", "list", "read"]
}
path "onyxia-kv/projet-{{identity.entity.aliases.auth_jwt_xyz.metadata.group7}}/*" {
capabilities = ["create","update","read","delete","list"]
}
path "onyxia-kv/data/projet-{{identity.entity.aliases.auth_jwt_xyz.metadata.group7}}/*" {
capabilities = ["create","update","read"]
}
path "onyxia-kv/metadata/projet-{{identity.entity.aliases.auth_jwt_xyz.metadata.group7}}/*" {
capabilities = ["delete", "list", "read"]
}
path "onyxia-kv/projet-{{identity.entity.aliases.auth_jwt_xyz.metadata.group8}}/*" {
capabilities = ["create","update","read","delete","list"]
}
path "onyxia-kv/data/projet-{{identity.entity.aliases.auth_jwt_xyz.metadata.group8}}/*" {
capabilities = ["create","update","read"]
}
path "onyxia-kv/metadata/projet-{{identity.entity.aliases.auth_jwt_xyz.metadata.group8}}/*" {
capabilities = ["delete", "list", "read"]
}
path "onyxia-kv/projet-{{identity.entity.aliases.auth_jwt_xyz.metadata.group9}}/*" {
capabilities = ["create","update","read","delete","list"]
}
path "onyxia-kv/data/projet-{{identity.entity.aliases.auth_jwt_xyz.metadata.group9}}/*" {
capabilities = ["create","update","read"]
}
path "onyxia-kv/metadata/projet-{{identity.entity.aliases.auth_jwt_xyz.metadata.group9}}/*" {
capabilities = ["delete", "list", "read"]
}
vault policy write onyxia-policy onyxia-policy.hclvault write auth/jwt/role/onyxia-user \
role_type="jwt" \
bound_audiences="vault" \
user_claim="preferred_username" \
claim_mappings="/groups/0=group0,/groups/1=group1,/groups/2=group2,/groups/3=group3,/groups/4=group4,/groups/5=group5,/groups/6=group6,/groups/7=group7,/groups/8=group8,/groups/9=group9" \
token_policies="onyxia-policy"vault secrets enable -path=onyxia-kv kv-v2vault write sys/config/cors allowed_origins="https://datalab.my-domain.net" enabled=trueonyxia:
web:
# ...
api:
# ...
regions:
[
{
"id": "paris",
...
"services": {...},
"data": {...},
"vault": {
"URL": "https://vault.lab.my-domain.net",
"kvEngine": "onyxia-kv",
"role": "onyxia-user",
"authPath": "jwt",
"prefix": "user-",
"groupPrefix" : "",
"oidcConfiguration":
{
"issuerURI": "https://auth.lab.my-domain.net/auth/realms/datalab",
"clientID": "vault",
}
}
]onyxia:
api:
userProfile:
enabled: true
default:
profileSchema: |
{
"type": "object",
"properties": {
"generalInfo": {
"type": "object",
"description": "General profile information",
"properties": {
"firstName": {
"type": "string",
"title": "First name",
"description": "Your first name",
"x-onyxia": {
"overwriteDefaultWith": "{{user.decodedIdToken.given_name}}"
}
},
"familyName": {
"type": "string",
"title": "Family name",
"description": "Your family name",
"x-onyxia": {
"overwriteDefaultWith": "{{user.decodedIdToken.family_name}}"
}
},
"email": {
"type": "string",
"title": "Email",
"description": "Your email address",
"x-onyxia": {
"overwriteDefaultWith": "{{user.decodedIdToken.email}}"
}
}
}
},
"git": {
"type": "object",
"description": "Git configuration",
"properties": {
"username": {
"type": "string",
"title": "Git username",
"description": "Your username for Git operations (e.g. git commit, git push)",
"x-onyxia": {
"overwriteDefaultWith": "{{git.name}}"
}
},
"email": {
"type": "string",
"title": "Git email",
"description": "Your email for Git operations",
"x-onyxia": {
"overwriteDefaultWith": "{{git.email}}"
}
}
}
}
}
}
roles:
# NOTE: You can define role-specific schemas if needed.
#- roleName: datascientist
# profileSchema: |
# ...{
"generalInfo": {
"firstName": "Joseph",
"lastName": "Garrone",
"email": "[email protected]"
},
"git": {
"username": "garronej",
"email": "[email protected]"
}
}"x-onyxia": {
"overwriteDefaultWith": "{{user.profile.generalInfo.lastName}}"
}
src/ui contains the React application, it's the UI of the app.
src/core contains the 🧠 of the app.
Nothing in the src/core directory should relate to React. A concept like react hooks for example is out of scope for the src/core directory.
src/core should never import anything from src/ui, even types.
It should be possible for example to port onyxia-web to Vue.js or React Native without changing anything to the src/core directory.
The goal of src/core is to expose an API that serves the UI.
The API exposed should be reactive. We should not expose to the UI functions that returns promises, instead, the functions we expose should update states and the UI should react to these states updates.
Whenever we need to interact with the infrastructure we define a port in src/core/port. A port is only a type definition. In our case the infrastructure is: the Keycloak server, the Vault server, the Minio server and a Kubernetes API (Onyxia-API).
In src/core/adapters are the implementations of the ports. For each port we should have at least two implementations, a dummy and a real one. It enabled the app to still run, be it in degraded mode, if one piece of the infrastructure is missing. Say we don’t have a Vault server we should still be able to launch containers.
In src/lib/usecases we expose APIs for the UI to consume.
The following framework is the backbone of onyxia-web, if you can familiarize yourself with it it will make working with onyxia-web much easyer.
Let's say we want to create a new page in onyxia-web where users can type in a repo name and get the current number of stars the repo has on GitHub.
Now let's say we want the search to be restricted to a given GitHub organization. (Example: InseeFrLab.) The GitHub organization should be specified as an environment variable by the person in charge of deploying Onyxia. e.g.:
  web:
    env:
      MINIO_URL: https://minio.lab.sspcloud.fr
      VAULT_URL: https://vault.lab.sspcloud.fr
      OIDC_URL: https://auth.lab.sspcloud.fr/auth
      OIDC_REALM: sspcloud
      TITLE: SSP Cloud
      ORG_NAME: InseeFrLab #<==========
If no ORG_NAME is provided by the administrator, the app should always show 999 stars for any repo name queried.
Currently users can save their GitHub Personal access token in their Onyxia account but not yet their GitLab token. Let's see how we would implement that.
The easy action to take when the user selects another project is to simply reload the page (windows.location.reload()). We want to avoid doing this to enable what we call "hot projet swiping":
To implement this behavior you have to leverage the evtAction middleware from clean-redux. It enabled to register functions to be run when certain actions are dispatched.
Using Onyxia (as a data scientist)
See also https://docs.sspcloud.fr
It's the Onyxia user guide dedicated to our staff.
There are 3 main components accessible on the onyxia web interface :
catalogs and services launched by the users (Kubernetes access)
a file browser (S3 access)
secret browser (Vault access)
Following is a documentation Onyxia when configured with the default service catalogs :
This collection of charts help users to launch many IDE with various binary stacks (python , R) with or without GPU support. Docker images are built here and help us to give a homogeneous stack.
This collection of charts help users to launch many databases system. Most of them are based on bitnami/charts.
This collection of charts help users to start automation tools for their datascience activity.
This collection of charts helps users to launch tools to visualize and share data insights.
Users can edit various parameters. Onyxia do some assertion based on the charts values schema and the configuration on the instance. For example some identity token can be injected by default (because Onyxia connect users to many APIs).
After launching a service, notes are shown to the user. He can retrieve those notes on the README button. Charts administrator should explain how to connect to the services (url , account) and what happens on deletion.
Now you want to learn how to setup your devloppement environement for day to day usage:
Users can manage their files on S3. There is no support for rename in S3 so don't be surprise. Onyxia is educational. Any action on the S3 browser in the UI is written in a console with a cli.
User can do the following S3 actions :
download files
upload files
delete files
Of course, in our default catalags there are all the necessary tools to connect to S3.
Our advice is to never download file to your container but directly ingest in memory the data.
Users can mange their secrets on Vault. There is also a cli console.
Onyxia use only a key value v2 secret engine in Vault. Users can store some secrets there and inject them in their services if configured by the helm chart.
Of course, in our default catalags there are all the necessary tools to connect to Vault.
Configuration parameters for integrating your Onyxia service with S3.
provides instructions on how to set up with a basic configuration. However, you may want more control or need to connect to a different S3-compatible system.
Below are all the available configuration options.
When charts allow overwriteSchemaWith you can modify this schema at the instance level or for a specific role.
You can override schemas directly in the values of Onyxia Helm Charts. In the following example, the ide/resources.json schema is overridden.
A schema can be redefined for a given role. Below, the schema for nodeSelector.json is overridden specifically for the fullgpu role. Similarly, the ide/resources.json schema is overridden at the whole instance.
onyxia:
  web:
    # ...
  api:
    # ...
    schemas:
      enabled: true
      files:
        - relativePath: ide/resources.json
          content: |
            {
                "$schema": "http://json-schema.org/draft-07/schema#",
                "title": "Resources",
                "description": "Your service will have at least the requested resources and never more than its limits. No limit for a resource and you can consume everything left on the host machine.",
                "type": "object",
                "properties": {
                    "requests": {
                        "description": "Guaranteed resources",
                        "type": "object",
                        "properties": {
                            "cpu": {
                                "description": "The amount of cpu guaranteed",
                                "title": "CPU",
                                "type": "string",
                                "default": "100m",
                                "render": "slider",
                                "sliderMin": 50,
                                "sliderMax": 10000,
                                "sliderStep": 50,
                                "sliderUnit": "m",
                                "sliderExtremity": "down",
                                "sliderExtremitySemantic": "guaranteed",
                                "sliderRangeId": "cpu"
                            },
                            "memory": {
                                "description": "The amount of memory guaranteed",
                                "title": "memory",
                                "type": "string",
                                "default": "2Gi",
                                "render": "slider",
                                "sliderMin": 1,
                                "sliderMax": 200,
                                "sliderStep": 1,
                                "sliderUnit": "Gi",
                                "sliderExtremity": "down",
                                "sliderExtremitySemantic": "guaranteed",
                                "sliderRangeId": "memory"
                            }
                        }
                    },
                    "limits": {
                        "description": "max resources",
                        "type": "object",
                        "properties": {
                            "cpu": {
                                "description": "The maximum amount of cpu",
                                "title": "CPU",
                                "type": "string",
                                "default": "5000m",
                                "render": "slider",
                                "sliderMin": 50,
                                "sliderMax": 10000,
                                "sliderStep": 50,
                                "sliderUnit": "m",
                                "sliderExtremity": "up",
                                "sliderExtremitySemantic": "Maximum",
                                "sliderRangeId": "cpu"
                            },
                            "memory": {
                                "description": "The maximum amount of memory",
                                "title": "Memory",
                                "type": "string",
                                "default": "50Gi",
                                "render": "slider",
                                "sliderMin": 1,
                                "sliderMax": 200,
                                "sliderStep": 1,
                                "sliderUnit": "Gi",
                                "sliderExtremity": "up",
                                "sliderExtremitySemantic": "Maximum",
                                "sliderRangeId": "memory"
                            }
                        }
                    }
                }
}onyxia:
web:
# ...
api:
# ...
schemas:
enabled: true
roles:
- roleName: fullgpu
files:
- relativePath: nodeSelector.json
content: |
{
"$schema": "http://json-schema.org/draft-07/schema#",
"title": "Node Selector",
"type": "object",
"properties": {
"disktype": {
"description": "The type of disk",
"type": "string",
"enum": ["ssd", "hdd"],
"default": "ssd"
},
"gpu": {
"description": "The type of GPU",
"type": "string",
"enum": ["A2", "H100"],
"default": "A2"
}
},
"additionalProperties": false
}
files:
- relativePath: ide/resources.json
content: |
{
"$schema": "http://json-schema.org/draft-07/schema#",
"title": "Resources",
"description": "Your service will have at least the requested resources and never more than its limits. No limit for a resource and you can consume everything left on the host machine.",
"type": "object",
"properties": {
"requests": {
"description": "Guaranteed resources",
"type": "object",
"properties": {
"cpu": {
"description": "The amount of cpu guaranteed",
"title": "CPU",
"type": "string",
"default": "100m",
"render": "slider",
"sliderMin": 50,
"sliderMax": 10000,
"sliderStep": 50,
"sliderUnit": "m",
"sliderExtremity": "down",
"sliderExtremitySemantic": "guaranteed",
"sliderRangeId": "cpu"
},
"memory": {
"description": "The amount of memory guaranteed",
"title": "memory",
"type": "string",
"default": "2Gi",
"render": "slider",
"sliderMin": 1,
"sliderMax": 200,
"sliderStep": 1,
"sliderUnit": "Gi",
"sliderExtremity": "down",
"sliderExtremitySemantic": "guaranteed",
"sliderRangeId": "memory"
}
}
},
"limits": {
"description": "max resources",
"type": "object",
"properties": {
"cpu": {
"description": "The maximum amount of cpu",
"title": "CPU",
"type": "string",
"default": "5000m",
"render": "slider",
"sliderMin": 50,
"sliderMax": 10000,
"sliderStep": 50,
"sliderUnit": "m",
"sliderExtremity": "up",
"sliderExtremitySemantic": "Maximum",
"sliderRangeId": "cpu"
},
"memory": {
"description": "The maximum amount of memory",
"title": "Memory",
"type": "string",
"default": "50Gi",
"render": "slider",
"sliderMin": 1,
"sliderMax": 200,
"sliderStep": 1,
"sliderUnit": "Gi",
"sliderExtremity": "up",
"sliderExtremitySemantic": "Maximum",
"sliderRangeId": "memory"
}
}
}
}
}onyxia:
api:
regions: [
{
# ...
data: {
S3 : { ... } # ...See expected format below
}
}
]type S3 = {
/**
* The URL of the S3 server.
* Examples: "https://minio.lab.sspcloud.fr" or "https://s3.amazonaws.com".
*/
URL: string;
/**
* The AWS S3 region. This parameter is optional if you are configuring
* integration with a MinIO server.
* Example: "us-east-1"
*/
region?: string;
/**
* This parameter informs Onyxia how to format file download URLs for the configured
* S3 server.
* Default: true
*
* Example:
* Assume "https://minio.lab.sspcloud.fr" as the value for region.data.S3.URL.
* For a file "a/b/c/foo.parquet" in the bucket "user-bob":
*
* With pathStyleAccess set to true, the download link will be:
* https://minio.lab.sspcloud.fr/user-bob/a/b/c/foo.parquet
*
* With pathStyleAccess set to false (virtual-hosted style), the link will be:
* https://user-bob.minio.lab.sspcloud.fr/a/b/c/foo.parquet
*
* For MinIO, pathStyleAccess is typically set to true.
* For Amazon Web Services S3, is has to be set to false.
*/
pathStyleAccess?: boolean;
/**
* Defines where users are permitted to read/write S3 files,
* specifying the allocated storage space in terms of bucket and object name prefixes.
*
* Mandatory unless data.S3.sts is not defined then it's optional.
*
* Example:
* For a user "bob" in the "exploration" group, using the configuration:
*
* Shared bucket mode, all the users share a single bucket:
* "workingDirectory": {
* "bucketMode": "shared",
* "bucketName": "onyxia",
* "prefix": "user-",
* "prefixGroup": "project-"
* }
*
* In this configuration Onyxia will assumes that Bob has read/write access to
* objects starting with "user-bob/" and "project-exploration/" in the "onyxia"
* bucket.
*
* Multi bucket mode:
* "workingDirectory": {
* "bucketMode": "multi",
* "bucketNamePrefix": "user-",
* "bucketNamePrefixGroup": "project-",
* }
*
* In this configuration Onyxia will assumes that Bob has read/wite access to the
* entire "user-bob" and "project-exploration" buckets.
*
* If STS is enabled and a bucket doesn't exist, Onyxia will try to create it.
*/
workingDirectory?:
| {
bucketMode: "shared";
bucketName: string;
prefix: string;
prefixGroup: string;
}
| {
bucketMode: "multi";
bucketNamePrefix: string;
bucketNamePrefixGroup: string;
};
/**
* Defines a list of S3 directory bookmarks to display in the user's file explorer
* interface.
*
* Bookmarks can be:
* - Static: shown to all users.
* - Dynamic: shown only if specific conditions based on the user's identity token
* are met.
*
* Each bookmark must define:
* - `fullPath`: The absolute S3 path to the bookmarked folder.
* - `title`: The display title, supporting dynamic content via template variables.
* - `description` (optional): A short description of the bookmark.
* - `tags` (optional): An array of LocalizedString tags for UI categorization.
*
* For static bookmarks:
* - Do not specify any `claimName`.
* - The bookmark is shown to all users.
*
* For dynamic bookmarks:
* - Set `claimName` to the name of a claim (e.g., `"groups"`) from the user's
* **ID token**.
* - The ID token is the one issued by the **OIDC configuration associated
* with the S3 client** (i.e., from `sts.oidcConfiguration`).
* - `includedClaimPattern` is a regular expression that must match at least one
* value in the specified claim for the bookmark to be shown.
* - `excludedClaimPattern` is a regular expression that, if matched by any value
* in the claim, causes the bookmark to be ignored.
* - If a `claimValue` matches both, exclusion takes precedence
* (i.e., the bookmark is not shown).
*
* Template placeholders:
* - `$1`, `$2`, ...: inserts corresponding capture groups from
* `includedClaimPattern` (useful for custom rendering in `fullPath`, `title`,
* `description`, or `tags`).
*
* 🔁 Example (static):
* ```json
* {
* "bookmarkedDirectories": [
* {
* "fullPath": "data/public",
* "title": {
* "fr": "Données publiques",
* "en": "Public Data"
* },
* "description": {
* "fr": "Dossier partagé contenant des jeux de données publics.",
* "en": "Shared folder containing public datasets."
* },
* "tags": [
* {
* "fr": "lecture seule",
* "en": "read-only"
* }
* ]
* }
* ]
* }
* ```
*
* 🔁 Example (dynamic):
* ```json
* {
* "bookmarkedDirectories": [
* {
* "fullPath": "group-$1/",
* "claimName": "groups",
* "includedClaimPattern": "^group-(.*)$",
* "excludedClaimPattern": "^group-secret$",
* "title": "Group: $1",
* "description": "Files accessible to group $1",
* "tags": ["group", "$1"]
* }
* ]
* }
* ```
*/
bookmarkedDirectories?: ({
fullPath: string;
title: LocalizedString;
description?: LocalizedString;
tags?: LocalizedString[];
} & (
| {}
| {
claimName: string;
includedClaimPattern: string;
excludedClaimPattern: string;
}
))[];
/**
* Configuration for Onyxia to dynamically request S3 tokens on behalf of users.
* Enabling S3 allows users to avoid manual configuration of a service account via the Onyxia interface.
*/
sts?: {
/**
* The STS endpoint URL of your S3 server.
* For integration with MinIO, this property is optional as it defaults to region.data.S3.URL.
* For Amazon Web Services S3, set this to "https://sts.amazonaws.com".
*/
URL?: string;
/**
* The duration for which temporary credentials are valid.
* AWS: Maximum of 43200 seconds (12 hours).
* MinIO: Maximum of 604800 seconds (7 days).
* Without this parameter, Onyxia requests 7-day validity, subject to the S3 server's policy limits.
*/
durationSeconds?: number;
/**
* Optional parameter to specify RoleARN and RoleSessionName for the STS request.
*
* Example:
* "role": {
* "roleARN": "arn:aws:iam::123456789012:role/onyxia",
* "roleSessionName": "onyxia"
* }
*/
role?: {
roleARN: string;
roleSessionName: string;
};
/**
* See: https://docs.onyxia.sh/admin-doc/openid-connect-configuration#oidc-configuration-for-services-onyxia-connects-to
*/
oidcConfiguration?: OidcConfiguration;
};
};

Customize your Onyxia instance with your assets and your colors, make it your own!
The full documentation of the available parameter can be found here:
Here is a galery of theme that you can try out.
onyxia:
  web:
    env:
      #ONYXIA_API_URL: https://datalab.sspcloud.fr/api
      CUSTOM_RESOURCES: "https://www.sspcloud.fr/ultraviolet/custom-resources.zip"
      FONT: |
        {
          fontFamily: "Geist",
          dirUrl: "%PUBLIC_URL%/custom-resources/fonts/Geist",
          "400": "Geist-Regular.woff2",
          "500": "Geist-Medium.woff2",
          "600": "Geist-SemiBold.woff2",
          "700": "Geist-Bold.woff2"
        }
      PALETTE_OVERRIDE: |
        {
          focus: {
            main: "#067A76",
            light: "#0AD6CF",
            light2: "#AEE4E3"
          },
          dark: {
            main: "#2D1C3A",
            light: "#4A3957",
            greyVariant1: "#22122E",
            greyVariant2: "#493E51",
            greyVariant3: "#918A98",
            greyVariant4: "#C0B8C6"
          },
          light: {
            main: "#F7F5F4",
            light: "#FDFDFC",
            greyVariant1: "#E6E6E6",
            greyVariant2: "#C9C9C9",
            greyVariant3: "#9E9E9E",
            greyVariant4: "#747474"
          }
        }
SOCIAL_MEDIA_IMAGE: "%PUBLIC_URL%/custom-resources/preview.png"onyxia:
web:
env:
#ONYXIA_API_URL: https://datalab.sspcloud.fr/api
CUSTOM_RESOURCES: "https://www.sspcloud.fr/onyxia-theme-sspcloud.zip"
GLOBAL_ALERT: |
{
severity: "success",
message: {
en: "If you like the platform, you can give us a ⭐️ [on GitHub](https://github.com/InseeFrLab/onyxia). Thank you very much! 😊",
fr: "Si vous aimez la plateforme, vous pouvez nous mettre une ⭐️ [sur GitHub](https://github.com/InseeFrLab/onyxia). Merci beaucoup ! 😊",
}
}
DISABLE_PERSONAL_INFOS_INJECTION_IN_GROUP: true
TERMS_OF_SERVICES: |
{
en: "%PUBLIC_URL%/custom-resources/tos_en.md",
fr: "%PUBLIC_URL%/custom-resources/tos_fr.md"
}
HEADER_LINKS: |
[
{
label: {
en: "Tutorials",
fr: "Tutoriels",
"zh-CN": "教程",
fi: "Opastus",
no: "Opplæring",
it: "Tutorial",
nl: "Zelfstudie"
},
icon: "https://www.sspcloud.fr/trainings.svg",
url: "https://www.sspcloud.fr/formation"
},
{
label: "AI Chat",
icon: "SmartToy",
url: "https://llm.lab.sspcloud.fr"
},
{
"label": {
"en": "Contact us",
"fr": "Contactez nous"
},
"icon": "Support",
"url": "https://join.slack.com/t/3innovation/shared_invite/zt-1bo6y53oy-Y~zKzR2SRg37pq5oYgiPuA"
}
]
HOMEPAGE_CALL_TO_ACTION_BUTTON_AUTHENTICATED: |
{
"label": {
"fr": "Nouvel utilisateur du datalab ?",
"en": "New user of the datalab?",
"zh-CN": "数据实验室新用户?",
"fi": "Uusi datalabin käyttäjä?",
"no": "Ny bruker av datalaben?",
"it": "Nuovo utente del datalab?",
"nl": "Nieuwe gebruiker van het datalab?"
},
"startIcon": "MenuBook",
"url": "https://docs.sspcloud.fr"
}
SOCIAL_MEDIA_TITLE: "SSPCloud Datalab"
SOCIAL_MEDIA_DESCRIPTION: "Open Innovation Platform powered by Onyxia"
SOCIAL_MEDIA_IMAGE: "%PUBLIC_URL%/custom-resources/social-preview.png"
HEADER_TEXT_BOLD: "SSPCloud"
HEADER_TEXT_FOCUS: "Datalab"
FONT: |
{
fontFamily: "Geist",
dirUrl: "%PUBLIC_URL%/fonts/Geist",
"400": "Geist-Regular.woff2",
"500": "Geist-Medium.woff2",
"600": "Geist-SemiBold.woff2",
"700": "Geist-Bold.woff2"
}
PALETTE_OVERRIDE_LIGHT: |
{
focus: {
main: "#3B82F6",
light: "#3B82F6",
},
light: {
main: "#FAFAFA",
light: "#FFFFFF",
greyVariant1: "#EBEFF6"
},
}
PALETTE_OVERRIDE_DARK: |
{
focus: {
main: "#5695FB",
light: "#5695FB",
},
dark: {
main: "#0A152B",
light: "#040B17",
},
}
HOMEPAGE_MAIN_ASSET: "false"
CUSTOM_HTML_HEAD: |
<link rel="stylesheet" href="%PUBLIC_URL%/custom-resources/main.css"></link>
BACKGROUND_ASSET: |
{
"light": "%PUBLIC_URL%/custom-resources/OnyxiaNeumorphismLightMode.svg",
"dark": "%PUBLIC_URL%/custom-resources/OnyxiaNeumorphismDarkMode.svg"
}
CONTACT_FOR_ADDING_EMAIL_DOMAIN: |
{
"en": "If your email domain is not yet allowed [contact us](https://3innovation.slack.com/signup#/domain-signup)",
"fr": "Si votre domaine de messagerie n'est pas encore autorisé [contactez-nous](https://3innovation.slack.com/signup#/domain-signup)"
}onyxia:
web:
env:
#ONYXIA_API_URL: https://datalab.sspcloud.fr/api
CUSTOM_RESOURCES: "https://www.sspcloud.fr/france/custom-resources.zip"
FONT: |
{
fontFamily: "Marianne",
dirUrl: "%PUBLIC_URL%/custom-resources/fonts/Marianne",
"400": "Marianne-Regular.woff2",
"400-italic": "Marianne-Regular_Italic.woff2",
"500": "Marianne-Medium.woff2",
"700": "Marianne-Bold.woff2",
"700-italic": "Marianne-Bold_Italic.woff2"
}
PALETTE_OVERRIDE: |
{
focus: {
main: "#000091",
light: "#9A9AFF",
light2: "#E5E5F4"
},
dark: {
main: "#2A2A2A",
light: "#383838",
greyVariant1: "#161616",
greyVariant2: "#9C9C9C",
greyVariant3: "#CECECE",
greyVariant4: "#E5E5E5"
},
light: {
main: "#F1F0EB",
light: "#FDFDFC",
greyVariant1: "#E6E6E6",
greyVariant2: "#C9C9C9",
greyVariant3: "#9E9E9E",
greyVariant4: "#747474"
}
}
SOCIAL_MEDIA_IMAGE: "%PUBLIC_URL%/custom-resources/preview-france.png"
HOMEPAGE_MAIN_ASSET: "false"onyxia:
web:
env:
#ONYXIA_API_URL: https://datalab.sspcloud.fr/api
CUSTOM_RESOURCES: "https://www.sspcloud.fr/honey/custom-resources.zip"
HEADER_LOGO: "%PUBLIC_URL%/custom-resources/dapla_honey.svg"
HEADER_TEXT_BOLD: "Onyxia Preview"
HEADER_TEXT_FOCUS: "v10"
HEADER_LINKS: |
[
{
"label": "AIML4OS",
"icon": "VideoCall",
"url": "https://insee-fr.zoom.us/webinar/register/WN_6dhMgoUvRXmkiyvYYIyKvw"
}
]
PALETTE_OVERRIDE: |
{
"focus": {
"main": "#FF9100", // Light mode focus
light: "#FAB900", // Dark mode focus
},
"limeGreen": {
"main": "#00DF0A"
},
"dapla": {
yellow: "#FAB900",
darkerYellow: "#FF9100"
}
}
FONT: |
{
fontFamily: "Geist",
dirUrl: "%PUBLIC_URL%/custom-resources/fonts/Geist",
"400": "Geist-Regular.woff2",
"500": "Geist-Medium.woff2",
"600": "Geist-SemiBold.woff2",
"700": "Geist-Bold.woff2"
}
HOMEPAGE_MAIN_ASSET: "%PUBLIC_URL%/custom-resources/dapla_bee_logo.png"
HOMEPAGE_MAIN_ASSET_SCALE_FACTOR: "0.8"
HOMEPAGE_MAIN_ASSET_Y_OFFSET: "3rem"
HEADER_HIDE_ONYXIA: "true"
BACKGROUND_ASSET: |
{
dark: "%PUBLIC_URL%/custom-resources/dapla_background_dark.svg",
light: "%PUBLIC_URL%/custom-resources/dapla_background_light.svg"
}
#HOMEPAGE_CARDS: "[]"
ENABLED_LANGUAGES: "no,en"
HOMEPAGE_HERO_TEXT: |
{
en: "Welcome to the Dapla **Lab**",
no: "Velkommen til Dapla **Lab**",
}
HOMEPAGE_HERO_TEXT_AUTHENTICATED: |
{
en: "Welcome %USER_FIRSTNAME%!",
no: "Velkommen %USER_FIRSTNAME%!",
}
TERMS_OF_SERVICES: |
{
en: "%PUBLIC_URL%/custom-resources/tos_en.md",
fr: "%PUBLIC_URL%/custom-resources/tos_fr.md",
}
CUSTOM_HTML_HEAD: |
<link rel="stylesheet" href="%PUBLIC_URL%/custom-resources/custom.css">Note that your custom assets are imported into your Onyxia instance via the use of the CUSTOM_RESOURCES parameter, url of a ZIP archive that should contain your assets.
Make sure to checkout the version of this document that matches the Onyxia version that you are deploying. See releases.
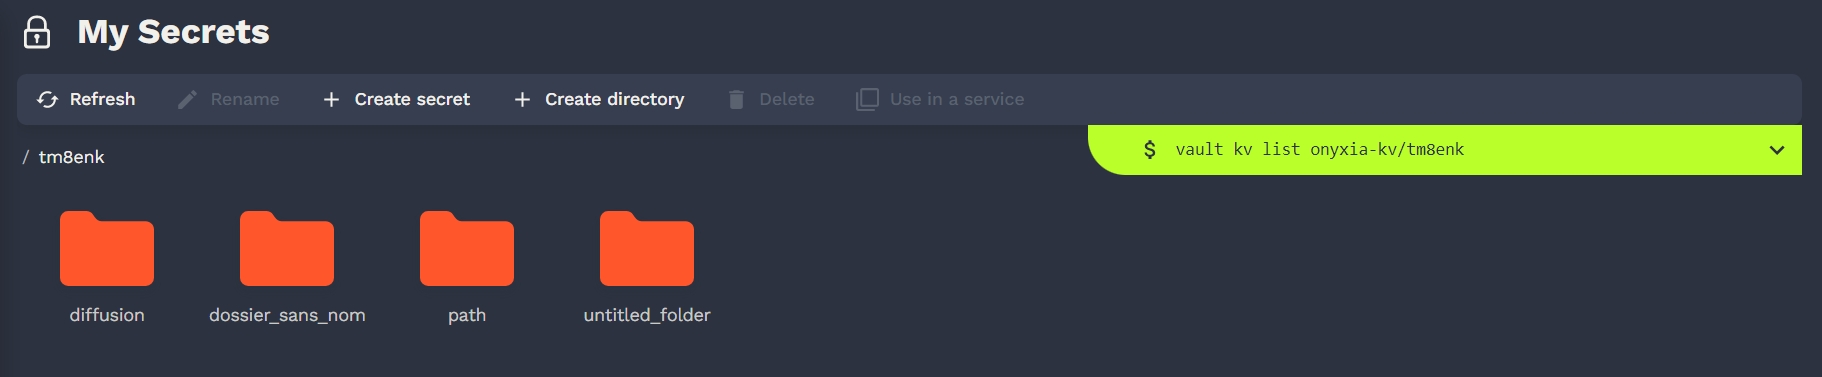
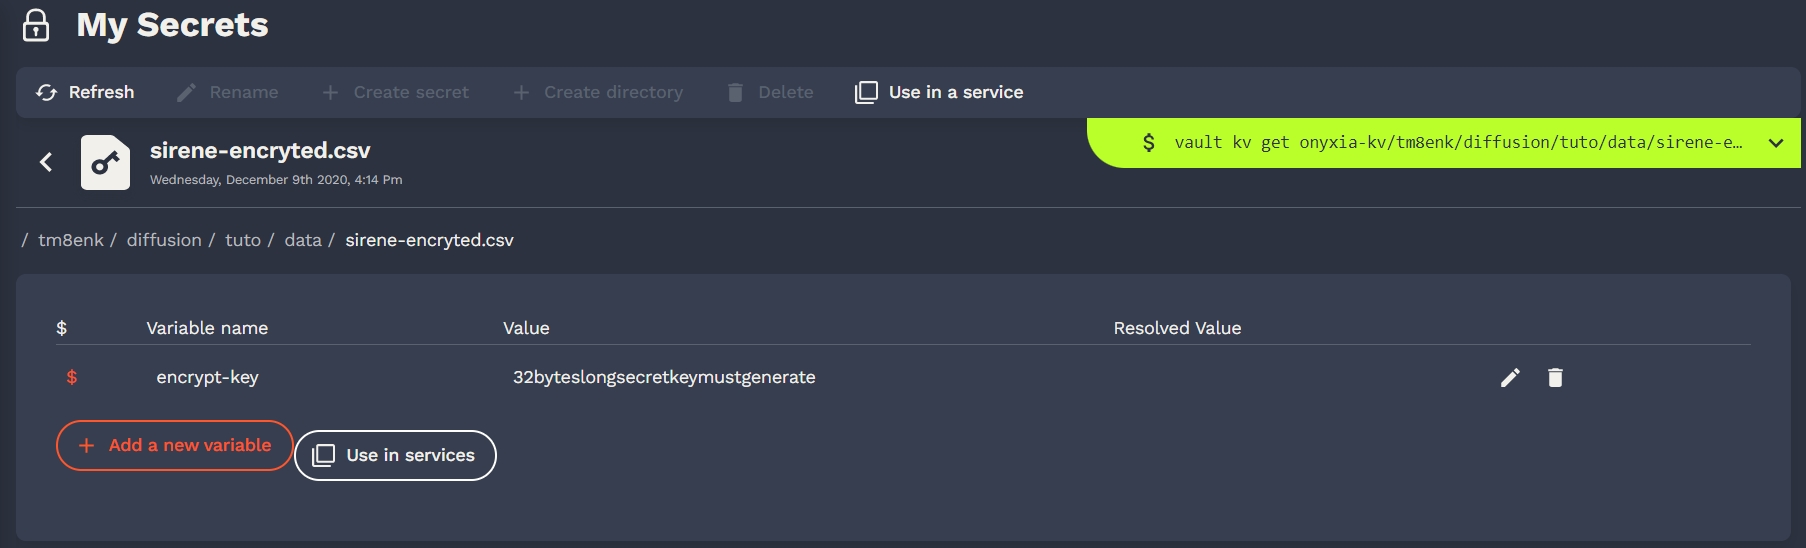
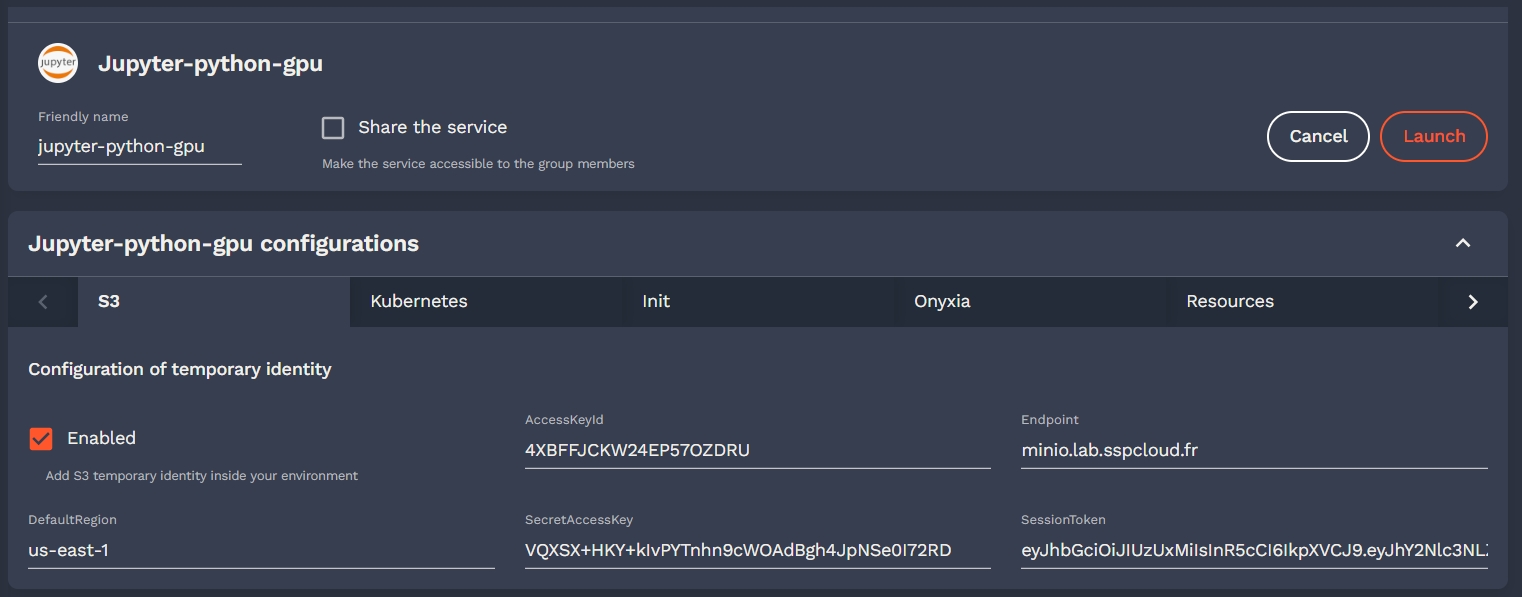

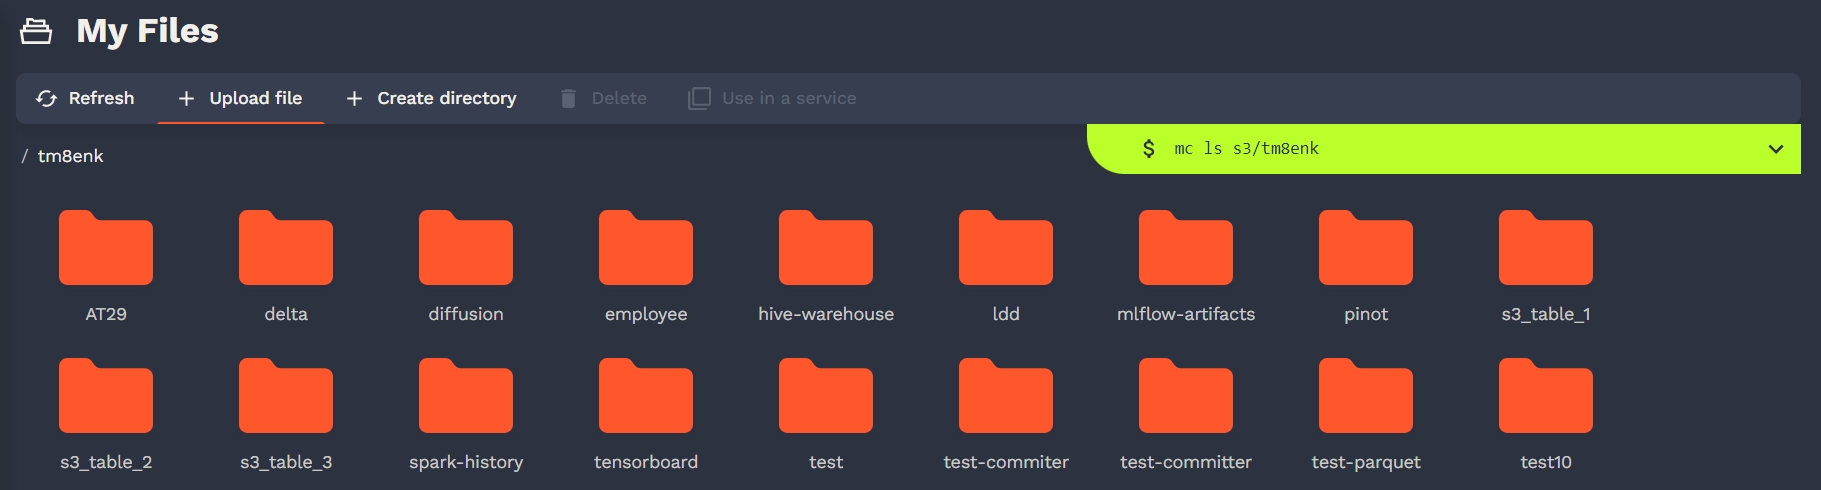


Technologies at play in Onyxia-web
To find your way in Onyxia, the best approach is to start by getting a surface-level understanding of the libraries that are leveraged in the project.
We also heavily rely on . It's a collection of utilities that help write cleaner TypeScript code. It is crutial to understand at least , , and to be able to contribute on the codebase.
Anything contained in the directory.
The UI toolkit used in the project, you can find the setup of in onyxia-web here: .
is fully compatible with .
Onyxia-UI offers but you can also use components in the project, their aspect will automatically be adapted to blend in with the theme.
To release a new version of . You just need to bump the and push. will automate publish .
If you want to test some changes made to onyxia-ui in onyxia-web before releasing a new version of onyxia-ui to NPM you can link locally onyxia-ui in onyxia-web.
Now you can make changes in ~/github/onyxia/ui/and see the live updates.
If you want to install/update some dependencies, you must remove the node_modules, do you updates, then link again.
The library we use for styling.
Rules of thumbs when it comes to styling:
Every component should acceptprop it should always .
A component should not size or position itself. It should always be the responsibility of the parent component to do it. In other words, you should never have height, width, top, left, right, bottom or margin in of your components.
You should never have a color or a dimension hardcoded elsewhere than in . Use theme.spacing() (, , ) and .
Onyxia is mostly used on desktop computer screens. It's not worth the effort to create a fully flege responsive design for the UI. screen-scaler enables us to design for a sigle canonical screen size. The library take charge of scaling/shrinking the image. depending on the real size of the screen. It also asks to rotate the screen when the app is rendered in protrait mode.
It enables us to test the graphical components in isolation. .
To launch Storybook locally run the following command:
We need to be able to do:
Then, somehow, access OIDC_URL in the code like process.env["OIDC_URL"].
In theory it shouldn't be possible, onyxia-web is an SPA, it is just static JS/CSS/HTML. If we want to bundle values in the code, we should have to recompile. But this is where comes into play.
It enables to run onyxia-web again a specific infrastructure while keeping the app docker image generic.
Checkout :
All the accepted environment variables are defined here: . They are all prefixed with REACT_APP_ to be compatible . Default values are defined in this file.
Only in development (yarn start) is also loaded and have priority over .env
Then, in the code the variable can be accessed .
Please try not to access the environment variable to liberally through out the code. In principle they should only be accessed . We try to keep things as much as possible.
It's a collection general purpose react hooks. Let's document the few use cases you absolutely need to understand:
For the sake of performance we enforce that every component be wrapped into . It makes that a component only re-render if one of their prop has changed.
However if you use inline functions or as callbacks props your components will re-render every time anyway:
We always use for callback props. And for callback prop in lists.
It is very handy to be able to get the height and the width of components dynamically. It prevents from having to hardcode dimension when we don’t need to. For that we use ``
It's a build tool that enables to implement the login and register pages that users see when they are redirected to Keycloak for authentication.
If the app is being run on Keycloak the isn't undefined and it means shat we should render the login/register pages.
If you want to test, uncomment and run yarn start. You can also test the login pages in a local keycloak container by running yarn keycloak. All the instructions will be printed on the console.
The keycloak-theme.jar file is automatically and by the CI.
The library we use for routing. It's like but type safe.
For internalization and translation.
Anything contained in the directory.
The framework used to implement strict separation of concern betwen the UI and the Core and high modularity of the code.
There is for helping you understand the clean architecture framework.
For everything related to user authentication.
EVT is an event management library (like is).
A lot of the things we do is powered under the hood by EVT. You don't need to know EVT to work on onyxia-web however, in order to demystify the parts of the codes that involve it, here are the key ideas to take away:
If we need to perform particular actions when a value gets changed, we use.
We use Ctxto detaches event handlers when we no longer need them. (See line 108 on )
In React, we use the hook to work with DOM events.
cd ~/github
git clone https//github.com/InseeFrLab/onyxia
cd onyxia/web
yarn install

cd ~/github/onyxia #This is just a suggestion, clone wherever you see fit.
git clone https://github.com/InseeFrLab/onyxia-ui ui
cd ui
yarn install
yarn build
yarn link-in-web
npx tsc -w

# Open a new terminal
cd ~/github/onyxia/web
yarn start
yarn storybookdocker run --env OIDC_URL="https://url-of-our-keycloak.fr/auth" InseeFrLab/onyxia-web web:
replicaCount: 2
env:
MINIO_URL: https://minio.lab.sspcloud.fr
VAULT_URL: https://vault.lab.sspcloud.fr
OIDC_URL: https://auth.lab.sspcloud.fr/auth
OIDC_REALM: sspcloud
TITLE: SSP CloudThe installation guide explain how to set up a new Keycloak instance to enable authentication on your datalab.
However, chances are that your organization already has an existing IAM system in place. This guide covers how to integrate Onyxia with various commonly used OIDC providers, including Keycloak, Auth0, and Microsoft Entra ID.
Onyxia use Public OpenID Connect client: no client Secret.
The technical term for a public OIDC client is Authorization Code Flow + PKCE.
It's the type of client that you create for Single Page Application (SPA).
Onyxia Login Theme
Each version of Onyxia ships with a custom Keycloak login theme. You can download it from the release page. Specific instructions for loading the theme in your Onyxia instance can be found in this guide.
If you are deploying Keycloak using Helm, as instructed in the installation guide, here are the relevant lines in the Onyxia-ops repository.
Choosing the Unique User Identifier Claim
Onyxia requires a unique user identifier. You must specify which claim in the Access Token should be used for this purpose.
Ideally, you can use preferred_username as an identifier, but this requires ensuring it complies with RFC 1123. This means it must contain only lowercase alphanumeric characters and -.
Since this format is restrictive, if you already have an existing user base, preferred_username may not be an option. In that case, you have two alternatives:
Define a custom claim: Configure a Keycloak mapper to generate an RFC 1123-compliant claim in the Access Token.
Use "sub": This claim is guaranteed to be unique and always present, but ensure that the sub values comply with RFC 1123.
If you are starting fresh with no existing users, you can enforce a regex pattern in the User Profile Attributes to require usernames that comply with the restriction.
More details can be found in the installation guide (search for "pattern").
Configuring Keycloak
Beyond what's covered in the installation guide, if you need a more general tutorial on setting up a public Keycloak OIDC client like Onyxia, refer to the following guide. It includes a test project to validate your configuration.
Here is an overview of what your Onyxia values.yaml should look like:
onyxia:
  api:
    env:
      authentication.mode: "openidconnect"
      # Example: "https://auth.lab.my-domain.net/auth/realms/datalab"
      oidc.issuer-uri: "https://<KC_DOMAIN><KC_RELATIVE_PATH>/realms/<REALM_NAME>"
      # Example: "onyxia"
      oidc.clientID: "<ONYXIA_CLIENT_ID>"
      # Examples:
      # `"preferred_username"` if a regex pattern is enforced for usernames.
      # `"my-custom-claim"`    if a custom Keycloak mapper is configured.
      # `"sub"`                always works and is unique.
      oidc.username-claim: "..."
      # NOTE: By default, Access Tokens issued by Keycloak have an `aud` claim
      # of "account". You can change this value in your protocol mapper and
      # update this setting accordingly.
oidc.audience: "account"Follow this guide to configure a Microsoft Entra ID application for Onyxia.
Here is what your configuration should look like:
onyxia:
  api:
    env:
      authentication.mode: "openidconnect"
      oidc.issuer-uri: "https://login.microsoftonline.com/<Directory (tenant) ID (Onyxia)>/v2.0"
      oidc.clientID: "<Application (client) ID (Onyxia)>"
      # ⚠️ Do **not** use `"sub"` or `"upn"` as they may contain
      # non-alphanumeric characters.
      oidc.username-claim: "oid"
      # Example: "profile api://onyxia-api/access_as_user"
      oidc.scope: "profile <Application ID URI (Onyxia - API)>/<scope name (usually access_as_user)>"
      # Example: "api://onyxia-api"
oidc.audience: "<Application ID URI (Onyxia - API)>"Follow this guide to configure an Auth0 application for Onyxia.
Generating an RFC 1123-Compliant Claim in the Access Token
By default, Auth0 does not issue a claim that Onyxia can use as a unique user identifier. You must create one by defining a custom claim in the access token using an Auth0 Trigger Action.
Steps to Create the onyxia-username Claim
1️⃣ Create a Custom Action:
Go to Auth0 Dashboard → Actions → Library.
Click Create Action.
Set:
Name: GenerateOnyxiaUsername
Trigger: Post Login
Runtime: Node 22
Click Create.
2️⃣ Add the Custom Code: Replace the default content with:
function toRFC1123(input) {
  if (!input) return "";
  let output = input.toLowerCase().replace(/[^a-z0-9-]/g, "-").replace(/^-+|-+$/g, "");
  return output.length > 63 ? output.substring(0, 63).replace(/-+$/, "") : output;
}

exports.onExecutePostLogin = async (event, api) => {
  const sub = event.user.user_id;
  if (sub) api.accessToken.setCustomClaim("onyxia-username", toRFC1123(sub));
};
3️⃣ Deploy and Activate the Action:
Click Deploy.
Go to Auth0 Dashboard → Actions → Triggers → Post Login.
Drag & drop GenerateOnyxiaUsername into the flow.
Click Apply Changes.
Now, your access token will include the onyxia-username claim.
Final Configuration
onyxia:
  api:
    env:
      authentication.mode: "openidconnect"
      oidc.issuer-uri: "https://auth.my-domain.net"
      oidc.clientID: "<Onyxia Application Client ID>"
      oidc.username-claim: "onyxia-username"
      oidc.extra-query-params: "audience=https://datalab.my-domain.net/api"
      oidc.audience: "https://datalab.my-domain.net/api"
      # Optional: Auto logout after inactivity.
oidc.idleSessionLifetimeInSeconds: "300"If you're using another OIDC provider and need help configuring Onyxia, reach out on Slack. We’ll be happy to schedule a call and assist with the integration.
However, here are some generic instructions.
Onyxia uses an OIDC client for authentication, but it also connects to other OIDC-enabled services. Each of these services can have its own OIDC client instance configuration, allowing Onyxia to authenticate using a separate client identity.
In the region configuration, you can specify an optional oidcConfiguration object for
each service:
S3 (MinIO STS) → onyxia.api.regions[].data.S3.sts.oidcConfiguration
Vault → onyxia.api.regions[].vault.oidcConfiguration
Kubernetes API → onyxia.api.regions[].services.k8sPublicEndpoint.oidcConfiguration
Each configuration follows this structure:
type OidcConfiguration = {
    issuerURI?: string;
    clientID?: string;
    extraQueryParams?: string;
    scope?: string;
    idleSessionLifetimeInSeconds?: number;
};
If no oidcConfiguration is provided for a service, Onyxia will reuse the same access_token used for onyxia-api.
However, defining a separate OIDC client for each service is recommended to improve access control and security.
You might find it strange that Onyxia requires creating multiple OIDC clients to communicate with different resource servers (e.g. onyxia-api, minio, vault, or the Kubernetes API). You’ll typically end up with several clients such as onyxia, onyxia-vault, onyxia-minio, and onyxia-kube.
At first, this can feel counterintuitive, a client ID seems like it should represent one application, not multiple variants of it.
Conceptually, a single client requesting tokens for multiple resource servers (each with its own audience and claims) would make more sense. However, Keycloak doesn’t model things that way. While Onyxia supports any OpenID Connect provider, it’s primarily designed around Keycloak’s behavior and limitations.
In Keycloak’s model, an OIDC client actually represents an application talking to a specific resource server, not just an application itself.
values.yamlonyxia:
api:
env:
authentication.mode: "openidconnect"
oidc.issuer-uri: "https://auth.lab.my-domain.net/auth/realms/datalab"
oidc.clientID: "onyxia"
regions:
[
{
data: {
S3: {
sts: {
oidcConfiguration: {
clientID: "onyxia-minio",
}
}
}
},
vault: {
oidcConfiguration: {
clientID: "onyxia-vault"
}
},
services: {
k8sPublicEndpoint: {
oidcConfiguration: {
clientID: "onyxia-k8s"
}
}
}
}
]When a user logs in, the OIDC provider issues an Access Token for the onyxia client.
This token includes claims such as:
{
  "sub": "abcd1234",
  "preferred_username": "jhondoe",
  "groups": [ "funathon", "spark-lab" ],
  "roles": [ "vip", "admin-keycloak" ]
}
If oidc.username-claim: "preferred_username" is configured in Onyxia’s main configuration,
then all services it connects to—such as onyxia-minio, onyxia-vault, and onyxia-k8s—
must also receive Access Tokens where the preferred_username claim exists and holds the same value.
To prevent issues, all OIDC clients (onyxia, onyxia-minio, onyxia-vault, onyxia-k8s)
should be configured within the same SSO realm in your OIDC provider.
This ensures that every issued Access Token follows the same claim structure and contains
consistent values for the same user.
If you're unsure whether your setup meets this requirement, check the JWT of each Access Token issued for different clients and confirm that the claims are aligned.

Onyxia has his own extension of json schema
Let's consider a sample of the values.schema.json of the InseeFrLab/helm-charts-interactive-services' Jupyter chart:
And it translates into this:
Note the "git.name", "git.email" and "git.token", this enables to pre fill the fields.
If the user took the time to fill its profile information, knows what is the Git username, email and personal access token of the user.
is defined the structure of the context that you can use in the overwriteDefaultWith field:
You can also concatenate string values using by wrapping the XOnyxia targeted values in {{}}.
This is an option for customizing the options of the forms fields rendered as select.
In your values shema such a field would be defined like:
But what if you want to dynamically generate the option? For this you can use the overwriteListEnumWith x-onyxia option. For example if you need to let the user select one of the groups he belongs to you can write:
Certain elements of a Helm chart should be customized for each instance of Onyxia, such as resource requests and limits, node selectors and tolerations. For this purpose, chart developers can use x-onyxia.overwriteSchemaWith to allow administrators to override specific parts of the schema. Our default charts use this specification.
You can see the list of default schemas included in the Onyxia API. We also provide examples demonstrating how you .
The following node selector schema provided by Onyxia API is a generic definition, which may not provide the best experience for a specific Kubernetes cluster in Onyxia.
As an administrator of Onyxia, you can provide your own schemas to refine and restrict the initial schemas provided in the Helm chart.
You can provide this schema to allow your users to choose between SSD or HDD disk types, and A2 or H100 NVIDIA GPUs. Any other values or labels are disallowed, and Onyxia will reject starting a service that does not comply with the provided schema.
This is the default role for IDE pods in our charts. It is very permissive, and you may want to restrict it to view-only access.
Here is the refined version
You may want to modify the slide bar for resources

"git": {
    "description": "Git user configuration",
    "type": "object",
    "properties": {
        "enabled": {
            "type": "boolean",
            "description": "Add git config inside your environment",
            "default": true
        },
        "name": {
            "type": "string",
            "description": "user name for git",
            "default": "",
            "x-onyxia": {
                "overwriteDefaultWith": "{{git.name}}"
            },
            "hidden": {
                "value": false,
                "path": "git/enabled"
            }
        },
        "email": {
            "type": "string",
            "description": "user email for git",
            "default": "",
            "x-onyxia": {
                "overwriteDefaultWith": "{{git.email}}"
            },
            "hidden": {
                "value": false,
                "path": "git/enabled"
            }
        },
        "cache": {
            "type": "string",
            "description": "duration in seconds of the credentials cache duration",
            "default": "",
            "x-onyxia": {
                "overwriteDefaultWith": "{{git.credentials_cache_duration}}"
            },
            "hidden": {
                "value": false,
                "path": "git/enabled"
            }
        },
        "token": {
            "type": "string",
            "description": "personal access token",
            "default": "",
            "x-onyxia": {
                "overwriteDefaultWith": "{{git.token}}"
            },
            "hidden": {
                "value": false,
                "path": "git/enabled"
            }
        },
        "repository": {
            "type": "string",
            "description": "Repository url",
            "default": "",
            "hidden": {
                "value": false,
                "path": "git/enabled"
            }
        },
        "branch": {
            "type": "string",
            "description": "Brach automatically checkout",
            "default": "",
            "hidden": {
                "value": "",
                "path": "git/repository"
            }
        }
    }
},export type XOnyxiaParams = {
/**
* This is where you can reference values from the onyxia context so that they
* are dynamically injected by the Onyxia launcher.
*
* Examples:
* "overwriteDefaultWith": "user.email" ( You can also write "{{user.email}}" it's equivalent )
* "overwriteDefaultWith": "{{project.id}}-{{k8s.randomSubdomain}}.{{k8s.domain}}"
* "overwriteDefaultWith": [ "a hardcoded value", "some other hardcoded value", "{{region.oauth2.clientId}}" ]
* "overwriteDefaultWith": { "foo": "bar", "bar": "{{region.oauth2.clientId}}" }
*
*/
overwriteDefaultWith?:
| string
| number
| boolean
| unknown[]
| Record<string, unknown>;
overwriteListEnumWith?: unknown[] | string;
hidden?: boolean;
readonly?: boolean;
useRegionSliderConfig?: string;
};
export type XOnyxiaContext = {
user: {
idep: string;
name: string;
email: string;
password: string;
ip: string;
darkMode: boolean;
lang: "en" | "fr" | "zh-CN" | "no" | "fi" | "nl" | "it" | "es" | "de";
/**
* Decoded JWT OIDC ID token of the user launching the service.
*
* Sample value:
* {
* "sub": "9000ffa3-5fb8-45b5-88e4-e2e869ba3cfa",
* "name": "Joseph Garrone",
* "aud": ["onyxia", "minio-datanode"],
* "groups": [
* "USER_ONYXIA",
* "codegouv",
* "onyxia",
* "sspcloud-admin",
* ],
* "preferred_username": "jgarrone",
* "given_name": "Joseph",
* "locale": "en",
* "family_name": "Garrone",
* "email": "[email protected]",
* "policy": "stsonly",
* "typ": "ID",
* "azp": "onyxia",
* "email_verified": true,
* "realm_access": {
* "roles": ["offline_access", "uma_authorization", "default-roles-sspcloud"]
* }
* }
*/
decodedIdToken: Record<string, unknown>;
accessToken: string;
refreshToken: string;
// See: https://docs.onyxia.sh/v/v10/admin-doc/catalog-of-services/customize-your-charts/declarative-user-profile
profile: Record<string, Stringifyable> | undefined;
};
service: {
oneTimePassword: string;
};
project: {
id: string;
password: string;
basic: string;
};
git: {
name: string;
email: string;
credentials_cache_duration: number;
token: string | undefined;
};
vault: {
VAULT_ADDR: string;
VAULT_TOKEN: string;
VAULT_MOUNT: string;
VAULT_TOP_DIR: string;
};
s3: {
AWS_ACCESS_KEY_ID: string;
AWS_SECRET_ACCESS_KEY: string;
AWS_SESSION_TOKEN: string;
AWS_DEFAULT_REGION: string;
AWS_S3_ENDPOINT: string;
AWS_BUCKET_NAME: string;
port: number;
pathStyleAccess: boolean;
/**
* The user is assumed to have read/write access on every
* object starting with this prefix on the bucket
**/
objectNamePrefix: string;
/**
* Only for making it easier for charts editors.
* <AWS_BUCKET_NAME>/<objectNamePrefix>
* */
workingDirectoryPath: string;
/**
* If true the bucket's (directory) should be accessible without any credentials.
* In this case s3.AWS_ACCESS_KEY_ID, s3.AWS_SECRET_ACCESS_KEY and s3.AWS_SESSION_TOKEN
* will be empty strings.
*/
isAnonymous: boolean;
};
region: {
defaultIpProtection: boolean | undefined;
defaultNetworkPolicy: boolean | undefined;
allowedURIPattern: string;
customValues: Record<string, unknown> | undefined;
kafka:
| {
url: string;
topicName: string;
}
| undefined;
tolerations: unknown[] | undefined;
from: unknown[] | undefined;
nodeSelector: Record<string, unknown> | undefined;
startupProbe: Record<string, unknown> | undefined;
sliders: Record<
string,
{
sliderMin: number;
sliderMax: number;
sliderStep: number;
sliderUnit: string;
}
>;
resources:
| {
cpuRequest?: `${number}${string}`;
cpuLimit?: `${number}${string}`;
memoryRequest?: `${number}${string}`;
memoryLimit?: `${number}${string}`;
disk?: `${number}${string}`;
gpu?: `${number}`;
}
| undefined;
};
k8s: {
domain: string;
ingressClassName: string | undefined;
ingress: boolean | undefined;
route: boolean | undefined;
istio:
| {
enabled: boolean;
gateways: string[];
}
| undefined;
randomSubdomain: string;
initScriptUrl: string;
useCertManager: boolean;
certManagerClusterIssuer: string | undefined;
};
proxyInjection:
| {
enabled: string | undefined;
httpProxyUrl: string | undefined;
httpsProxyUrl: string | undefined;
noProxy: string | undefined;
}
| undefined;
packageRepositoryInjection:
| {
cranProxyUrl: string | undefined;
condaProxyUrl: string | undefined;
packageManagerUrl: string | undefined;
pypiProxyUrl: string | undefined;
}
| undefined;
certificateAuthorityInjection:
| {
cacerts: string | undefined;
pathToCaBundle: string | undefined;
}
| undefined;
};"hostname": {
"type": "string",
"form": true,
"title": "Hostname",
"x-onyxia": {
"overwriteDefaultWith": "{{project.id}}-{{k8s.randomSubdomain}}.{{k8s.domain}}"
}
}"pullPolicy": {
"type": "string",
"default": "IfNotPresent",
"listEnum": [
"IfNotPresent",
"Always",
"Never"
]
}"group": {
"type": "string",
"default": "",
"listEnum": [""],
"x-onyxia": {
"overwriteDefaultWith": "{{user.decodedIdToken.groups[0]}}",
"overwriteListEnumWith": "{{user.decodedIdToken.groups}}"
}
}"nodeSelector": {
"type": "object",
"description": "NodeSelector",
"default": {},
"x-onyxia": {
"overwriteSchemaWith": "nodeSelector.json"
}
}{
"$schema": "http://json-schema.org/draft-07/schema#",
"title": "Node Selector",
"type": "object",
"description": "Node selector constraints for the pod",
"additionalProperties": {
"type": "string",
"description": "Key-value pairs to select nodes"
}
}{
"$schema": "http://json-schema.org/draft-07/schema#",
"title": "Node Selector",
"type": "object",
"properties": {
"disktype": {
"description": "The type of disk",
"type": "string",
"enum": ["ssd", "hdd"],
"default": "ssd"
},
"gpu": {
"description": "The type of GPU",
"type": "string",
"enum": ["A2", "H100"],
"default": "A2"
}
},
"additionalProperties": false //any other label is disallowed
}{
"$schema": "http://json-schema.org/draft-07/schema#",
"title": "Role",
"type": "object",
"properties": {
"enabled": {
"type": "boolean",
"description": "allow your service to access your namespace ressources",
"default": true
},
"role": {
"type": "string",
"description": "bind your service account to this kubernetes default role",
"default": "view",
"enum": [
"view",
"edit",
"admin"
]
}
}
}
{
  "$schema": "http://json-schema.org/draft-07/schema#",
  "title": "Role",
  "type": "object",
  "properties": {
    "enabled": {
      "type": "boolean",
      "const": true,
      "description": "This value must always be true, allowing your service to access your namespace resources."
    },
    "role": {
      "type": "string",
      "const": "view",
      "description": "This value must always be 'view', binding your service account to this Kubernetes default role.",
    }
  }
}
{
    "$schema": "http://json-schema.org/draft-07/schema#",
    "title": "Resources",
    "description": "Your service will have at least the requested resources and never more than its limits. No limit for a resource and you can consume everything left on the host machine.",
    "type": "object",
    "properties": {
        "requests": {
            "description": "Guaranteed resources",
            "type": "object",
            "properties": {
                "cpu": {
                    "description": "The amount of cpu guaranteed",
                    "title": "CPU",
                    "type": "string",
                    "default": "100m",
                    "render": "slider",
                    "sliderMin": 50,
                    "sliderMax": 40000,
                    "sliderStep": 50,
                    "sliderUnit": "m",
                    "sliderExtremity": "down",
                    "sliderExtremitySemantic": "guaranteed",
                    "sliderRangeId": "cpu"
                },
                "memory": {
                    "description": "The amount of memory guaranteed",
                    "title": "memory",
                    "type": "string",
                    "default": "2Gi",
                    "render": "slider",
                    "sliderMin": 1,
                    "sliderMax": 200,
                    "sliderStep": 1,
                    "sliderUnit": "Gi",
                    "sliderExtremity": "down",
                    "sliderExtremitySemantic": "guaranteed",
                    "sliderRangeId": "memory"
                }
            }
        },
        "limits": {
            "description": "max resources",
            "type": "object",
            "properties": {
                "cpu": {
                    "description": "The maximum amount of cpu",
                    "title": "CPU",
                    "type": "string",
                    "default": "30000m",
                    "render": "slider",
                    "sliderMin": 50,
                    "sliderMax": 40000,
                    "sliderStep": 50,
                    "sliderUnit": "m",
                    "sliderExtremity": "up",
                    "sliderExtremitySemantic": "Maximum",
                    "sliderRangeId": "cpu"
                },
                "memory": {
                    "description": "The maximum amount of memory",
                    "title": "Memory",
                    "type": "string",
                    "default": "50Gi",
                    "render": "slider",
                    "sliderMin": 1,
                    "sliderMax": 200,
                    "sliderStep": 1,
                    "sliderUnit": "Gi",
                    "sliderExtremity": "up",
                    "sliderExtremitySemantic": "Maximum",
                    "sliderRangeId": "memory"
                }
            }
        }
    }
}
{
    "$schema": "http://json-schema.org/draft-07/schema#",
    "title": "Resources",
    "description": "Your service will have at least the requested resources and never more than its limits. No limit for a resource and you can consume everything left on the host machine.",
    "type": "object",
    "properties": {
        "requests": {
            "description": "Guaranteed resources",
            "type": "object",
            "properties": {
                "cpu": {
                    "description": "The amount of cpu guaranteed",
                    "title": "CPU",
                    "type": "string",
                    "default": "100m",
                    "render": "slider",
                    "sliderMin": 50,
                    "sliderMax": 10000,
                    "sliderStep": 50,
                    "sliderUnit": "m",
                    "sliderExtremity": "down",
                    "sliderExtremitySemantic": "guaranteed",
                    "sliderRangeId": "cpu"
                },
                "memory": {
                    "description": "The amount of memory guaranteed",
                    "title": "memory",
                    "type": "string",
                    "default": "2Gi",
                    "render": "slider",
                    "sliderMin": 1,
                    "sliderMax": 200,
                    "sliderStep": 1,
                    "sliderUnit": "Gi",
                    "sliderExtremity": "down",
                    "sliderExtremitySemantic": "guaranteed",
                    "sliderRangeId": "memory"
                }
            }
        },
        "limits": {
            "description": "max resources",
            "type": "object",
            "properties": {
                "cpu": {
                    "description": "The maximum amount of cpu",
                    "title": "CPU",
                    "type": "string",
                    "default": "5000m",
                    "render": "slider",
                    "sliderMin": 50,
                    "sliderMax": 10000,
                    "sliderStep": 50,
                    "sliderUnit": "m",
                    "sliderExtremity": "up",
                    "sliderExtremitySemantic": "Maximum",
                    "sliderRangeId": "cpu"
                },
                "memory": {
                    "description": "The maximum amount of memory",
                    "title": "Memory",
                    "type": "string",
                    "default": "50Gi",
                    "render": "slider",
                    "sliderMin": 1,
                    "sliderMax": 200,
                    "sliderStep": 1,
                    "sliderUnit": "Gi",
                    "sliderExtremity": "up",
                    "sliderExtremitySemantic": "Maximum",
                    "sliderRangeId": "memory"
                }
            }
        }
    }
}"My App" → "Onyxia"
<APP_DOMAIN> → datalab.my-domain.net
<BASE_URL> → /
<DEV_PORT> → 5173
"My App - API" → "Onyxia - API"
https://myapp.my-company.com/api → https://datalab.my-domain.net/api
"auth.my-company.com" → "auth.my-domain.net"auth.lab.my-domain.net
<KC_RELATIVE_PATH>: /auth
<REALM_NAME>: datalab
<APP_DOMAIN>: datalab.my-domain.net
<BASE_URL>: /
<DEV_PORT>: 5173
✅ Note that Onyxia implement an auto logout countdown that will start to display once minute befor auto logout if you configure your client as "My App" → "Onyxia"
"My App - API" → "Onyxia - API"
"api://my-app-api" → "api://onyxia-api"
"https://my-app.com/" → "https://datalab.my-domain.net/"https://my-app.com/ by https://datalab.my-domain.net/.